Sunbaked '76 Cali 280z

SacCyclone

Club Member
George, look at GI-9 above for the front, gives a good look.
GI-10 is the rear frame boxed tube, just like the front.
Give the car a good shake both front and rear before you climb under it to make sure your stands are secure.
Never hurts to have a additional standby stand next to where you are laying a few inches down from strong metal......I do that sometimes cause I am in earth quake country....LOL
 

Robotsan

Club Member
No, I wouldn't. The sill jacking points were 'emergency' (wheel/tyre change) lift points for the on-board scissor jack, designed to lift a wheel on one side just enough to change it. Frankly I would have avoided them at all costs even when the cars were new, unless it was unavoidable and brief.

I'm worried that you will collapse your doglegs/sills/inner sill structure, even a little. That's a one-way street. There's a safety element too. Don't risk it, please. Pretty please.

The factory-designated rear Supportable Points are easy to spot (the photo GI-10 speaks for itself, surely?) and are structural rather than cosmetic. They are also SAFE. Please use them.

Advice heeded, thanks.

I took it down last night before I saw your message. It was still supported by the trolley jack in the middle and was all only up around 4 hours so no damage done.

I will make sure to use the proper supporting locations once I'm clear about them :)
 

Robotsan

Club Member
George, look at GI-9 above for the front, gives a good look.
GI-10 is the rear frame boxed tube, just like the front.
Give the car a good shake both front and rear before you climb under it to make sure your stands are secure.
Never hurts to have a additional standby stand next to where you are laying a few inches down from strong metal......I do that sometimes cause I am in earth quake country....LOL

Haha, I always shake the car too and I'm definitely not in earthquake country :)

That GI-9 picture confused me.. as I feel like I've seen conflicting advice about jacking up on those tube sections, in that it's why all these cars have dents in those rails. But is that just from jacking up on the wrong section of them?
 

toopy

Club Member
Haha, I always shake the car too and I'm definitely not in earthquake country :)

That GI-9 picture confused me.. as I feel like I've seen conflicting advice about jacking up on those tube sections, in that it's why all these cars have dents in those rails. But is that just from jacking up on the wrong section of them?
The 'Chassis rails' under the middle of the car are not.... well, chassis rails (or frame rails) more a structural support for the floor and surrounding area and are not designed for jacking/supporting from below. The front section under the bulkhead and engine bay obviously are, the rear bit isn't actually chassis rail as such as Albrecht explained. These cars are 'Monocoque' construction and have no separate 'chassis' the body tub as a whole gives the car it's strength, unlike earlier cars that had a completely separate chassis and body bolted together.
 

Rob Gaskin

Treasurer
Staff member
Site Administrator
FWIW, I have always jacked the rear of my S30s using the diff/suspension subframe i.e. the bar behind the diff. I was careful to use a jack with a raised 'lip' that I could position so that the car didn't slip off the jack. Of course I used axle-stands too.

It didn't seem right to jack the car on the diff - I felt it was a bit like jacking the front under the gearbox. The diff is mounted directly via two bolts to the moustache bar which is rubber bushed.
 

Albrecht

Well-Known Forum User
FWIW, I have always jacked the rear of my S30s using the diff/suspension subframe i.e. the bar behind the diff. I was careful to use a jack with a raised 'lip' that I could position so that the car didn't slip off the jack. Of course I used axle-stands too.

It didn't seem right to jack the car on the diff - I felt it was a bit like jacking the front under the gearbox. The diff is mounted directly via two bolts to the moustache bar which is rubber bushed.

Jacking the rear of the car on the rear transverse link is a bad habit. It was not designed to cope with that weight and I have seen several with cracks and kinks in them due to this habit. In extreme cases it starts to pull the rear inner link bushes inwards (in shear!) and forces toe-out. NOT recommended.

The factory advice to jack on the diff casing itself is sound. The weight of the car then goes onto the moustache bar and moustache bar bushes vertically, and thence to the (beefy!) moustache bar mount bolts which are just about the strongest part of the whole structure, and which are designed to work in that plane.


I just don't get the difficulty in understanding this stuff? The factory's advice is clear, sound and safe. They put it right at the beginning of the FSM for good reason.
 

Robotsan

Club Member
Can't do too much on the car until my Rock Auto order arrives with the brake parts and various senders, but while I had a spare half hour this afternoon I thought I'd try and do something about the steering wheel.

It had a nasty brown 70s cover glued to it in the past, which had left lots of little raised bits, glue and leftover dried pleather on it:

uKM8tup8TU+v2TpE%a+58Q~2.jpg

But managed to get it all off by sacrificing my fingernails, and then using 120 grit to smooth it down. Not perfect, but it'll do until I get a new wheel or get this one covered in the future.

PXL_20220901_164555785.jpg
 

Robotsan

Club Member
Car definitely has an oil leak. Anyone able to give me an educated guess at where its coming from? Hard to tell from looking under as the entire sump is oily. But its roughly from the rear of the block as I hope this shows.

I guess I'll try and degrease the whole lot and then see where it appears from.

1662128229167.png
 

jonbills

Membership Secretary
Site Administrator
If there's oil running down the block there, it will have come out between head and cam cover or head and block.
 

MCBladeRun

Club Member
Now that Jon mentions it, I did have a similar issue when I'd imported my Datsun; the cam cover was not tightened up and it was leaking oil there.

If they are loose, make sure you follow the proper procedure on tightening the cam cover. There is a sequence you need to follow 👌
 

Robotsan

Club Member
Now that Jon mentions it, I did have a similar issue when I'd imported my Datsun; the cam cover was not tightened up and it was leaking oil there.

If they are loose, make sure you follow the proper procedure on tightening the cam cover. There is a sequence you need to follow 👌

Maybe it's something @SacCyclone does to test us ;)

In all seriousness though, thanks, I'll check once I've cleaned it up.
 

Robotsan

Club Member
Fuel hose is fuel hose - get some ethanol safe hose from a reputable local shop.


Just looking at ordering some fuel hosing from the place Jim recommended, but just have a couple of questions -

Is it 8mm hose I need everywhere on the car?

How many metres should I get in order to be able to cover all the hosing in the car do you reckon? 4m should easily cover it right?
 

Robotsan

Club Member
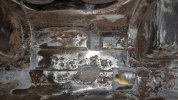
While waiting for the new parts to arrive, I took the driver's seat out and started work on the floor.

I got some nice new poly discs so decided to just strip the floors back to bare metal wherever there was signs of where surface rust was under the POR15, just so I can do a proper job on it.

Found a couple of tiny holes which I've filled with a combination of JB weld and aluminium mesh, then ground smooth with the poly discs. Seems incredibly strong for what is essentially a filler, so pretty chuffed with the results.

PXL_20220830_174852895.jpg

PXL_20220904_163003892.jpg

PXL_20220906_175724496~2.jpg

Was really struggling to see what I was going in the garage with the little magnetic mechanics light I had, so I spent £50 on this bad boy - 7200 lumens in every direction! It's like having the sun itself in the car.

PXL_20220908_180153913.jpg

And then a finger belt sander and a Flexi drive type extension thing for the drill so I could get into smaller spaces.. but I'm struggling with the latter.. it seems to almost immediately get tangled up with the drill itself and wrap itself around it both times I've tried to use it. Anyone got any suggestions? I'm thinking I'll have to make some sort of sturdy wooden box thing to hold the drill while I'm using it.

PXL_20220908_181810275.jpg

I've now also taken the centre console out. Found a number of acorns sequestered under the ash tray for that true 'barn find' vibe.

The factory sound deadening is in good nic on the trans tunnel so I'm thinking of just taking a knife and running it horizontally along it from front to back, and leaving the top half of it attached. Then I'll just run the new stuff up to the edge of it. Or even over the top of it for extra sound proofing.
 

Attachments

  • PXL_20220906_175724496.jpg
    PXL_20220906_175724496.jpg
    373 KB · Views: 8

Robotsan

Club Member
Got another couple of hours' work in on the Z today. As planned, I removed all the factory sound deadening (just with a wood chisel and the poly disc) up to halfway up the trans tunnel.

PXL_20220916_181712491.jpg

Glad I did as I found some surface rust under it near the pedals..

PXL_20220916_154856961.jpg

Next nasty job was to see what was hiding behind the weird plastic panel at the back which had a kind of furry insulation behind it, as the surface rust was creeping up under the bottom of it so I wanted to get to all of it. Some of it was already broken off, and as I tried to remove it it just fell apart.. felt like bakerlite or something!

PXL_20220916_160051456.jpg

So decided to just remove all of it, and then I'll put some new sound deadening there and paint over it. Not sure how that will look though as I guess the carpet won't go that high up. So maybe I'll have to try and cover it with some vinyl?

PXL_20220916_181747756.jpg

Aiming to get both floors painted with rust converter by the end of the weekend, ready for epoxy primer in a week or 2.

I never want to do this kind of work again so I was chuffed when I checked the passenger side floor and found it to be waaaay better. Result.
 

Robotsan

Club Member
Another 4 hours today. Absolutely fooking knackered, so it is beer o'clock. Managed to do almost everything on the right hand floor. Wasn't going to take as much of the factory sound deadening off as I did on the driver's side, just because the floor was in a lot better state visually.

But glad I did, because I found worse surface rust on the trans tunnel behind it than on the other side, despite it all looking hunky dory before that.

So I would suggest no one takes it as red that there's no rust starting there just because there's no evidence of it. And this is a Californian car. I'm now considering removing ALL of it just to make sure.

PXL_20220917_173432950.jpg
 
Top