260z Restoration - Let's get started

Albrecht

Well-Known Forum User
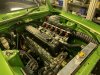
Alan, think I’ve figured out where the difference lies. On the Jenvey the throttle spindle is about 30mm further back from the front flange than a weber. Compare my images with the weber image posted here. This is what prevents the linkage working effectively.

That's interesting. Thank you.

The reason I needed to go up into the loft was to have a look at a set of period works Nissan ECGI throttle bodies I've got up there, and remind myself how they were actuated. I can see that the reason for the throttle spindle and butterflies being so far forward in comparison to carbs is to make space for the injector. Duh! Never thought of that.
 

Turn & Burn

Club Member
Slow but satisfying progress on building a new wiring loom for the ECU, Injectors, coil packs, sensors this weekend. Seems to take an age to pull everything, sleeve, crimp , etc. I’ve mounted the coil pack on the inner wing using mounts that were already present, the leads in the pic are just mocked up so I can order correct lengths etc. In the end I got a bit distracted and made up a discreet housing for the Wideband A/F display. This now sits in place of the ashtray and covers over when not needed.F5A87E1F-3DE8-4216-886E-3100E7214D26.jpegEE5669A0-8C7F-4DB8-B488-1071DD9E45AE.jpegF4595208-6ECD-4BD6-B744-DA0E3E04349C.jpegF84A3833-AD73-4E2F-9E2E-309DF95F2B3A.jpeg
 

moggy240

Insurance Valuations Officer
Staff member
Club Member
Great idea with the AFR gauge, what coil pack are you using as I noticed it has not got a standard type plug connector. Have you got a connector to fit it.
 

Turn & Burn

Club Member
Great idea with the AFR gauge, what coil pack are you using as I noticed it has not got a standard type plug connector. Have you got a connector to fit it.
The current leads are mock-ups just to get lengths sorted. The coil pack is Ford Gen 2. I’m getting the leads made up with correct ends on.
 

moggy240

Insurance Valuations Officer
Staff member
Club Member
The plug leads look spot on, I was on about the electrical wire connector for the coil pack,but if you can the ends then that is good.
 

Turn & Burn

Club Member
The plug leads look spot on, I was on about the electrical wire connector for the coil pack,but if you can the ends then that is good.
The coil pack, plug and connectors were supplied loose by Emerald. Also supplied comprehensive wiring diagrams etc so a clanky (like me) should hopefully be able to figure the wiring black art out!
 

moggy240

Insurance Valuations Officer
Staff member
Club Member
It should be fairly straightforward, I think the only issue I had with mine was the wiring the coil pack but mine is not the Emerald kit.
 

Turn & Burn

Club Member
I finished the induction side of things tonight, I’ve managed to squeeze a 100mm flexy duct through the front panel, the 260z has a slightly larger hole than the 240z, but even so it’s a real tight fit. To hold everything in place I’ve made a bracket that holds the filter and the duct end on the same clamp, looks quite neat.
The airbox is Australian EFI Hardware and the only disadvantage I’ve found so far is I couldn’t get the top off it with 90mm stacks fitted on the Jenvey’s, I’ve had to come down to a 60mm.E34668A9-5B17-4EFC-B0B6-8479F2F95B60.jpeg44A0C09D-DD9F-4425-95AE-11E887735918.jpeg118AF3AF-9F78-4D61-90F4-EBAC3510475D.jpeg
 

Rob Gaskin

Treasurer
Staff member
Site Administrator
On my old track car I fitted an OMEX Revlimiter in the ash-tray space.

On my 260 (Webers) I have installed a 280 console which is a lot neater because it doesn't have a choke slot.
 

Turn & Burn

Club Member
On my old track car I fitted an OMEX Revlimiter in the ash-tray space.

On my 260 (Webers) I have installed a 280 console which is a lot neater because it doesn't have a choke slot.
I think I’ll probably fill the choke slot on mine it looks a bit worn and scruffy.
 

Turn & Burn

Club Member
More steady progress, nearly there!
Interior finished and seats installed, I made the carpets up myself and got the local carpet fitter to bind the edges, reckon they’ve come out really well and fit is spot on. The seats were done locally, and have come out ok but I’ve seen better, can’t win em all, they’ve cost nothing tho.
I fitted a Retrosound radio which I reckon looks classic enough to suit the interior.
Wiring loom finished and tested, I fired up the ecu for the 1st time today, checked all signals and turned her over for the 1st time to get the oil circulating again as it’s been stood for a while since I primed it. I had a few issues with the crank signal and ended up having to split the sensor wire out of the loom I’d painstakingly built, despite being sheathed it was getting upset by the air temp sensor which I’d loomed alongside it. I had been warned they’re very sensitive, should have paid more attention!
 

Attachments

  • 31B8779F-91C2-4AE4-8DF9-C917D7A362D5.jpeg
    31B8779F-91C2-4AE4-8DF9-C917D7A362D5.jpeg
    305.7 KB · Views: 57
  • 5CD3781F-6747-45C6-92E6-173CE581866E.jpeg
    5CD3781F-6747-45C6-92E6-173CE581866E.jpeg
    398.9 KB · Views: 55
  • 8B550E86-0B6F-417A-B643-0570194FCC92.jpeg
    8B550E86-0B6F-417A-B643-0570194FCC92.jpeg
    407 KB · Views: 59
  • B88A1445-188B-4B10-B649-92140256D382.jpeg
    B88A1445-188B-4B10-B649-92140256D382.jpeg
    318.2 KB · Views: 55
Top