-
The Z Club relies on the support of it's paid members - join the club or renew your membership here.
You are using an out of date browser. It may not display this or other websites correctly.
You should upgrade or use an alternative browser.
You should upgrade or use an alternative browser.
The Project Dixie thread!
- Thread starter richiep
- Start date
richiep
Club Member
Yes, 907 green.Is this the same green that's on the well known fourways car?
Rich, how about spraying inside your 'Cacoon'?Especially given how much of it will have vinyl glued to it and trim panels, carpets and everything else covering it. And those areas with the most dust nibs are invisible when complete.
The engine bay is 90% likely to happen now. Although that will entail a lot more work to mitigate the dust issue (I.e. plenty of wet sanding of a good thickness of clear coat!).
richiep
Club Member
Not enough room and mine is a bubble type without structure. Even with a framed one, air flow and filtration would be inadequate - quite a nightmare the more I think about trying it actually!Rich, how about spraying inside your 'Cacoon'?
What I really need is one of those blow-up spray booths, but I’d have to relocate the car to the farm where the others are, and all that expense - I’d be better off just having a body shop do it for me!
Ian
Club Member
Exactly, mine will likely just be finished in a satin black, its easier and much cheaper and doesn't stand out badly on any areas the paint is visible beside trim etc.Especially given how much of it will have vinyl glued to it and trim panels, carpets and everything else covering it. And those areas with the most dust nibs are invisible when complete.
richiep
Club Member
I actually considered leaving it just as base coat as the satin finish looked superb, but it lacks the durability of the scratch-resistant HS clear I used.Exactly, mine will likely just be finished in a satin black, its easier and much cheaper and doesn't stand out badly on any areas the paint is visible beside trim etc.
I might wet sand and buff some parts of the rear deck area (around the tool boxes) just to practice and satisfy my perfectionism in an area that I will occasionally see when lifting the carpet up!
There will also be some hand painted satin black bits added inside in a future update, duplicating the factory approach…
richiep
Club Member
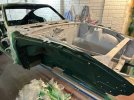
Bust the engine bay out of its masking cocoon for the first time in many months to start making painting preparations. The sealing coat of epoxy that has been on there needs a gentle smoothing with 6-800 wet and dry but all other finessing has been done. I’m going to get some more basecoat from the paint factors tomorrow and will probably get a couple of cans of it in aerosol in addition to the tin. The cans can be very useful for getting at fiddly areas where the full size spray gun with hose hanging off it can be a bit unwieldy. That way, when I do use the basecoat gun, there’s already some decent coverage in the books and crannies.


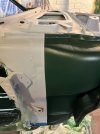
The above shows the relocated brake valve for the clean frame rail look. And below - this masking line for the Raptor undercoating just appealed to my perfectionist streak!


The above shows the relocated brake valve for the clean frame rail look. And below - this masking line for the Raptor undercoating just appealed to my perfectionist streak!

IbanezDan51
Well-Known Forum User
Currently SORN (no MOT though its a classic now..) hope it didn't drive thereJust for you Rich, I know you like these. Next door to Huggy's Speedshop yesterday.
Why would you SORN that if it doesn't need an MoT and Tax if free? Surely it's insured?Currently SORN (no MOT though its a classic now..) hope it didn't drive there
Last edited:
richiep
Club Member
Yummy. Yes please!Just for you Rich, I know you like these. Next door to Huggy's Speedshop yesterday.
IbanezDan51
Well-Known Forum User
No idea! It is insured on the insurance database. Perhaps its been having work done there since March (when it would have been classed as a historic vehicle)Why would you SORN that if it doesn't need an MoT and Tax if free? Surely it's insured?
richiep
Club Member
Okay, so…
Got a bit carried away after painting the inside of the car. I decided two things: 1) when painting the engine bay I would not be using my true HVLP turbine gun for various reasons, so got another Iwata AZ3 in 1.3mm to use with my compressor for base and clear. I’ve also got a budget but highly recommended LVLP gun on the way from China to play with. I’ll still use the turbine for my air-fed mask when spraying the clear; 2) while getting dust in the paint wasn’t a big issue inside the cabin (to be hidden by a full interior), I wanted a cleaner environment for painting the engine bay. So, I kinda fell down the rabbit hole…


Basically, half my garage has become a positive pressure air spray booth. The back door now features a removable outer panel and the inside a panel with a u-channel frame inside to mount an intake filter. My 24in fan I’ve been using previously to provide air flow when spraying just via open doors will be able to stand out back pushing air through the door, or inside sucking it in. I still need to hit the up-and-over door with the angle grinder to remove one of the decorative pressed panels for a filtered exhaust (with a removable panel added outside for when not in use). The garage door is crap so I don’t mind butchering it! The setup should create a positive pressure (more air coming in than can get out, keeping dust out and driving fume to the exhaust). Access to the paint mixing area/other half of the garage is via a zippered panel. The first pic above is a bit out of date as I’ve trimmed and sealed all that sheet hanging down the side wall, but you can see the ultra bright LED panel I’ve fitted over the engine bay. No shortage of light there!
It can all be disassembled and plastic binned. The idea is for it to be available for use in the future as I have other painting plans beyond the present one, both with Dixie and my other cars (engine bay of the Celica, few bits on my EP3).
Need to clean the spray area floor and walls tomorrow, and the shell. I may do the scuttle area base coat tomorrow if I have time.
Got a bit carried away after painting the inside of the car. I decided two things: 1) when painting the engine bay I would not be using my true HVLP turbine gun for various reasons, so got another Iwata AZ3 in 1.3mm to use with my compressor for base and clear. I’ve also got a budget but highly recommended LVLP gun on the way from China to play with. I’ll still use the turbine for my air-fed mask when spraying the clear; 2) while getting dust in the paint wasn’t a big issue inside the cabin (to be hidden by a full interior), I wanted a cleaner environment for painting the engine bay. So, I kinda fell down the rabbit hole…


Basically, half my garage has become a positive pressure air spray booth. The back door now features a removable outer panel and the inside a panel with a u-channel frame inside to mount an intake filter. My 24in fan I’ve been using previously to provide air flow when spraying just via open doors will be able to stand out back pushing air through the door, or inside sucking it in. I still need to hit the up-and-over door with the angle grinder to remove one of the decorative pressed panels for a filtered exhaust (with a removable panel added outside for when not in use). The garage door is crap so I don’t mind butchering it! The setup should create a positive pressure (more air coming in than can get out, keeping dust out and driving fume to the exhaust). Access to the paint mixing area/other half of the garage is via a zippered panel. The first pic above is a bit out of date as I’ve trimmed and sealed all that sheet hanging down the side wall, but you can see the ultra bright LED panel I’ve fitted over the engine bay. No shortage of light there!
It can all be disassembled and plastic binned. The idea is for it to be available for use in the future as I have other painting plans beyond the present one, both with Dixie and my other cars (engine bay of the Celica, few bits on my EP3).
Need to clean the spray area floor and walls tomorrow, and the shell. I may do the scuttle area base coat tomorrow if I have time.
richiep
Club Member
As Anakin Skywalker says in The Phantom Menace, “it’s working! It’s working!” The garage spray booth got a test today and it operated pretty well. I’ve run it with both the fan standing inside the garage pulling clean air in and outside blowing it in, and it’s works either way - good if the weather isn’t being friendly. The positive pressure works - as evidenced by the ballooning of the plastic:


I cut a panel out the garage door for the exhaust, welded some captive nuts inside, and a brushed aluminium plate can be bolted onto the outside when not is use. Filter clearly works:

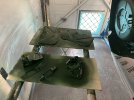
Sprayed some hinges and the toolbox lids in basecoat. Plus a bit on the extremities in the engine bay. More painting to come over the next week or two, hopefully before it gets too cold.


On the downside, my compressor is on the sickly side, and I decided it’s time to replace. Tomorrow I should have a new 100L 4hp silent oil-free compressor arriving that will make things better in various ways - noise, no oil in the air, faster refilling. Plus, once I’ve cleaned it out, I intend to adapt the old one’s 100L tank as a secondary air receiver, giving me 200L of air capacity. Should be enough! I’ll set up separate lines for air tools and painting.


I cut a panel out the garage door for the exhaust, welded some captive nuts inside, and a brushed aluminium plate can be bolted onto the outside when not is use. Filter clearly works:

Sprayed some hinges and the toolbox lids in basecoat. Plus a bit on the extremities in the engine bay. More painting to come over the next week or two, hopefully before it gets too cold.


On the downside, my compressor is on the sickly side, and I decided it’s time to replace. Tomorrow I should have a new 100L 4hp silent oil-free compressor arriving that will make things better in various ways - noise, no oil in the air, faster refilling. Plus, once I’ve cleaned it out, I intend to adapt the old one’s 100L tank as a secondary air receiver, giving me 200L of air capacity. Should be enough! I’ll set up separate lines for air tools and painting.
Last edited:


