Another 240z RHD conversion project

LiamR

Club Member
Where are you located @johnymd?

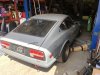
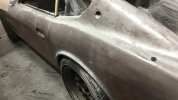
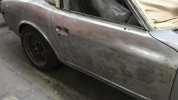
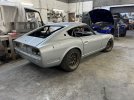
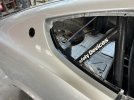
Would it be better to install a whole new RHD bulk head whilst its stripped down? My engine bay looks horrendous and the bulk head looks like it's been hit and dented so many times... the bonnet latch bracket has also been removed from mine by the previous owner....

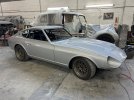
I might just bring it to you once it's a bare rolling shell .

Having trouble finding the RHD bits.. looks like everything is hens teeth to find!

Cheers dude!
 

johnymd

Club Member
Haven't updated this for quit a while so an update is well overdue. The car has been out of action for a several months after my newly built stroker motor had a cam failure after 5hrs of running. It's now been rebuilt again with a reground nissan cam by kent cams in a mild stage 3 grind, DJ springs, and the correct!! length valves. This engine was run in and mapped on an engine dyno near me and is now back at my workshop ready to go in the car over the weekend. The engine is built to be a fast road engine with low to mid torque its main goal. This was achieved and evident in the dyno graphs I'll add later. The headline figures of 244hp/230ftlb do not tell the full story but the graph will. One of the issues we had was applying advance at or above maximum torque. The most the engine could take was 24* @ around 6k. It was happy with 28* below 5K but not above. Anyway, we will get around that somehow.

I have changed the front brakes to willwood 4 pots and T3 ali bell disks. Tires are now AD08r.
 

Attachments

  • IMG_6150.JPG
    IMG_6150.JPG
    273.8 KB · Views: 80
  • IMG_6149.JPG
    IMG_6149.JPG
    314.9 KB · Views: 79
  • IMG_6148.JPG
    IMG_6148.JPG
    358.8 KB · Views: 80
  • IMG_6129.JPG
    IMG_6129.JPG
    228.1 KB · Views: 79

240L31

Club Member
Impressive HP number! I'm looking forward to see the dyno chart.
My engine features exactly the same max torque (314Nm max, more than 280Nm from 2500rpm on) but much less HP (210).

Max ignition advance is set to 36deg BTDC, 98 octane fuel.
 

Fairlineguy

Club Member
Hi John,
I'm planning to do the RHD conversion soon. Was wondering how you did the holes in bulk head, are the measurements of the holes the same as the LHD side? (with the spacer you mentioned before) I'm thinking about buying this panel from Auto Panel Solutions, to get the measurements just right. Do you think I could just cut out the shape of this panel and weld it in as it is? or should I repair the firewall first then weld this on top? I've got a load of 1mm steel I'm planning to use.
Nick
The last couple of conversations that I have done I’ve found it easier to heat and shrink back the raised factory pressings
In the bulkhead to make it flat so the new panel fits flat.
You will need some one in side the car holding a dolly to the bulkhead whilst you heat and shrink it back
Takes about 10min and saves you a ton of welding
 

johnymd

Club Member
After enjoying and evolving this one for over 5 years, I think it’s time to give it the paint job it deserves. It will be sad to see the original paint removed, it will allow us to get the metalwork just right. I’ve replaced to headlight sugar scoops with a pair that fit the wings much better and will lose the front and rear markers using purpose made fillers. It’s been at the body shop for a week now and they have removed most of the paint and started getting the doors to fit properly.

Here’s a few pics of the progress and the rears quarters showing the areas that were hand painted black from the factory.167e1189-4c52-4549-9bfb-f73f6725a776.jpeg
 

Attachments

  • 81a1acd9-3829-4856-87ae-58ca258aa707.jpeg
    81a1acd9-3829-4856-87ae-58ca258aa707.jpeg
    359.3 KB · Views: 52
  • a0cf20c1-8928-43e7-8346-a6b4d50acdaa.jpeg
    a0cf20c1-8928-43e7-8346-a6b4d50acdaa.jpeg
    322.7 KB · Views: 55
  • IMG_8945.jpeg
    IMG_8945.jpeg
    272.5 KB · Views: 56
  • IMG_8944.jpeg
    IMG_8944.jpeg
    280.4 KB · Views: 55

johnymd

Club Member
This started as a “quick” flat the paint, fill any dents and make it all look one colour and shinny. It quickly evolved to “ all the paint needs to come off”. From there it was then make everything fit properly and remove any dings/dents while it’s just metal. This took a while but I wanted it as straight as possible with very little filler. Next came epoxy to seal everything. Once he was happy that all the bodywork was done he then applied a black primer. The whole car should be primed by the end of next week. Then it’s the final fit of all the panels and check everything is good. He then wants me to go over the car to make sure im happy before he moves onto paint.

I am really happy with the progress so far.
 

Robotsan

Club Member
This started as a “quick” flat the paint, fill any dents and make it all look one colour and shinny. It quickly evolved to “ all the paint needs to come off”. From there it was then make everything fit properly and remove any dings/dents while it’s just metal. This took a while but I wanted it as straight as possible with very little filler. Next came epoxy to seal everything. Once he was happy that all the bodywork was done he then applied a black primer. The whole car should be primed by the end of next week. Then it’s the final fit of all the panels and check everything is good. He then wants me to go over the car to make sure im happy before he moves onto paint.

I am really happy with the progress so far.

Looks like a really good job this. And the kind of thing I'm thinking for mine - glass out, panels off, engine bay masked off.
 

johnymd

Club Member
Yes. The engine bay was already painted so I didn't need to strip the car back to a bare shell. To strip the outside of the car and doors/tailgate only takes a day or so then putting it all back together should also be relatively quick.

When you have a car painted or stripped to metal and painted, you need to be realistic about the final price. When the shop originally priced this repaint, they had no idea what they would find once it started. Although my car was pretty much rust free, the work they have had to do to get it right was a lot more than they expected so I'm happy to pay more. When I went to look at the car yesterday I asked what they expected the final price to be, even though I had a fixed price quote. He mentioned about all the extra work in removing the paint, repairing the bottom of the front wings, and getting rid of all the dings without filler. I expected all this and we agreed at a 20% increase in the total cost.
 

johnymd

Club Member
I enjoy building these cars and then enjoy using them for as long as possible. There will then come a time when it needs to be sold to fund the next one. I would love to keep them all but I am realistic that this is just not possible.
 

Needa240z

Club Member
I enjoy building these cars and then enjoy using them for as long as possible. There will then come a time when it needs to be sold to fund the next one. I would love to keep them all but I am realistic that this is just not possible.
Pm if and when
See if within my budget
 

johnymd

Club Member
Nearly ready to pick up. He has done a great job and painted it in its original 901 silver grey. He has even replicated the satin black around the rear windows and side windows.IMG_9420.jpeg
 

Attachments

  • IMG_9421.jpeg
    IMG_9421.jpeg
    422.3 KB · Views: 45
  • IMG_9422.jpeg
    IMG_9422.jpeg
    459.2 KB · Views: 49
  • IMG_9423.jpeg
    IMG_9423.jpeg
    267.8 KB · Views: 49

johnymd

Club Member
He still needs to paint the front spoiler and I’m going to drop off a 3 piece metal valance for him to paint in case I go that route.
 
Top