Shell Preparation. Essential but not much fun.

Status
Not open for further replies.

pmac

Well-Known Forum User
Well its time I strarted a new thread on something ........sooooooooooo here is what I have been doing this week......................
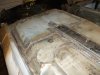
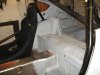
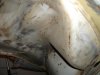
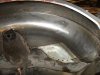
stripping **ap off the underside of my "rally car" shell.
Its deffo essential cos im not about building cars all plastered in Schutz, Underseal and layers of chip papers.
Its not fun cos.......1. If you pay someone else to strip the shell whatever method you choose then its not cheap.:eek:
2. its not fun doing it yourself either cos its a dirty tiring numbskull sort of job. Now some may say Im well suited to that level of work.
Whatever. You can pass all the comments you want. Critial, sycophantic or downright sarcastic. I dont care. Theads drifiting off topic and descending in to a bunfight/squabble are fine with me.:D
After all this is a Car Club forum.... completely detached from real life as I know it:lol:

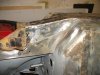
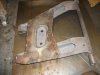
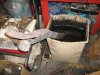
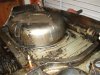
Anyway... here are a couple of pics.......

sharp eyed members will see that rust doesnt feature much. Thats cos its been round LA nearly all its life and covered in underseal from day one.
 

Attachments

  • Rally car build 002 (Large).jpg
    Rally car build 002 (Large).jpg
    61.7 KB · Views: 278
  • Rally car build 005 (Large).jpg
    Rally car build 005 (Large).jpg
    126.9 KB · Views: 262
  • Rally car build 003 (Large).jpg
    Rally car build 003 (Large).jpg
    139.3 KB · Views: 237
  • Rally car build 004 (Large).jpg
    Rally car build 004 (Large).jpg
    86.5 KB · Views: 230

zbloke

Club Member
Thats an early-ish shell ain't it Mr Mac?

6" servo?

Pedal box not in the car and not going in for a while?

I'll pop round and take a few measurments from it if it ain't
 

SeanDezart

Well-Known Forum User
Theads drifiting off topic and descending in to a bunfight/squabble are fine with me.:D
After all this is a Car Club forum.... completely detached from real life as I know it:lol:

My kinda man - more into real-life than perhaps he thinks.:rolleyes:

Great project - it's almost inspiring me but why bother if this one stays LHD ;) ?
 

pmac

Well-Known Forum User
Thats an early-ish shell ain't it Mr Mac?

6" servo?

Pedal box not in the car and not going in for a while?

I'll pop round and take a few measurments from it if it ain't

Mid 71 shell.:driving: FFS you have been looking at it for 4 years each time you come round:smash:

Small reinforcing plate and originally 6" servo. was auto tho so Steve n me have modified the bulkhead to take a later and wider pedal box(manual) Will be using 7" servo.
You had better get round soonish before I weigh in that grearbox tail piece you want:rolleyes:

:D:D:D

We are probably going to change to the later/stronger gearbox tunnel support too. Why ????........
Cos we can;)
 

SeanDezart

Well-Known Forum User
We are probably going to change to the later/stronger gearbox tunnel support too. Why ????........
Cos we can;)

You changing the tunnel completely ? Seen that done - it allows the exhaust centre box to sit higher up !
 

zbloke

Club Member
Small reinforcing plate and originally 6" servo. was auto tho so Steve n me have modified the bulkhead to take a later and wider pedal box(manual) Will be using 7" servo.
You had better get round soonish before I weigh in that grearbox tail piece you want:rolleyes:

I'll be round at the weekend, have you still got the 6" pedal box assembly, cus thats the bit I really need now.....

Might even have another look at the shell while I'm at it too :rofl:
 

pmac

Well-Known Forum User
I'll be round at the weekend, have you still got the 6" pedal box assembly, cus thats the bit I really need now.....

Might even have another look at the shell while I'm at it too :rofl:

i have a horrible feeling that it may have been recyled and now has a new life in someones washing machine or fridge.:eek:
However we can look in the stores:unsure:
 

bigblock

Well-Known Forum User
When i noticed the stripped underside the other day,i thought jesus, i bet your mind has been in that weird zone while doing that scraping.Funny youve just put up pics i was stalking your past posts recently assuming you already had.Still havent received my wages for my labour though:)
 

pmac

Well-Known Forum User
When i noticed the stripped underside the other day,i thought jesus, i bet your mind has been in that weird zone while doing that scraping.Funny youve just put up pics i was stalking your past posts recently assuming you already had.Still havent received my wages for my labour though:)

HELP!!! Ive got a STALKER!!:eek:

Mods! Mods !!! Im being followed... some had better delete EVERYTHING about me... I need to go into hiding:cool::cool:

WAGES??? You never stopped to DO anything ... So no wages:smash:

glad you are getting on with that rack. I know the one you are removing is not quite straight but before you bin it I need a spring and shim from it... Pleeeze...pretty please.
They live under the big locknut:thumbs:
 

slaphead

Club Member
Having just stripped 75% of my 2+2 Pete, I can sympathise entirely, its amazing how quickly you develop a nervous tick whilst stripping underseal ;)
 

pmac

Well-Known Forum User
You changing the tunnel completely ? Seen that done - it allows the exhaust centre box to sit higher up !

no just the support cradle. Its stronger than the early version and allows the use of the later type g box crossmember with some new poly bushes it it and maybe an uprated gbox mount:confused:

Looking good Pete looks like some stitch welding on the inner wings ?

More pictures please.
You dont miss much do you;)
Some stitch welding done as you have noticed. Lots more to do.
Full set of Star Motorsport reinfocing plates as well( fully FIA compliant:D)

Selected pictures may follow:thumbs:
As previously said im not publishing a full "How to Build a rally Z" journal.:smash:

Intellectual property rights . Blah Blah blah etc...:lol:

No bad for a japanese beer can... :D
Exactly!!!

On a serious point tho. These pictures are of a 40 year old abandoned 240Z that was dragged out of a pick n pull yard somewhere in the LA /San Diego area and shipped to the UK.Its not some high dollar cherished Zed. There is virtually no rust at all un the underside. Truly remarkable IMO. And is going to make a fabulous rally ccar for someone. (blatant self praise and self promotion):D:D:D
 

pmac

Well-Known Forum User
More pics......
Next time someone new comes along asking about buying a UK car just direct them to these pics.....

Rad support panel.... Laser cut strengthener stitch welded in place.
Inner wing and air tube detail....pristine. Just need to do some stitch welding .
Chassis rail/compression rod mount. Original and not rusty. Just added an additional skid/reinforcing plate. This area will take the captive nut for the rear sumpguard mount. So extra strength is needed,
 

Attachments

  • Rally car build 008 (Large).jpg
    Rally car build 008 (Large).jpg
    102.1 KB · Views: 174
  • Rally car build 009 (Large).jpg
    Rally car build 009 (Large).jpg
    101 KB · Views: 176
  • Rally car build 006 (Large).jpg
    Rally car build 006 (Large).jpg
    69.2 KB · Views: 180

pmac

Well-Known Forum User
Perfect shell, Keep posting the progress, I'm relying on the inspiration!!!

well its not perfect Phil but it is very good.
steady progress continues.
small hole at front of sill repaired including new captive nut wing fixing.
more underseal removal at rear. This is the hardest bit.
US spec seat belt recesses need removing and plating.
under floor chassis rails werent rusty but damaged. so relacements have been plug and stich welded in place. i also took the opportunity to put an extra plate on the critical area where the engine bay chassis leg meets the shell. This is the area that will take the rear sumpguard mount so needs reinforcing.(legally;))
rear floors are being replaced to add strength and because removing all the stock seat mounts leaves a lot of spot weld holes:(.
Both front and rear bottom suspension arms are getting the Star motorsport strengthening laser cut plates.
Moustach bars in acid. These will be going to be powder coated along with the suspensionarms.
Heres the pics... enjoy
 

Attachments

  • Rally car build 012 (Large).jpg
    Rally car build 012 (Large).jpg
    102.8 KB · Views: 133
  • Rally car build 013 (Large).jpg
    Rally car build 013 (Large).jpg
    105.9 KB · Views: 122
  • Rally car build 011 (Large).jpg
    Rally car build 011 (Large).jpg
    97.7 KB · Views: 111
  • Rally car build 017 (Large).jpg
    Rally car build 017 (Large).jpg
    106.2 KB · Views: 116
  • Rally car build 016 (Large).jpg
    Rally car build 016 (Large).jpg
    100.9 KB · Views: 99
  • Rally car build 015 (Large).jpg
    Rally car build 015 (Large).jpg
    132 KB · Views: 119
  • Rally car build 010 (Large).jpg
    Rally car build 010 (Large).jpg
    133.8 KB · Views: 133
  • Rally car build 014 (Large).jpg
    Rally car build 014 (Large).jpg
    101.1 KB · Views: 100

pmac

Well-Known Forum User
Well its about as lonely on this thread as it is working in my garage. :(
So probably not worth posting up much more .
Since the rear floors are now both in place and the seatbelt recesses welded up it was time to pop the cage in and make up some rear mounts.
Im using an older used cage so there is no fitting kit.
Made up these today. i need to wait till my supervisor comes up from Coalville to approve them before I weld them in place. (Fingers crossed) They are 120cm sq.
All the seat cross supports are cut and lying in place. I just need to weld on the mounting lugs and captive nuts. Once again I need the job signing off before I weld them in.
I am also having a trial fit of the whole cage to get the positioning spot on and make sure the seats fit and the doors close. It will be a snug fit in there.:driving:
The final job today was to install the front anti roll bar modified mounts using a crush tube.
This means the antiroll bar now bolts thru the chassis rail which is supported with the weld in crush tube. I will then make an inside mounting plate for the two bolts so single handed installation from underneath is preserved.
There are a lot of hours involved in these initial stages in addition to normal bare shell work. They have to be done now before i get to paint stage. I hope they will show thru in the quality and fitness for purpose of the final car:unsure:
 

Attachments

  • Rally car build 019 (Large).jpg
    Rally car build 019 (Large).jpg
    95.5 KB · Views: 123
  • Rally car build 020 (Large).jpg
    Rally car build 020 (Large).jpg
    82.7 KB · Views: 103
  • Rally car build 018 (Large).jpg
    Rally car build 018 (Large).jpg
    60.1 KB · Views: 105
  • Rally car build 021 (Large).jpg
    Rally car build 021 (Large).jpg
    83.9 KB · Views: 108
  • Rally car build 022 (Large).jpg
    Rally car build 022 (Large).jpg
    65.6 KB · Views: 114

zbloke

Club Member
I am also having a trial fit of the whole cage to get the positioning spot on and make sure the seats fit and the doors close. It will be a snug fit in there.:driving:

Having fitted a full cage to my Z I can confirm it will indeed be a snug fit
 

SeanDezart

Well-Known Forum User
Are you welding in the cage ?
What is the distance you expect between the rood bars and the roof itself ?

Lonely ? Nah, we're just waiting for you to slip up and pounce on yer !
 
Status
Not open for further replies.
Top