Longest 240z restoration ever?

Paul Henley

Club Member
more fan/heater pics

few more pics
 

Attachments

  • 11.jpg
    11.jpg
    228.2 KB · Views: 81
  • 14.jpg
    14.jpg
    116.5 KB · Views: 76
  • 13.jpg
    13.jpg
    90.1 KB · Views: 73
  • 18.jpg
    18.jpg
    592.4 KB · Views: 66
  • 17.jpg
    17.jpg
    733.3 KB · Views: 70
  • 16.jpg
    16.jpg
    879.5 KB · Views: 72
  • 15.jpg
    15.jpg
    948.1 KB · Views: 73
  • 12.jpg
    12.jpg
    284.4 KB · Views: 74
Last edited by a moderator:

racer

Club Member
That's impressive attention to detail. I've never seen anyone restore a heater unit to that level.
Please keep the pictures coming.
 

Rob Gaskin

Treasurer
Staff member
Site Administrator
That's impressive attention to detail. I've never seen anyone restore a heater unit to that level.
Please keep the pictures coming.

But it's not original anymore, what was wrong with a rusty original? :devil:

If you stick to the original theme it saves a hell of a lot of work. :thumbs:

Great work as I've said before.
 

Paul Henley

Club Member
Brake/Clutch Pedal Box Overhaul

Hi All
A few before and after pic's of the Brake/Clutch Pedal Box. This was basically just a clean and paint job. There was a little rust pitting, so after stripping it was sent for sand blasting. Then on return it was painted in primer and black. I'd tested the brake pedal switch and that was ok, when I stripped it I measured the distance it was set at, so hopefully it should be somewhere close. - Paul
 

Attachments

  • 6.jpg
    6.jpg
    588 KB · Views: 66
  • 5.jpg
    5.jpg
    607.5 KB · Views: 60
  • 4.jpg
    4.jpg
    545.4 KB · Views: 56
  • 3.jpg
    3.jpg
    578.8 KB · Views: 61
  • 2.jpg
    2.jpg
    932.1 KB · Views: 58
  • 1.jpg
    1.jpg
    968.7 KB · Views: 66

Paul Henley

Club Member
Hi All

Thought I'd add an update on the work I'e done on my steering wheel.

The wheel didn't have a lot of wear as the car had done 50+k miles, but it was dull looking with standing unused for so long, and had various chips and scratches to the center spokes, I assume from keys, watch straps etc.
I had no idea how to go about doing this and have never seen or have access to view a "new" steering wheel for reference, so I've basically followed everything I've read from the various Z forums This basically went as follows:-

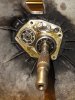
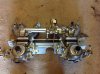
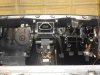
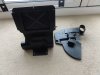
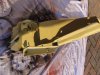
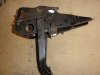
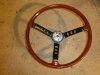
I removed the wheel from the column and stripped it of all component parts and gave it a good scrub/clean in soapy water to remove the initial dirt/grime. Pic's 1 & 2 show the wheel at this stage.

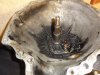
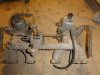
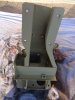
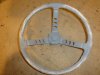
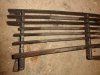
I then stripped the paint off the center spokes, mainly using a drill/flapper wheel to get the bulk of the original black satin paint off - Pic 3

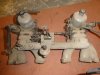
I then masked up the wheel and applied a few coats of primer to the center spokes.- Pic 4

Next I painted the center spokes with a few fresh coats of satin black - Pic's 5 & 6

After leaving for a few days for the paint to harden, I masked up the freshly painted spokes for protection while I addressed the outer wheel.

I cleaned and smoothed the wheel with various grades of grit paper, from 800 to 2000,, taking care not to sand to hard and remove the original colour.

I then applied coats of clear varnish (I think it was 3) and sanded between coats to maintain the smooth finish - Pic's 7 & 8

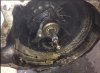
I had found that there was some corrosive pitting to the center outer ring that creates the contact for the horn switch. I polished this out as it would certainly have caused contact problems latter on. This ring is shown in Pic 7.

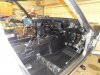
Finally I reassembled and refitted the wheel to the steering column, by this point I had now refitted the column and dash to the car. - Pic 10

It's hard to tell the final finish/colour by digital pic's as they all seem different depending on flash, shadow etc, but I'm quite happy with the end result. :)
 

Attachments

  • 11.JPG
    11.JPG
    757.5 KB · Views: 98
  • 10.JPG
    10.JPG
    933.4 KB · Views: 81
  • 9.JPG
    9.JPG
    332.8 KB · Views: 86
  • 8.JPG
    8.JPG
    309.7 KB · Views: 76
  • 7.JPG
    7.JPG
    447.6 KB · Views: 71
  • 6.JPG
    6.JPG
    497.3 KB · Views: 75
  • 4.JPG
    4.JPG
    375.9 KB · Views: 77
  • 3.JPG
    3.JPG
    534.2 KB · Views: 76
  • 2.JPG
    2.JPG
    487.1 KB · Views: 80
  • 1.JPG
    1.JPG
    598.6 KB · Views: 101

zedhed

Club Member
Good job! I've just been through this process too and nearing the end this being my 3rd year. Only the engine installation and suspension remain to be done (the car is currently with Duncan at Z farm, as I haven't the time or kit to do it). Nick
 

Paul Henley

Club Member
Grill Overhaul

Hi All
Haven't done an update on my progress for a while so thought I'd crack on. This piece concerns the overhaul of the grill. It had some rust, bends etc, so first job was to strip it apart and give it a good clean. The main mount brackets and attached strips were sent to a sand blasters for stripping and priming (the parts in buff primer). As the remaining strips looked like they might suffer from the harsh effects of the blasting media I stripped them by hand with wire brush, paper and sanding wheels and put them in primer (the grey primer parts) I also replaced the rods and nuts that tie them together. Some of the rods had rusted badly into their nuts. I've obtained the correct grey paint and they'll get a coat before refitting to the car.
Paul
 

Attachments

  • fbIMG_1125.JPG
    fbIMG_1125.JPG
    339.7 KB · Views: 43
  • fbIMG_1128.JPG
    fbIMG_1128.JPG
    312.4 KB · Views: 38
  • fbIMG_1127.JPG
    fbIMG_1127.JPG
    443 KB · Views: 39
  • fbDSC06323.JPG
    fbDSC06323.JPG
    747.4 KB · Views: 42
  • fbDSC06322.JPG
    fbDSC06322.JPG
    669.3 KB · Views: 42
  • fbDSC06319.JPG
    fbDSC06319.JPG
    713.1 KB · Views: 41

Paul Henley

Club Member
Gearbox

After cleaning the gearbox externally with wire brush, solvents and polishing wheels I stripped the front oil seal apart. I'm fairly confident the gearbox operation is fine as it was when stripped and was relatively low mileage. However for the sake of a few quid it wasn't worth putting the gearbox back in without replacing the oil seals. I checked the bearings while I had access and as expected these seem fine (time will tell). I also repaced the rear oil seal that sits on the propshaft. I had the gearbox mount bracket blasted and repainted black and replaced the associated nuts bolts and rubbers. A new clutch, thrust bearing, clutch slave cylinder, rubber and rev counter cable completed the work.
 

Attachments

  • fbIMG_1500 - Copy.JPG
    fbIMG_1500 - Copy.JPG
    455.2 KB · Views: 50
  • fbDSC07910r.jpg
    fbDSC07910r.jpg
    150.6 KB · Views: 52
  • fbDSC04139 - Copy.JPG
    fbDSC04139 - Copy.JPG
    314.3 KB · Views: 51
  • fbDSC07907r.jpg
    fbDSC07907r.jpg
    216.5 KB · Views: 53
  • fbDSC07906r.jpg
    fbDSC07906r.jpg
    180.7 KB · Views: 56
  • fbDSC07901 - Copy.JPG
    fbDSC07901 - Copy.JPG
    592.2 KB · Views: 57
  • fb2014-08-03_00-18-11.jpeg
    fb2014-08-03_00-18-11.jpeg
    230.7 KB · Views: 53
  • fb2014-08-03_00-04-14.jpeg
    fb2014-08-03_00-04-14.jpeg
    310.6 KB · Views: 60
  • IMG_4164.JPG
    IMG_4164.JPG
    416.1 KB · Views: 48
Last edited by a moderator:

Paul Henley

Club Member
Diff

The diff appears to be working fine but required stripping, cleaning and repainting. I also replaced the nuts/washers vent etc for aesthetic reasons. It came up nice I thought. I also stripped and painted the diff mounts, the support strap was in good condition.
 

Attachments

  • 10DSC09294.JPG
    10DSC09294.JPG
    990.4 KB · Views: 51
  • 8DSC06400 - Copy.JPG
    8DSC06400 - Copy.JPG
    453.6 KB · Views: 46
  • 7DSC06389 - Copy.JPG
    7DSC06389 - Copy.JPG
    399.3 KB · Views: 41
  • 6DSC06382 - Copy.JPG
    6DSC06382 - Copy.JPG
    407.2 KB · Views: 44
  • 5DSC06347 - Copy.JPG
    5DSC06347 - Copy.JPG
    326.6 KB · Views: 46
  • 4DSC06336 - Copy.JPG
    4DSC06336 - Copy.JPG
    705.6 KB · Views: 46
  • 9DSC06410 - Copy.JPG
    9DSC06410 - Copy.JPG
    427.3 KB · Views: 50
  • 1DSC06361 - Copy.JPG
    1DSC06361 - Copy.JPG
    648.4 KB · Views: 49
  • 2DSC06394 - Copy.JPG
    2DSC06394 - Copy.JPG
    629.6 KB · Views: 46
  • 3DSC06367 - Copy.JPG
    3DSC06367 - Copy.JPG
    591.8 KB · Views: 43

Paul Henley

Club Member
Diff fitted

I was limited to the number of pics uploaded (I think) so here's a couple of the diff when refitted.
 

Attachments

  • 12DSC07557.JPG
    12DSC07557.JPG
    443.4 KB · Views: 79
  • 13DSC07587.JPG
    13DSC07587.JPG
    441.2 KB · Views: 71

Paul Henley

Club Member
Engine Pic's

The engine was stripped and checked and new parts fitted and overhauled as required. It's a totally standard L24. Repainted and new ancillaries fitted. For some unknown reason some of the pics seem to be uploading upside down.....
 

Attachments

  • 7IMG_3294.JPG
    7IMG_3294.JPG
    455.9 KB · Views: 89
  • 6IMG_3293.JPG
    6IMG_3293.JPG
    482.7 KB · Views: 90
  • 5IMG_3292.JPG
    5IMG_3292.JPG
    448.4 KB · Views: 93
  • 4IMG_1119.JPG
    4IMG_1119.JPG
    802.5 KB · Views: 93
  • 3IMG_1116.JPG
    3IMG_1116.JPG
    703 KB · Views: 89
  • 2IMG_1102.JPG
    2IMG_1102.JPG
    434.6 KB · Views: 89
  • 1IMG_1121.JPG
    1IMG_1121.JPG
    682.3 KB · Views: 95
Last edited by a moderator:

Paul Henley

Club Member
Carbs

Hi All
Few more pics uploaded, these are the before and after pics of the original carbs. They were in quite a state having sat in dust for 30+ years. Knowing nothing about carbs I decided to send mine across the water to ZTherapy to have them overhauled. Really happy with the result but the proof in the pudding will when I finally fire up the car and set about setting them. They came back with the heatshield in what looked like grey primer so I'ved switched that with one I'd had replated.
Paul
 

Attachments

  • IMG_0784.JPG
    IMG_0784.JPG
    499.6 KB · Views: 85
  • IMG_0781.JPG
    IMG_0781.JPG
    516 KB · Views: 74
  • IMG_0780.JPG
    IMG_0780.JPG
    483.6 KB · Views: 70
  • IMG_0778.JPG
    IMG_0778.JPG
    569.6 KB · Views: 73
  • IMG_0773.JPG
    IMG_0773.JPG
    584.4 KB · Views: 78
  • rDSC05436.jpg
    rDSC05436.jpg
    690.7 KB · Views: 68
  • rDSC05418.jpg
    rDSC05418.jpg
    501.7 KB · Views: 70
  • rDSC01705.jpg
    rDSC01705.jpg
    653.8 KB · Views: 73
  • rDSC01703.jpg
    rDSC01703.jpg
    616.5 KB · Views: 82

Paul Henley

Club Member
Brake master cylinder/servo overhaul

Hi all, thought I'd get my finger out and post some more pics n stuff. Thought it might be worth something to someone to share the details on my brake master cylinder/servo overhaul. My car hadn't used its brakes for 30 plus years so I didn't have much faith in it being functional. When I took it apart it was evident it was screaming for a repair kit. What was left of the brake fluid looked like it had kind of crystallized around the piston in the master cylinder. Some of the internal rubber parts had actually turned to a black gunge. So after stripping it down, I cleaned up the piston, springs etc and fitted a Tokico repair kit that I'd acquired at some point replacing the internals. I cleaned up and polished the external body and fitted new reservoirs, at a later time I was able to come by a pair of new Nabco reservoir caps from Moggy240 to complete the master cylinder overhaul. The master servo wasn't really an issue as it's not subject to any corrosive elements other than paint damage and as the car was fairly low mileage I figured the internals wouldn't have worn much (this has since proven to be correct as the system appears to be working fine). So I just stripped and renewed the paint and fitted a new decal. I guess if a master cylinder is used regularly despite is age it won't suffer the damage internally that mine had but if your going to check it over you may as well open it up and check inside.
 

Attachments

  • 11.jpg
    11.jpg
    612.5 KB · Views: 48
  • 10.jpg
    10.jpg
    984.2 KB · Views: 48
  • 9.jpg
    9.jpg
    766.6 KB · Views: 47
  • 8.jpg
    8.jpg
    755.3 KB · Views: 41
  • 7.jpg
    7.jpg
    810.6 KB · Views: 43
  • 5.jpg
    5.jpg
    568.5 KB · Views: 40
  • 4.jpg
    4.jpg
    605.5 KB · Views: 40
  • 2.jpg
    2.jpg
    788.5 KB · Views: 46
  • 1.jpg
    1.jpg
    716.3 KB · Views: 44
  • 12.jpg
    12.jpg
    457 KB · Views: 43

moggy240

Insurance Valuations Officer
Staff member
Club Member
The carbs look like new,you must be really happy with them.Did you use stainless bolts on the engine.
 
Top