Tim when you say flat top carbs do you mean the carbs that were on the 260 Z as when I had them on my car years ago I used the colour tune a vacuum gauge and there is a special tool for adjustment that You insert through the top,my car ran perfect even with those carbs on it,I even done a 15.2 down the strip
-
The Z Club relies on the support of it's paid members - join the club or renew your membership here.
You are using an out of date browser. It may not display this or other websites correctly.
You should upgrade or use an alternative browser.
You should upgrade or use an alternative browser.
What did you do to your Z this week?
- Thread starter jonbills
- Start date
johnymd
Club Member
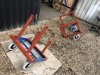
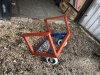
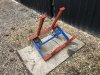
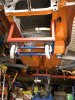
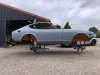
been Playing with a new project today. I’ve found someone local that wants to take on the shell restoration and paint so time to get the shell ready. Car was mostly stripped anyway but the suspension and interior parts still had to come off. I’ve created a couple of dollies to move the car around and they will probably stay attached for the whole time it’s away. These are bolted very solidly to the shell so it moves around really easily on these. Even on very rough ground.
Attachments
-
 11A2F47B-BB8C-45A7-A0FD-1C42F6716C8B.jpeg673.7 KB · Views: 57
 -
 E25FAADB-C3D6-4FAA-A56E-332D617A4F88.jpeg749 KB · Views: 52
 -
 B53CEBF4-5AB6-4366-8551-B5F811759F85.jpeg386.3 KB · Views: 52
 -
 3A40007D-FA1E-4DCA-A9BD-0C468A3EF55F.jpeg714.2 KB · Views: 51
 -
 C457F511-E15A-4ECA-A734-6595BC6894CB.jpeg197.1 KB · Views: 54
 -
 5CD25B51-0B2D-4B2E-BB95-C41008AC70A5.jpeg295.4 KB · Views: 54
 -
 3334C6C4-9602-4555-872E-8762914DED58.jpeg435.8 KB · Views: 55
 -
 0925EA95-E3EF-4153-B157-5A1D26C54867.jpeg222 KB · Views: 53
toopy
Club Member
been Playing with a new project today. I’ve found someone local that wants to take on the shell restoration and paint so time to get the shell ready. Car was mostly stripped anyway but the suspension and interior parts still had to come off. I’ve created a couple of dollies to move the car around and they will probably stay attached for the whole time it’s away. These are bolted very solidly to the shell so it moves around really easily on these. Even on very rough ground.
There's obviously a reason which I'm not seeing, so, a question for my own curiosity,
Why are the wheels not centred on the dollies?
MaximG
Well-Known Forum User
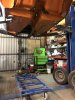
Drained the fuel out the fuel tank as best I could and managed not to swallow an petrol this time, ready to drop the tank out for the new one.
Did the thing I hate the most and got the car off the ground on all 4 corners.
Took the wheels off and must remember to swap round front to back when I put them back, to see if it resolves the wheel imbalance issue. Or it might be worth having them re balanced anyway as they are off.
Jobs to do, may re-ferb front struts completely as I want to change the front shocks so while I have them off again. Didn't do it while the was in bits last time as was going to go a different route. Also may upgrade the front breaks as have a PUG Toyota upgrade kit sat under the bench that I never got round to fitting.
Need to swap out the back bumper back to chrome and anything else I can think off while I'm under the car.
The biggest job I have in mind this time round is swapping out the R200 for the 3.9 R180 I had refurbished last year? Trouble is I have little faith they did a good job as had serious hassle dealing with them. So at the moment have very little faith in it to just try it out. Its a lot of work for it to be crap.
I hate putting it on 4 stands too. Takes forever.
Today I put the pistons in my "to sell" engine.
All the pistons and rods weigh the same within a gramme or so and the pistons have got little 3cc dishes to keep the compression ratio under 10.5:1 which should be safe for an e88 head.

Today I put the pistons in my "to sell" engine.
All the pistons and rods weigh the same within a gramme or so and the pistons have got little 3cc dishes to keep the compression ratio under 10.5:1 which should be safe for an e88 head.
Farmer42
Club Member
Finally made the decision on what to do about the issue of potential headlight switch burnout. I converted my headlights to H4 halogens a while back but hev been a bit concerned about posts about switch burnout due to extra load. I have been in 2 minds for quite a while to either get one of the wire harnesses with relays from MSA or to use LED bulbs. The former ends up at megabucks and the latter seems to have fostered a debate on legality ad there also seems to be a space issue between the back of the headlight unit and the bucket with the bulbs being too long and deep to fit in the space.
On the offchance I Googled to see if there were any H4 universal harnesses that replicated the MSA harness and I was pleased to say that there were loads. I took a chance and bought one from e-bay. It only cost £13 so not much to lose if it didn't work.
https://www.ebay.co.uk/itm/H4-Headl...e=STRK:MEBIDX:IT&_trksid=p2060353.m2749.l2649
I fitted it this afternoon with success. It took a bit of fettling and some adaptations to both the harness and the bodywork but it all works fine. Basically it is plug and play with the positive coming directly from the battery and a plug that joins into the socket from the back of one of the headlights. The oem wiring on the other side is redundant.
There were 3 issues to overcome when fitting. Firstly, getting the old plug out of the back of the headlight bucket which had to be cut off. I had to rejoin one of these on one side for the feed to the relay. I had a similar issue getting the new plugs on the harness into the headlight buckets. Luckily the plug dismantles and the wires fed through the small hole and I then clipped them back into the plug. The final issue was that the wiring from the relays to the shorter side was too short so I had to re-route it through a hole I drilled in the inner wing and it fed directly into the back of the headlight bucket. I mounted the relays on the inside of the front panel next to the radiator where there was a convenient screw hole and ran the live wire along the underside of the wing to the battery. The harness comes with a fuse in this line so is protected. I realise now that I should have taken photo's as I was going to aid this description but I got engrossed in ensuring I got it finished before it got dark.
The other job I got done today was to refit my clock after getting it repaired. I have one of the calendar clocks with a Citizen movement and it hasn't worked for ages. The mechanism was fine but there was an issue with the printed circuit board that drives the movement and a friend of mine that repairs TVs sorted it. All working nicely now and it was good to to get everything back together inside again.
Finally made the decision on what to do about the issue of potential headlight switch burnout. I converted my headlights to H4 halogens a while back but hev been a bit concerned about posts about switch burnout due to extra load. I have been in 2 minds for quite a while to either get one of the wire harnesses with relays from MSA or to use LED bulbs. The former ends up at megabucks and the latter seems to have fostered a debate on legality ad there also seems to be a space issue between the back of the headlight unit and the bucket with the bulbs being too long and deep to fit in the space.
On the offchance I Googled to see if there were any H4 universal harnesses that replicated the MSA harness and I was pleased to say that there were loads. I took a chance and bought one from e-bay. It only cost £13 so not much to lose if it didn't work.
https://www.ebay.co.uk/itm/H4-Headlight-Headlamp-Light-Bulb-Relay-Wiring-Harness-Socket-Plug-Wire-UK-Gifts/123967182083?ssPageName=STRK:MEBIDX:IT&_trksid=p2060353.m2749.l2649
I fitted it this afternoon with success. It took a bit of fettling and some adaptations to both the harness and the bodywork but it all works fine. Basically it is plug and play with the positive coming directly from the battery and a plug that joins into the socket from the back of one of the headlights. The oem wiring on the other side is redundant.
There were 3 issues to overcome when fitting. Firstly, getting the old plug out of the back of the headlight bucket which had to be cut off. I had to rejoin one of these on one side for the feed to the relay. I had a similar issue getting the new plugs on the harness into the headlight buckets. Luckily the plug dismantles and the wires fed through the small hole and I then clipped them back into the plug. The final issue was that the wiring from the relays to the shorter side was too short so I had to re-route it through a hole I drilled in the inner wing and it fed directly into the back of the headlight bucket. I mounted the relays on the inside of the front panel next to the radiator where there was a convenient screw hole and ran the live wire along the underside of the wing to the battery. The harness comes with a fuse in this line so is protected. I realise now that I should have taken photo's as I was going to aid this description but I got engrossed in ensuring I got it finished before it got dark.
The other job I got done today was to refit my clock after getting it repaired. I have one of the calendar clocks with a Citizen movement and it hasn't worked for ages. The mechanism was fine but there was an issue with the printed circuit board that drives the movement and a friend of mine that repairs TVs sorted it. All working nicely now and it was good to to get everything back together inside again.
It would interesting to see a wiring diagram for this. I think I understand it.
My concern is the one fuse to the relays i.e. if that blows you have no lights - main or dip. Am I right?
The original wiring gave you one per side (right or left headlamp) which was best.
Most people rewire by supplying main and dip from separate fuses.
Farmer42
Club Member
This is a diagram from a similar harness.
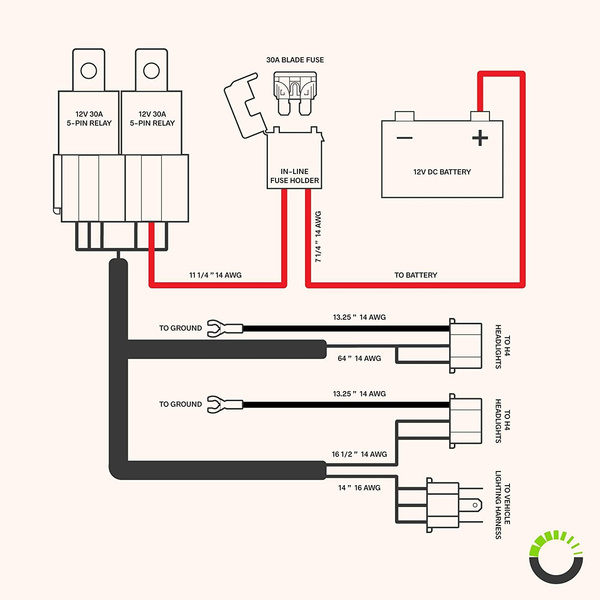
I hadn't thought about both main and dip failing if the fuse blows but I would say that probably would happen as all the live feed will be cut. Hopefully I won't have any issues but if I do, I will have to reconsider. I did notice that when I used the flasher button at the end of the indicator stalk, a separate relay clicked. Maybe that is on a different circuit and would work if the fuse blows. Next time I am in the car I will test it out.
I used the left side headlight plug as the switch feed as it was a shorter live wire to the battery along the left side. The right side was disconnected and is redundant.
....... I did notice that when I used the flasher button at the end of the indicator stalk, a separate relay clicked. Maybe that is on a different circuit and would work if the fuse blows. Next time I am in the car I will test it out.
In normal conditions the flasher sends -ve and +ve to the main-beam circuit whether the light switch is on or off however that will now stop at the new relays. As you know your headlights are now fed via the new fused circuit direct from the battery.


MaximG
Well-Known Forum User
Holy crap

That's what I thought too! 8700 RPM, it turns out, is too much.Holy crap
Alphabettispaghetti
Club Member
That's what I thought too! 8700 RPM, it turns out, is too much.
ooof. all ok? that cams had a lot of meat off it, possible vibration at those RPM and reduced pressure on the rockers given the base circle?
Huw
Club Member
Ohhh crap! Do you know the cause of the failure?
That's what I thought too! 8700 RPM, it turns out, is too much.
Seriously? 8700!