-
The Z Club relies on the support of it's paid members - join the club or renew your membership here.
You are using an out of date browser. It may not display this or other websites correctly.
You should upgrade or use an alternative browser.
You should upgrade or use an alternative browser.
Restoration 240z
- Thread starter MaximG
- Start date

uk66fastback
Club Member
Really nice job you're doing there. Can only bow to your thoroughness and attention to detail. It's what divides the very best cars from the also-rans ...
MaximG
Well-Known Forum User
Really nice job you're doing there. Can only bow to your thoroughness and attention to detail. It's what divides the very best cars from the also-rans ...
Much appreciated.
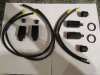
Ah right - the tubings look familiar now - very smart.Rebuild kits for the head light and lower wrap round front indicator wiring looms.
MaximG
Well-Known Forum User
So time for a little update.
Things are ticking along slowly. I have installed the S14 box but not sure its photo worthy IMHO.
So some photos of other stuff")


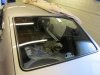
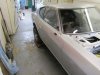
So as you can see the screens are now in. Took an age after having the interior done to getting the a guy to come round and put them in. The rear screen went in with out a hitch but due to unexpected issues the chap had to come back and do the front screen about two weeks later. Even then I had to install the SS finishing strip which was really really fun. But to be honest it ended up being quite satisfying and to pat myself on the back I made a good job of it.
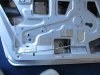
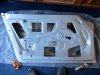
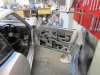
Due to unforeseen circumstances my plans to put the engine in had to be put on hold. So to do something I retrieved a door from the loft and started fitting it out which turned out to be a bit of a mindbender despite pre dismantle photos.

First stop a little sound deadening.

Then the fun could begin.

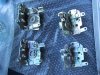
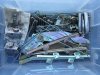
A mix of stuff but generally door internals. If it looks a lot you would be right for reasons I wont go into I have ended up two doors worth of internal parts. Only two window mechanisms mind you as mine were completely knackered.

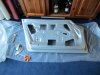
Which is early which is later, I couldn't figure it out. I only know mine were the ones with the conventional spring after looking at pre dismantle photos.

So the bell crank as its termed, who new there were different types. Again not sure which one predates which. Yes I have two of each.


New door handles, who new they were still available, well you do now.

Think someone might have got angry. This is typical of a lot of the rods I have, bent to suite. The best are obviously going on my car.
And that's it.
I have done a little more this afternoon. I will take some pictures of door internals installed and post up tomorrow.
Mike
Things are ticking along slowly. I have installed the S14 box but not sure its photo worthy IMHO.
So some photos of other stuff
So as you can see the screens are now in. Took an age after having the interior done to getting the a guy to come round and put them in. The rear screen went in with out a hitch but due to unexpected issues the chap had to come back and do the front screen about two weeks later. Even then I had to install the SS finishing strip which was really really fun
. But to be honest it ended up being quite satisfying and to pat myself on the back I made a good job of it.Due to unforeseen circumstances my plans to put the engine in had to be put on hold. So to do something I retrieved a door from the loft and started fitting it out which turned out to be a bit of a mindbender despite pre dismantle photos.
First stop a little sound deadening.
Then the fun could begin.
A mix of stuff but generally door internals. If it looks a lot you would be right for reasons I wont go into I have ended up two doors worth of internal parts. Only two window mechanisms mind you as mine were completely knackered.
Which is early which is later, I couldn't figure it out. I only know mine were the ones with the conventional spring after looking at pre dismantle photos.
So the bell crank as its termed, who new there were different types. Again not sure which one predates which. Yes I have two of each.
New door handles, who new they were still available, well you do now.
Think someone might have got angry. This is typical of a lot of the rods I have, bent to suite. The best are obviously going on my car.
And that's it.
I have done a little more this afternoon. I will take some pictures of door internals installed and post up tomorrow.
Mike
Attachments
-
 IMG_2091 (Medium).JPG287.5 KB · Views: 187
 -
 IMG_2090 (Medium).JPG339.8 KB · Views: 188
 -
 IMG_2089 (Medium).JPG255.7 KB · Views: 189
 -
 IMG_2087 (Medium).JPG177.4 KB · Views: 187
 -
 IMG_2085 (Medium).JPG241.2 KB · Views: 187
 -
 IMG_2084 (Medium).JPG210.1 KB · Views: 188
 -
 IMG_2083 (Medium).JPG200.5 KB · Views: 189
 -
 IMG_2082 (Medium).JPG185.7 KB · Views: 189
 -
 IMG_2081 (Medium).JPG151.9 KB · Views: 189
 -
 IMG_2080 (Medium).JPG192 KB · Views: 190
MaximG
Well-Known Forum User
Just the locking mechanism installed at the moment.


My intention is to now get the door on the car. Cavity wax the interior and then fit the rest of the internals.
My intention is to now get the door on the car. Cavity wax the interior and then fit the rest of the internals.
Attachments

MaximG
Well-Known Forum User
I've really enjoyed reading this thread, you're doing a fabulous job!! Your Z will be amazing
All looking really good, you have come a long way, its getting there!
Thanks guys very much appreciated. In all honesty it's taking a tad longer to put it back together than I anticipated. Doesn't help that my helper broke his wrist the other day
, am a little short handed.For anyone wondering, if I can I will help Tom out.
Mike
Alphabettispaghetti
Club Member
Hi Mike, any update?
MaximG
Well-Known Forum User
Well things have been moving on but slowly and to be honest with the fiddling I'm doing it doesn't seem worth taking photos, so I haven't.
The Passenger door is on with all internals fitted, and everything seems to work absolutely fine. However the drivers door is causing me headaches. I spent cumulatively the best part of a weekend trying to get the drivers door lock to work. Only to have an epiphany late on a Sunday afternoon that the reason why it didn't work was because the door was open which meant the striker was in the wrong place. Set the striker in the right place and low and behold it was absolutely fine.
The next problem was an issue that it didn't close far enough in. I changed the mechanism and back again and striker plate was adjusted all the way in. I ended up having to elongate the bottom holes in the striker plate to put it further into the car. Which I'm glad to say resolved the problem this should have been picked up by the body shop in my humble opinion.
Also after fitting I noticed the front of the door was touching up against that A pillar. This was an easy fix in that all I did was slacken off the hinge bolts get a club hammer and block of wood and adjust them backward. What pissed me off was that yet again this should have picked up and sorted by the body shop. They set the hinges in place doing trial fits with the doors and frames.
This Sunday just gone I fitted the glass into the drivers door and I cant seem to find an easy way to do it what a sod of a job. So after a lot of hassle its now in but unlike the passenger side I cant seem to get it working in any shape or form. The strange thing is I think I may have the front sash fitted incorrectly and if that's the case so is the passenger door which works fine lol.
So yep things are moving on but no pictures..... I will get some done this week and post them up if only to illustrate the problem.
Mike
MaximG
Well-Known Forum User
So the problems with the doors have largely been sorted, just took a while to get the adjustment right.
Messed around with the drivers rear quarter window. Having had the frames repaired and also the rear quarters replaced it meant the fixing holes weren't quite in the right place.
I'm still toying with the idea of trying to adjust the door position as I'm still not happy with it I think it could do with going down a few mm and then adjusted forward again. By my reckoning you need about three pairs of hands to do it which means I'm a few short.
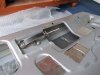
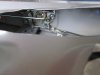
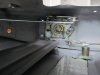
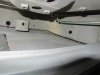
So anyway some pictures to give you an idea of where the car is at.


Messed around with the drivers rear quarter window. Having had the frames repaired and also the rear quarters replaced it meant the fixing holes weren't quite in the right place.
I'm still toying with the idea of trying to adjust the door position as I'm still not happy with it I think it could do with going down a few mm and then adjusted forward again. By my reckoning you need about three pairs of hands to do it which means I'm a few short.
So anyway some pictures to give you an idea of where the car is at.
Attachments


MaximG
Well-Known Forum User
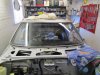
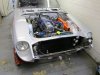
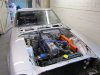
So ok made some progress over the weekend.
Bled the brakes and clutch up of Sat, I so hate that job.
Today saw me pop down Tesco fill up a Jerry Can with Petrol poor it in the tank and crank the motor over. Yep that's pretty much all I did for quite a while other than scratch my head in utter bafflement. Essentially couldn't get the dam think to fire. So as a last resort I swapped out the 280zx diss module for my spare and still nothing.... I was only a after a brief text conversation with ZedHead 240 and a lunchtime interlude with included watching F1 Chine that I went back to the garage with renewed enthusiasm. My first mission was to change the rotor arm and after finding one on the bench...... Hang on is that a spare or the one I took out while replacing the Ign Module, are !!!!.... Cleaned it up put it back in and hay presto we have a running engine first turn of the key...
Hang on ffs it only flipping works !!!!!!!!