JDM mirrors sourced at last!

Ped

Club Member
I have got a definitive answer to the positioning of the mirrors on the wing, if the photo was not enough. :D Its from a helpful chap (thanks Buster) on the zclub.nz site:

"I''ve got a 79 JDM 280zx S130 2+2. Just back on the road after about 6 years sitting in the back of the shed.

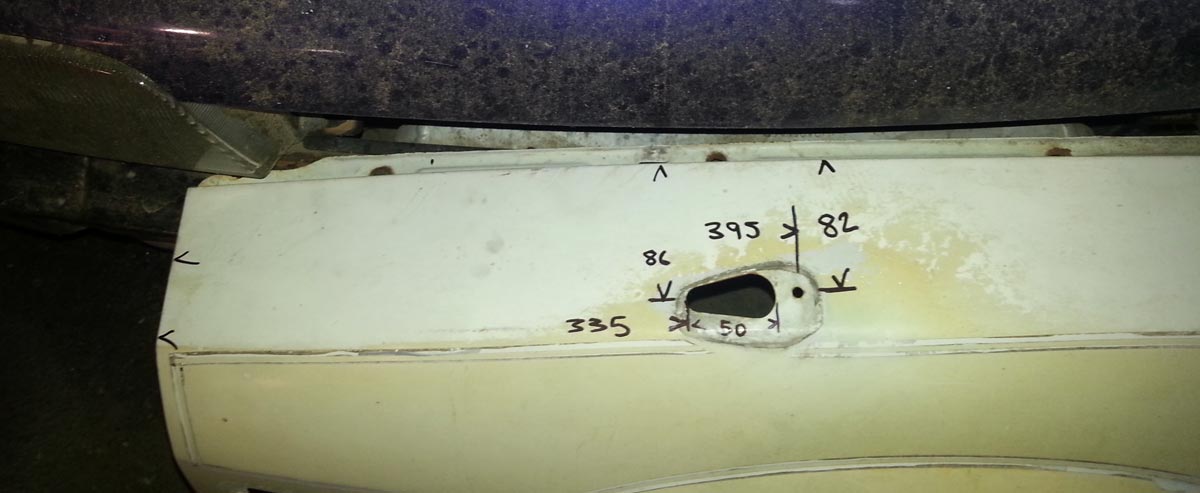
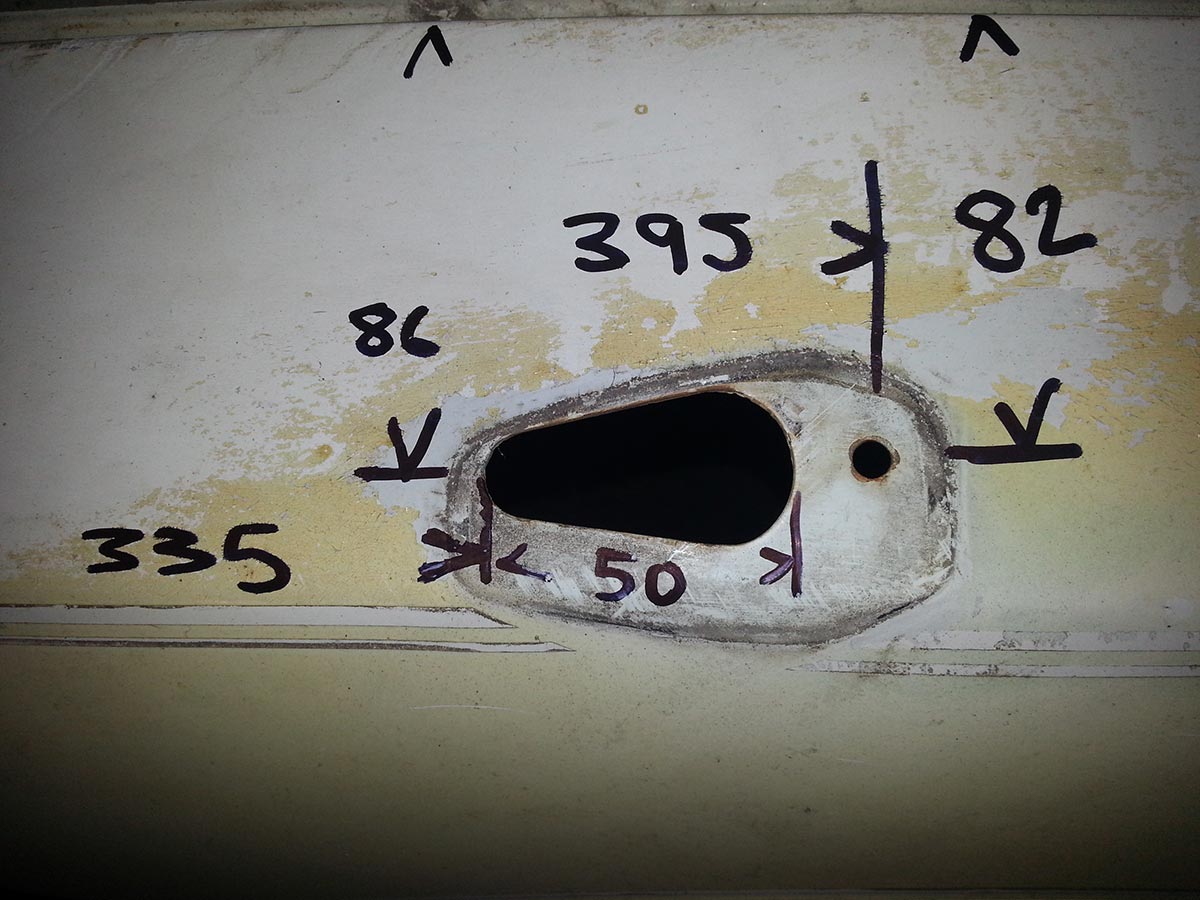
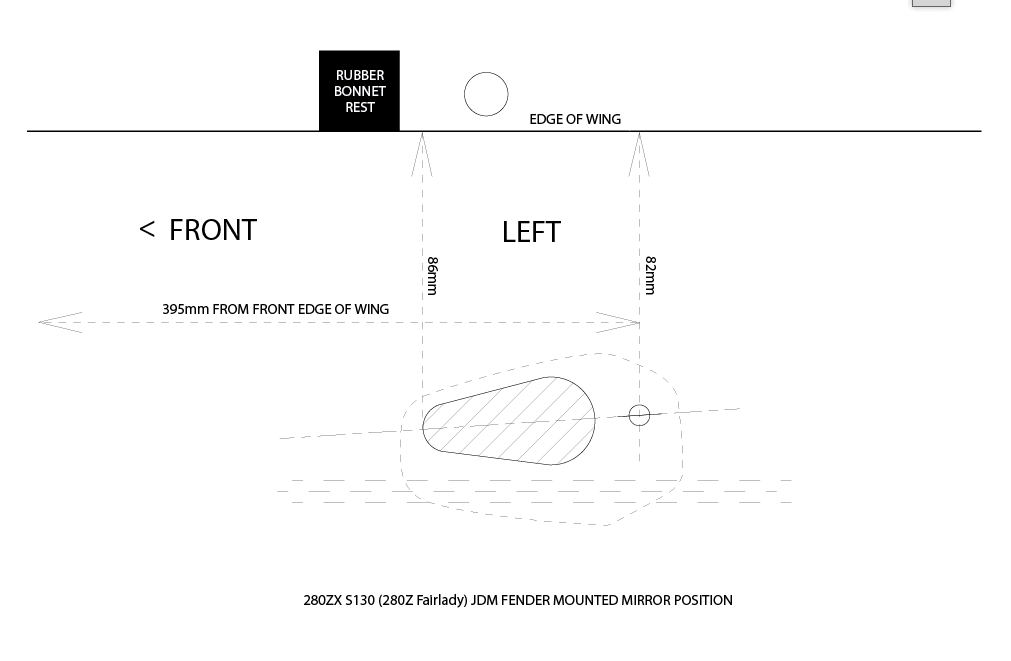
That photo looks correct to me. The leading edge of the mirror mount lines up with the trailing edge of the small rubber bonnet rest in the fender channel. Mine measured ~325mm from the front of the actual fender to the front of the mirror mount.

Mine are the same both sides. I'll take a photo if you want.

There is a fender screw in the channel about a third of the way back from the leading edge of the mirror mount."


:thumbs:
 

Ped

Club Member
Here they are in matt black enamel, I will need to get some satin lacquer to clear coat them.

black-mirrors.jpg


Had a bit of matt lacquer left so tidied up the trim. It will get the same satin finish as the mirrors.

satin-trim.jpg
 

Ped

Club Member
Big thanks to jp280 (aka Jeremy) from the zclub.nz for these really helpful pics. Top man!

dimensions-jdm-fender-holes280z.jpg


dimensions-jdm-fender-mirrors280z.jpg
 

Ped

Club Member
Looks like a nice paint job on those mirrors :thumbs: should look well when they're done

Cheers. Quite pleased so far, considering its just a rattle can job. Last bit is the satin lacquer, so will just take my time.
 

zNathan

Well-Known Forum User
Nice! Don't mean to sound like a brown-noser but I was honestly under the impression you had an airbrush haha..
 

Ped

Club Member
Nice! Don't mean to sound like a brown-noser but I was honestly under the impression you had an airbrush haha..

Yes, I do have an airbrush, but its only for small stuff hence the rattle cans. My spray booth was struggling to cope, and its mostly black now. :eek:

spraybooth.jpg
 
Last edited by a moderator:

Ped

Club Member
Cheers for the positive comments, but compared to the full restorations other have undertaken on here, my efforts are modest.

All I can say is; its all about the prep. If you rush it, it will look rubbish.

Just as an aside note: if you shake the rattle cans for 3 - 4 minutes to properly mix them (not the 2 minutes suggested on the label), and then keep the nozzle moving when you are spraying, and only do light coats, the results are not bad.

I am waiting on the satin enamel lacquer to be delivered (not that easy to get hold of for some reason), so I still have time to balls it up! :D
 

JEZ 280ZX

Well-Known Forum User
Hi,

Looking good!

I tend to use Smoothrite satin black paint for car parts as it doesn't need a lacquer coat or even an undercoat and tends to give a good finish if you're patient applying the coats!

Cheerz,
Jez
 

Ped

Club Member
Hi,

Looking good!

I tend to use Smoothrite satin black paint for car parts as it doesn't need a lacquer coat or even an undercoat and tends to give a good finish if you're patient applying the coats!

Cheerz,
Jez

I'll give that a go at some point, looks ideal for metal items. I probably could get away without using lacquer since it is enamel paint, but I want them to be hard wearing. The lacquer will just seal them nicely and the black won't look quite as 'flat'.
 

Ped

Club Member
The mirrors are now lacquered and reassembled. They have a bit of a sheen which is what I wanted, so they'll do a turn... I'm fast running out of excuses not to drill the holes in the wings. :D

s130-jdm-mirror-restored.jpg


s130-jdm-mirror-restored2.jpg
 
Last edited by a moderator:

Ped

Club Member
Switches were a bit rough so gave them a quick tidy up. Peeled off the 'chrome' and a bit of silver paint. Will keep an eye out for some in good condition.

switch-before.jpg


switch-after.jpg
 

Ped

Club Member
Not had any spare time recently, so the mirror job is taking its time... I have drawn up a hole template (which I need to check in on the car), if its right I will simply flip over the drawing for the right hand side. Once confirmed I will post it up as a PDF for the next person to use.

cutter-guide-wings.png


I am tempted just to mount them without the power, but if I do, chances are I will never get round to wiring them up, so am holding fire.

Next thing I need to do is have a look under the centre console to see if there is any wiring in place for the switches. My guess is no, but won't know till I have a look. If the wiring is there it will be heading off to the doors, not the wings... one thing at a time though.
 

Huw

Club Member
Hiya

Coming on a treat mate. Yes there should be connectors for the mirror switches under the centre console and corresponding connectors for the power mirrors in each foot well. These would have taken the cables for mirrors on the doors. But I guess you can use them and run the cables through the bulk head cable glands on each side into the engine bay and on into the inner wings for your mirrors.

Cheers

Huw
 

Ped

Club Member
Hiya

Coming on a treat mate. Yes there should be connectors for the mirror switches under the centre console and corresponding connectors for the power mirrors in each foot well. These would have taken the cables for mirrors on the doors. But I guess you can use them and run the cables through the bulk head cable glands on each side into the engine bay and on into the inner wings for your mirrors.

Cheers

Huw
That is what I am hoping for, so fingers crossed. Am going to get the mounting bracket welded later this week, just waiting to hear back from my contact exactly when.
 

Ped

Club Member
Still not got the bracket welded, hopefully next week.

Tested out my template on the motor, it looks about right, just some tweaking and its there.

template_position.jpg
 

Ped

Club Member
Had a look at wiring the mirrors. Under the centre console are the connectors I was hoping to find! :thumbs:

280zx_existing_unused_wiring.jpg


All I had to do was plug in the switches I have...

wiring_centre_console.jpg


After taking the drivers seat out, lifting the carpet, and half removing the side trim I came to the conclusion that the wiring probably appears again somewhere under the dash. So I removed the lower dash panel and... it was almost right in front of me! It was taped up onto a thicker part of the loom with light blue electrical tape. (It looks to me that any wiring connectors which are not in use in my spec car are tagged with blue tape. Thanks Datsun, very handy.) Here it is with tape removed hanging down...

connector_right.jpg


So I tested it with a multimeter to be sure the wires matched up with the switch, and they did. I then roughly wired up a mirror to test it - it works a treat!

right-mirror-test.jpg


The wiring for the left hand side is under the lower dash panel below the glove box, in almost the same position as the right, and again taped with light blue tape. Bit tighter in here...

connector_left.jpg


Question: are these 4 point connector blocks available new? It would make life much easier if I could get hold of a couple of new female ones. That way I can just plug them in.

Here are a couple of quick videos to see them in action. Kids, don't try this at home, my wiring method was purely a very quick try out. :lol:

https://youtu.be/jpgEHfjDaxs

https://youtu.be/hYYCWHf2ON0

OK. So it all works. The next step is to order up some cable.

Question: Can anyone advise what gauge/thickness I need to look for? I had thought of trailer cable, but would like to do it properly.
 
Last edited by a moderator:

Ped

Club Member
I also need to modify the trim on the centre console to take the mirror switches. I have already drilled holes for the switch stalks to come through, but they allow the switches to turn. Does anyone have a picture of the trim without the switches fitted? I want to find out on which face of the switch body they rest on. It is either a round hole with the bottom flat, or a round hole with a key notched out? Any pics would be helpful.

Decide to just have a go at this, since no-one replied and time marches on...
 
Last edited by a moderator:

Ped

Club Member
I got the trim for mounting the mirror switches modified yesterday. I measured up a cutter guide for the backing plate for the switches to push into, then printed it out on paper and stuck it to a 2mm thick scrap of perspex I had kicking around. I will put this cutter guide up on here when its all done, just in case anyone else needs to do the same.

trim-mounting-plate.png


I then just drilled out and filed it to shape with the bottom of the hole flat - (the inner circle is the hole to drill in the main trim body). The switches are now a good tight fit an don't spin around when you try to use them. It also adds a bit of strength so the main trim does not crack.

switch3.jpg


The slot in the top of the cutter guide centres the switches in the trim and locks into place in the back of the main trim body. The bottom edge of the backing plate is level with the bottom of the trim body.

switch2.jpg


Here it is finished.

switch1.jpg


Just need to plug it into the centre console. :smash:

The only thing missing from this bit is the white graphic with the arrows and the word 'mirrors', but since this is a hideous little icon, I think I can do without it! :D
 
Top