-
The Z Club relies on the support of it's paid members - join the club or renew your membership here.
You are using an out of date browser. It may not display this or other websites correctly.
You should upgrade or use an alternative browser.
You should upgrade or use an alternative browser.
Here we go again Derricks 260z restoration
- Thread starter candy red
- Start date


Good to see progress Derrick. It must feel good having a decent inner sill and floor.


candy red
Club Member
Unpicked the battery tray surprisingly not to much rust 


Need to figure out how to cut the whole footwell out along with part of the firewall in order to repair the whole lot in one piece making sure all relevant folds and joins are correct
Some quality repairs here amazing whoever welded this has only tacked the inner wing to the firewall truly shocking god only knows what would happen if it had been in an accident

Back in a while need to do some serious bracing before any cutting goes on
Need to figure out how to cut the whole footwell out along with part of the firewall in order to repair the whole lot in one piece making sure all relevant folds and joins are correct
Some quality repairs here amazing whoever welded this has only tacked the inner wing to the firewall
truly shocking god only knows what would happen if it had been in an accident
Back in a while need to do some serious bracing before any cutting goes on
candy red
Club Member
Thanks Rob ,yes does feel good to get sill and floor in and all the A post section sort and looking good , no rust there now and nice and solidGood to see progress Derrick. It must feel good having a decent inner sill and floor.
candy red
Club Member
Fantastic work! Keep the pictures coming, I really enjoy watching the progress
Thanks Peter glad your enjoying the thread still got a lot to do so will keep the pics coming so you can have more enjoyment
candy red
Club Member
It's coming together now! Great progress.
Cheers Ped
Still got some major repairs to carry out some of which may not have been detailed before
Ian
Club Member
Great work. I must really try and do a lot of TIG welding practice on my next leave, my bike project kept me back last time I as home.
Not sure I could do what you are doing though, all those badly repaired areas you are fixing would freak me out, so much mess. Messes with my OCD, how could someone leave something like that.
Not sure I could do what you are doing though, all those badly repaired areas you are fixing would freak me out, so much mess. Messes with my OCD, how could someone leave something like that.
candy red
Club Member
Great work. I must really try and do a lot of TIG welding practice on my next leave, my bike project kept me back last time I as home.
Not sure I could do what you are doing though, all those badly repaired areas you are fixing would freak me out, so much mess. Messes with my OCD, how could someone leave something like that.
Thanks Ian
Appreciate your comments as you know the sort of repairs I’m having to do looking at what you’ve had done to your car which is amazing
I’m sure you could done things equally the same as me ,it’s just a case of doing 1 part at a time and ignoring what’s already been bodged by others knowing your making things better and eventually you will see light at the end of the tunnel
candy red
Club Member
Done a little bit of bracing today,ready to cut the inner wing and the chassis rail from the firewall so I can replace the footwell in 1 piece. Inner wing will be held in place still with the air-tube and the bracing
Attachments
candy red
Club Member


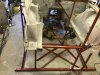
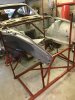
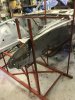
 Well started unpicking this donor pane that I’d brought about 3 years ago it had been acid dipped and ten e-coated .
Guessing it’s from an early 240z judging by the chassis numbers
surprised how much rust was between the welded seams just goes to show how dipping isn’t always the best option
View attachment 44326 View attachment 44326 View attachment 44327 View attachment 44328 View attachment 44329 View attachment 44330 View attachment 44331 View attachment 44332 Well started unpicking this donor pane that I’d brought about 3 years ago it had been acid dipped and ten e-coated .
Guessing it’s from an early 240z judging by the chassis numbers
surprised how much rust was between the welded seams just goes to show how dipping isn’t always the best option
Derek, that is from an early 260Z. RS not HS.
Hey Derek, that 'clip' that you bought could have been worth a few 'bob'.
candy red
Club Member
Arr right thanks for that Rob every days a school day probably the same as a 240z being an early 260 not exactly the same as my late 260zDerek, that is from an early 260Z. RS not HS.