Rushingphil
Club Member
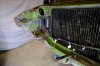
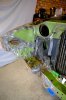
Have also removed the bumpers, lights and front wings. One of my biggest concerns and unknowns when I bought the car was the condition of the air dams, as the tops of these are obviously hidden by the wings. What I found was relatively pleasing; although there is a lot of surface rust, I don't think it's too bad - I've read threads where people have had to replace them and I honestly don't think my skills could cope with that!


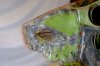
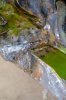
 . It was obviously then smothered with the 'stuff' to hide the deformations
  . In actual fact it's not too bad, but will need to sorted at a later date!