Another 2+2 Rebuild

spitdigger

Club Member
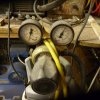
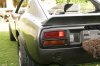
Having seen other rebuilds appearing I thought that I'd stick some progress (sooo slow though) shots of mine up. It's a 77 2+2, it has had a lot of work carried out by a previous owner, but not all of very well done though.
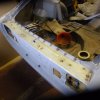
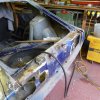
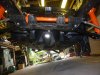
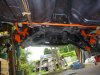
The chassis rails have been repaired and are sound, the inner wings have had some done, but for example under the battery tray was layers of plates and rust so that came right out. The drivers floor pan had been replaced with a donor section, but now after making it sound is more like a quilt. Sills have been replaced, the back end was fairly good though.
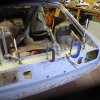
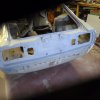
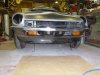
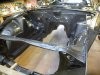
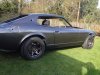
The shell has been in a rotisserie, without which I may well have given up, and the bottom is now sound, primed and stonechipped. It's now back on the wheels ready for the next job of swapping roof skins to get rid of the enormous sunroof.

I don't seem to be able to upload or attach photos at the moment, however there are a selection on Flickr; https://www.flickr.com/photos/67251416@N08/sets/72157645367276545/
 

Wyn

Club Member
Fair play, thats a lot of work gone into that :thumbs:

Keep the pics coming as always interesting to see how peeps rebuild & make things
 

spitdigger

Club Member
Cheers Wyn, feedback always welcome. Still can't upload photos directly but judging by the viewing stats the Flickr link works.
Jeff
 

spitdigger

Club Member
Roof skin swap

Took the off roof skin off today, nice and straight forward after clearing the lead loading and drilling out the spot welds. I knew there was some rust in the rear roof frame but it's a bit grim, luckily the donor roof and frame is in better condition. Rather surprised that that there was rust under the lead on one side, maybe the flux wasn't cleaned away totally that side.

Another plus the photo upload worked tonight.

Leaded joint.jpg

Skin off.jpg

Roof support rust.jpg

Jeff
 

Wyn

Club Member
Looks like its already had a roof change by them welds in pic one ?
I guess the rot is from the old jumbo sunroof letting in sun as well as water over time :D
 

andrew muir

Club Member
The factory rear quarters did not join there, they went up and under the roof skinabout 10-12 inches further. So as Wyn says looks like rear quarters were done at some time.
I am surprised by the amount of rot in rear of roof, my 2+2 was totally rust free from top of sills up!
Lots of rot below that though!!

Good luck with it!!
 

morbias

Well-Known Forum User
Well, that's not going to be an easy job to put right :eek:

Best of luck with it, that roof repair is definitely going to keep you busy!
 

spitdigger

Club Member
Roof update - the donor skin matches the original for position of the join and the style of joint & lead loading. Looking at the joints and the underside of the skins, it all looks factory finish. Fortunately the rear roof frame on the donor is in far better shape, thanks to not having a sunroof hacked in, so a bit of transplanting is in order.

Anyone had issues with rust around the vent apetures in the rear pillars? Looks like they need cutting out and repairing, from initial check one side may have had some repairs already.

Jeff
 

spitdigger

Club Member
Roof swap progress

Nice to see acccounts on here of other 2+2 rebuilds, progress on mine has been slow due to other things that are deemed more important - apparently major decorating being one of them.

I'm going to try to insert images in the text in the right order - as before if all else fails they are on Flickr

However things are moving, the donor frame section has been unstitched and when blasted will be ready to go in.
set-72157646570004979

I tacked a brace in before chopping the original section out, drivers side was marginally the worst.
set-72157646570004979


I've blasted the grot on the side frames and cut out the worst - trial fit of the repair piece.
set-72157646570004979

set-72157646570004979

The roof skin and tailgate have been on and off many times to get the position of the frame so I'm happy with the alignment all round.
set-72157646570004979


Jeff
 

spitdigger

Club Member
Back to the rust, thanks to a new slam panel from MrF this week, I managed to get the rear more or less sorted today. Blasted and primed the back panel and welded in the new slam panel - with just enough gas to do it. Forgot to exchange the cylinder during the week, remembered this morning. :unsure:
 

Attachments

  • Gas.JPG
    Gas.JPG
    717.7 KB · Views: 46
  • Done.JPG
    Done.JPG
    643.5 KB · Views: 53
  • Clamped up.JPG
    Clamped up.JPG
    696.7 KB · Views: 56
  • Blasted.JPG
    Blasted.JPG
    590.4 KB · Views: 57
  • Before.JPG
    Before.JPG
    896.5 KB · Views: 58

tel240z

Club Member
Back to the rust, thanks to a new slam panel from MrF this week, I managed to get the rear more or less sorted today. Blasted and primed the back panel and welded in the new slam panel - with just enough gas to do it. Forgot to exchange the cylinder during the week, remembered this morning. :unsure:

you mention blasted the rear panel Jeff what type of blaster do you use and whats it like ?

Terry
 

spitdigger

Club Member
I bought one of the 10 gallon pot set-ups via ebay. Chinese made, works well enough, being of small capacity I can run it around 80psi and my 3hp comp copes ok with that. I've used garnet and crushed glass, both fine for rust and paint removal. It's not mega quick but far less risk of panel damage. Valves, tips and hose don't last and it makes a lot of mess !!!

Jeff


http://www.ebay.co.uk/itm/10-GALLON-37-LITRE-PORTABLE-POT-BEAD-SAND-GRIT-BLAST-DIY-BLASTING-SANDBLASTER-/290979617867?pt=UK_Air_Tools_and_Compressors&hash=item43bfbc9c4b
 

spitdigger

Club Member
Long time without an update - it occurred to me the other day that the welder can have a rest until the next one now.

Underside, inside & engine bay done in BMW sparkling graphite - to my eye the 2+2 looks better in a dark colour, fuel lines and tank in while it was still in the rotisserie.

Doors & tailgate repaired, I stripped the bonnet of paint & filler and even deskinned it, then recalled seeing one in the classifieds previously - so long story short better bonnet acquired from Pmac.

Suspension blasted, rebushed and powdercoated/painted

It's now back on its wheels, door & tailgate insides & shuts painted (Seemed a good idea to give them a coat of stonechip internally as it gets in more than a spraygun before cavity wax)

Latest was a trial fit of the new (to me) front spoiler

More skim -guide coat - sanding before it's off final paint http://www.zclub.net/forum/images/smilies/thumbs.gif
 

Attachments

  • 21012319204_a500cffa54_z.jpg
    21012319204_a500cffa54_z.jpg
    80.6 KB · Views: 48
  • 21644081191_b2ea647abe_z.jpg
    21644081191_b2ea647abe_z.jpg
    91.9 KB · Views: 51
  • 21635159605_7731148fff_z.jpg
    21635159605_7731148fff_z.jpg
    86.8 KB · Views: 52
  • 18174307393_ed366a3f1c_z.jpg
    18174307393_ed366a3f1c_z.jpg
    80.9 KB · Views: 52
  • 18608732269_74cb02f59b_z.jpg
    18608732269_74cb02f59b_z.jpg
    105.6 KB · Views: 54
  • 18306664792_7d3f053e75_z.jpg
    18306664792_7d3f053e75_z.jpg
    98 KB · Views: 52

SKiddell

Well-Known Forum User
Carefull using those dark colours Jeff, and whatever you do don't black out your chrome .......folks will say it looks "dull" :rofl:

Joking aside I love it :bow:
 

spitdigger

Club Member
whatever you do don't black out your chrome .......folks will say it looks "dull"
Thank God I went with my inner teen for the orange struts - that might just save me from irredeemable dullness :)
 

spitdigger

Club Member
Long while since the last post, but it's finally got some colour all over. Took the opportunity to roll it out into the sun today to have a look over the finish and see it on the wheels properly - not unhappy with what I saw. Some minor defects to attend to but should be ok.
 

Attachments

  • IMG_0672.JPG
    IMG_0672.JPG
    3.2 MB · Views: 38
  • IMG_5451.JPG
    IMG_5451.JPG
    2.3 MB · Views: 34
Top