-
The Z Club relies on the support of it's paid members - join the club or renew your membership here.
You are using an out of date browser. It may not display this or other websites correctly.
You should upgrade or use an alternative browser.
You should upgrade or use an alternative browser.
280ZX, Never ending rebuild
- Thread starter Huw
- Start date
Huw
Club Member
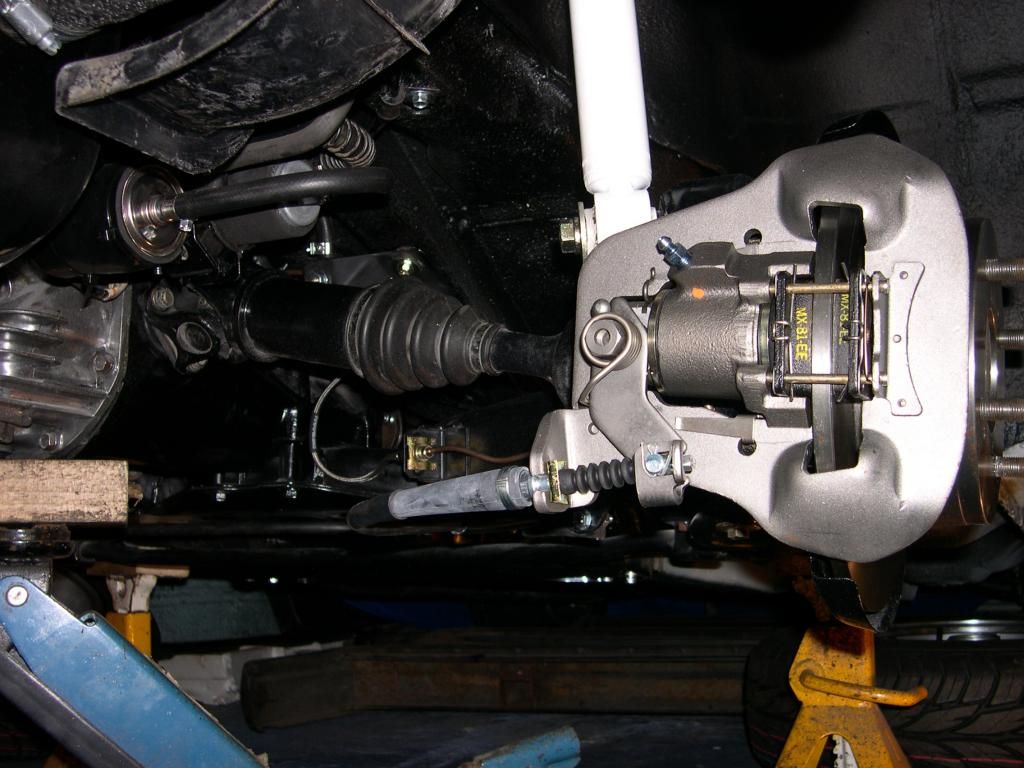
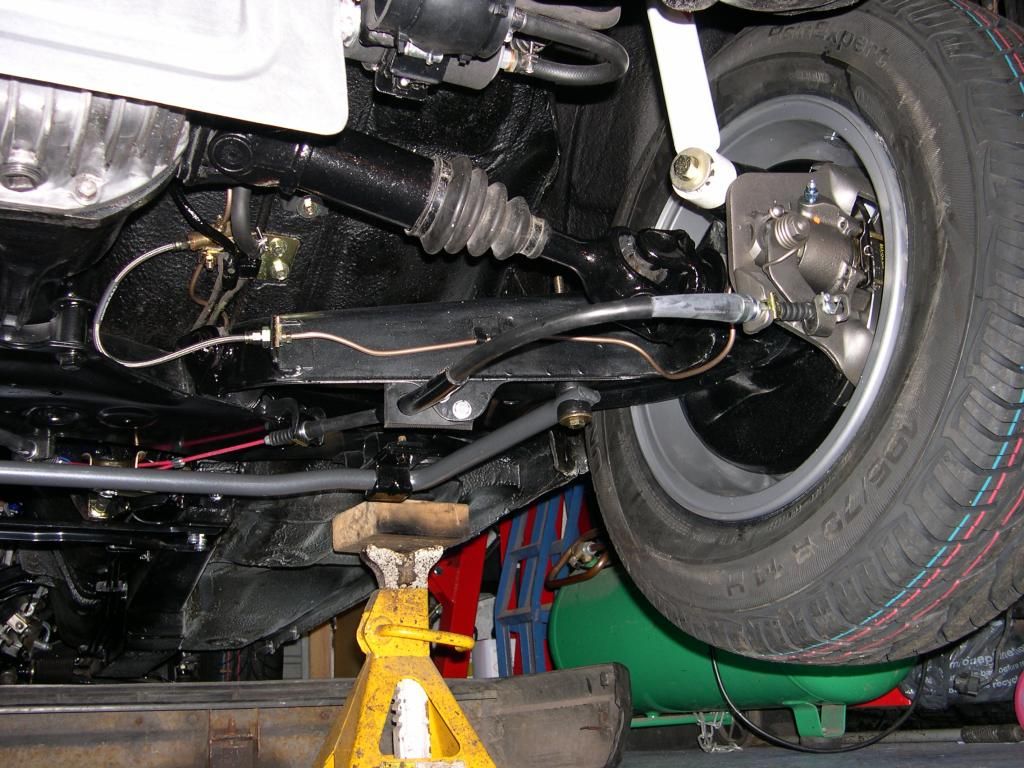
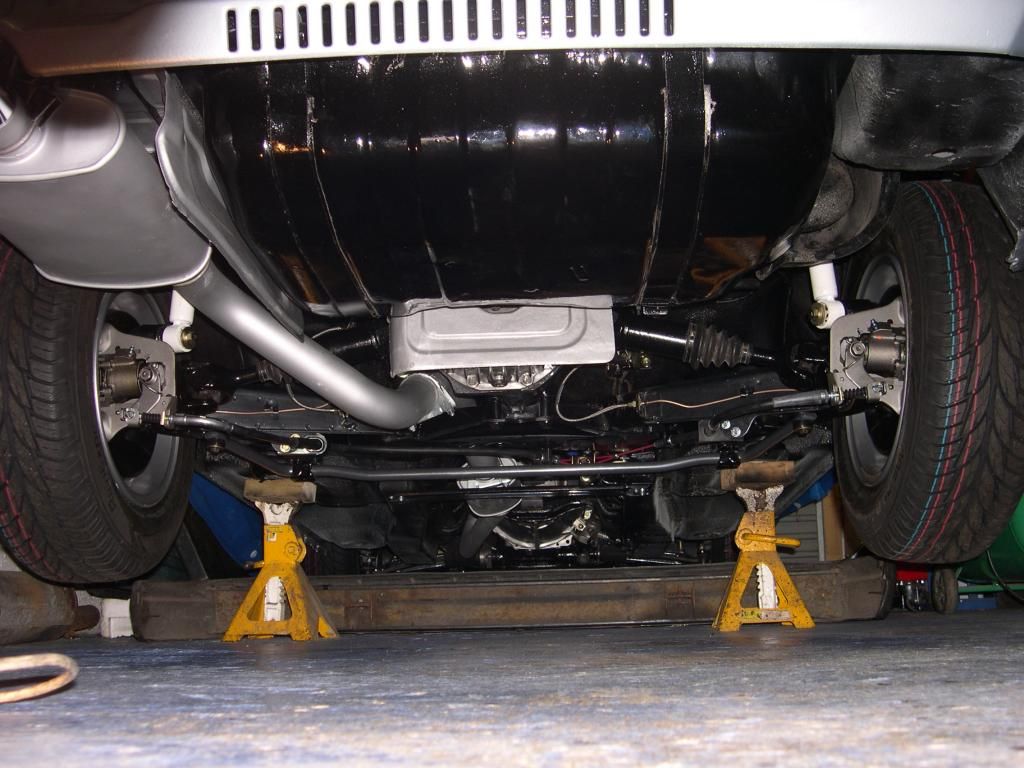
Not had chance to update this thread for a while, but progress is continuing at a steady if slow pace. I try to at least bolt something back on the car every time I visit the garage. The rear brakes are now all refurbished and new hardlines and stainless steel braided flexi hoses have also been fitted. Its nice to have a handbrake I can use instead of chocking the wheels with lumps of wood every time I have to push the car out of the garage to turn it around.
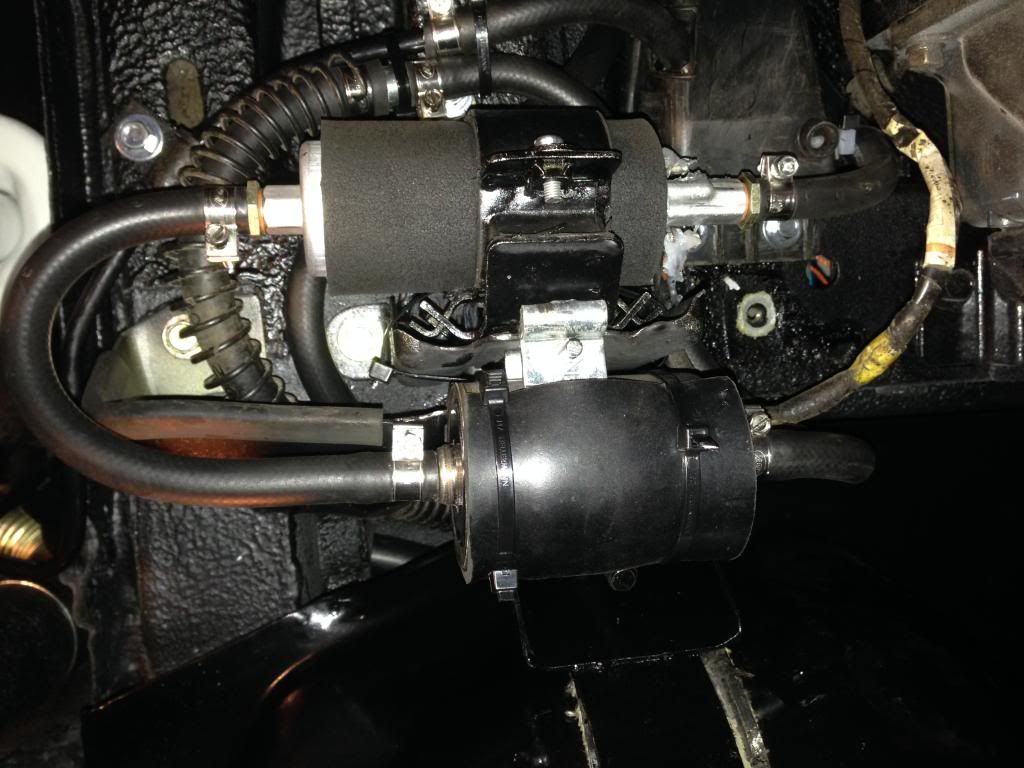
I’ve also had to completely re-plumb the fuel system with new hoses, refurbish the tank sender and fit a new fuel pump due to the sludge that was once fuel in the lines. The pump came from MJP and had a pre-filter as part of the kit. Finding a position for the pre-filter was a challenge. I ended up fabricating a bracket and piggy backing it to the fuel pump bracket (thanks Ped for the photos of yours). A sheet of 4mm rubber was wrapped around the pre-filter just to give a bit of protection, as its rather exposed where it is.
Whilst crawling around the underside I took the opportunity of cavity waxing everything one last time. I also swapped the rear sway bar with an uprated version again from MJP. Really easy to fit and nicely made. Just have to do the front one when I can turn the car around again.
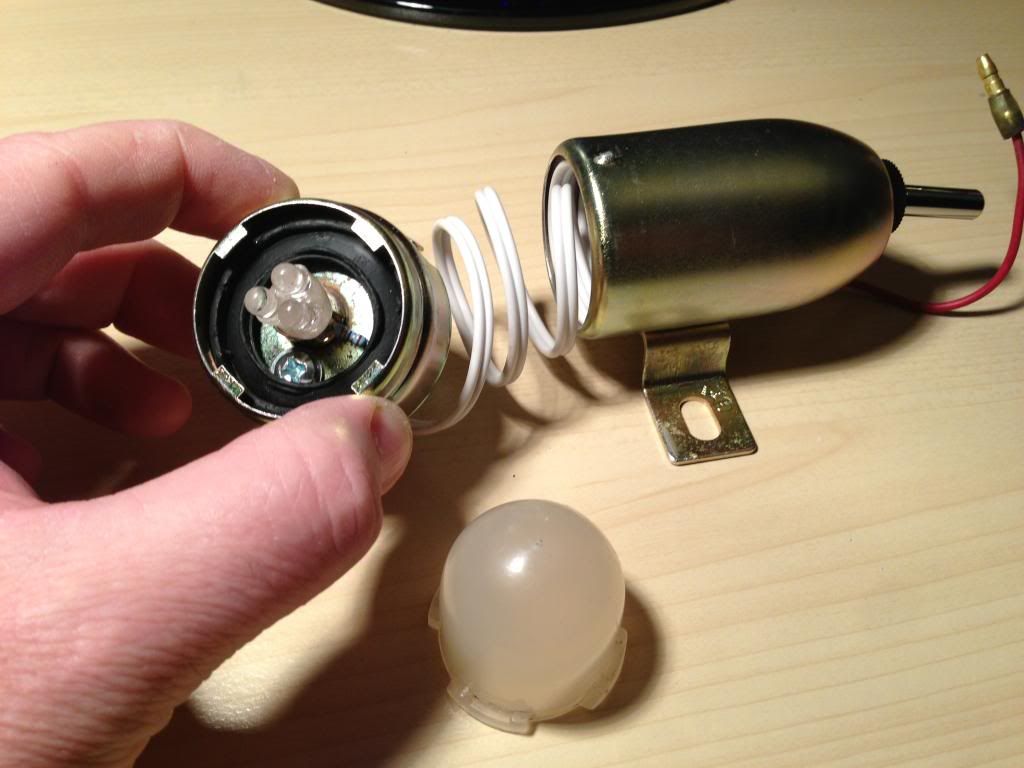
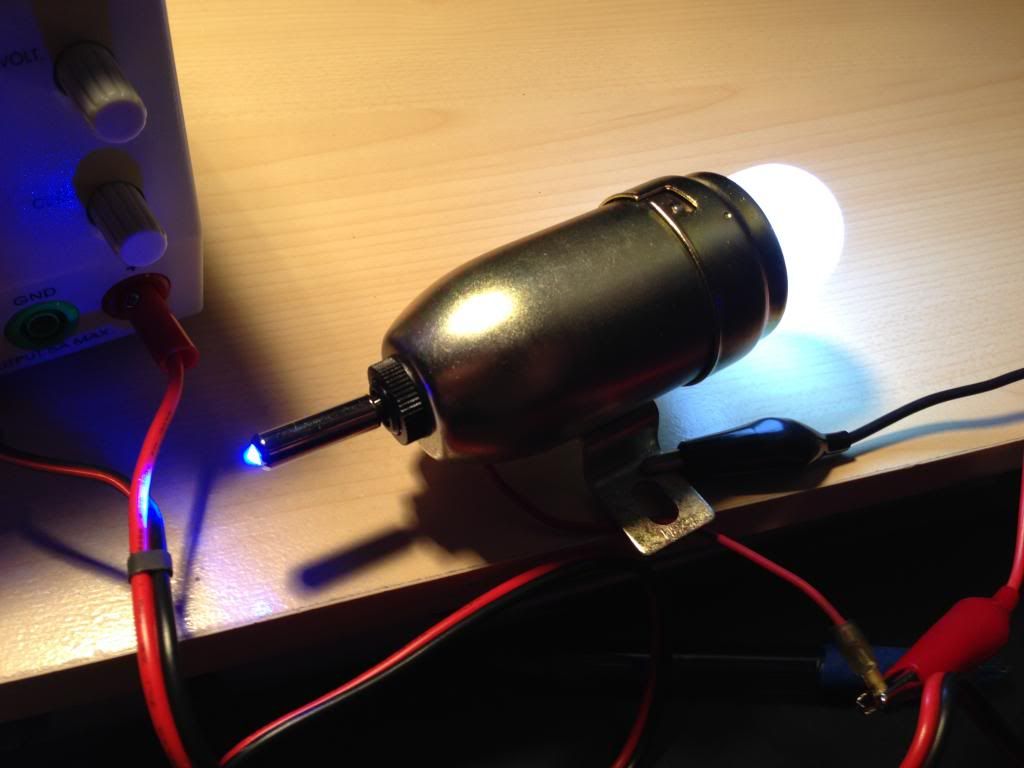
Just the wiring to complete and then I can tackle the interior proper. Whilst tinkering with the wiring I upgraded the under bonnet light (as if I have nothing else to do) with some ultra bright LEDs. I dunno why, seemed like a good idea at the time plus I liked the way the switch lights up - little things.. Right back to the wiring for me…..

I’ve also had to completely re-plumb the fuel system with new hoses, refurbish the tank sender and fit a new fuel pump due to the sludge that was once fuel in the lines. The pump came from MJP and had a pre-filter as part of the kit. Finding a position for the pre-filter was a challenge. I ended up fabricating a bracket and piggy backing it to the fuel pump bracket (thanks Ped for the photos of yours). A sheet of 4mm rubber was wrapped around the pre-filter just to give a bit of protection, as its rather exposed where it is.


Whilst crawling around the underside I took the opportunity of cavity waxing everything one last time. I also swapped the rear sway bar with an uprated version again from MJP. Really easy to fit and nicely made. Just have to do the front one when I can turn the car around again.


Just the wiring to complete and then I can tackle the interior proper. Whilst tinkering with the wiring I upgraded the under bonnet light (as if I have nothing else to do) with some ultra bright LEDs. I dunno why, seemed like a good idea at the time plus I liked the way the switch lights up - little things.. Right back to the wiring for me…..


fae821w
Club Member
Huw,
The car looks outstanding, I have been watching your thread since we met at the NEC, when do you think it will be on the road?
Took mine out of the garage last week, first time it had seen the light of day since Novembers Show, it started on the button and purred.
I have been helping my youngest Son with his purchase, a 1972 Cortina Mk 3 , so the few minor jobs on the Z will have to wait.But then I can just drive it.
See you at Japfest?
Andy.
Huw
Club Member
Thanks for the comments Andy, it was good talking to you at the NEC. Your car looked great, black really goes well. I've got the wiring and interior to complete. But time is difficult to find at the moment, so maybe a while yet. Hope to catch up at Japfest. Wish you and your son well on the Cortina project. We had one of those as the family car, I seem to recall it spent more time in the garage than on the road back then. But it was elderly when we had it!
Huw
Huw
Huw
Club Member
Finally sorted out the spaghetti under the bonnet. As the loom has been out of the car for years all the little labels on the wires I had so carefully done had come off, thankfully the loom is really easy to reinstall. I replaced all the cable tidies with blue conduit to match the rocker cover colour scheme. Blue is not for everyone but I like it. So here are some picture:
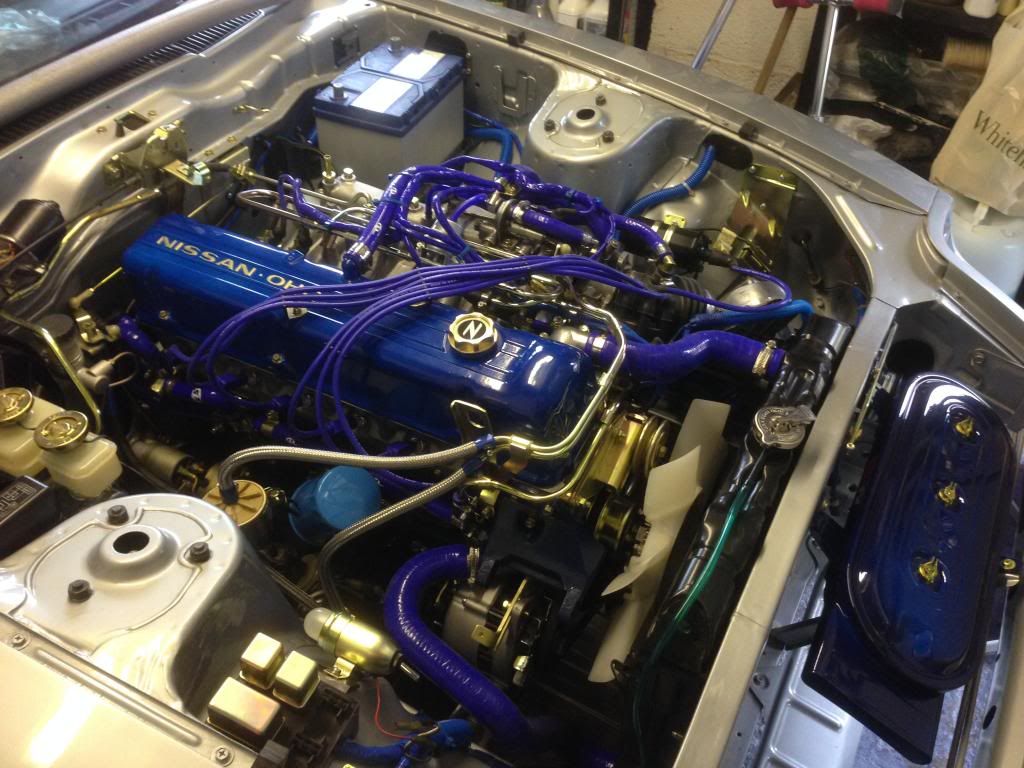
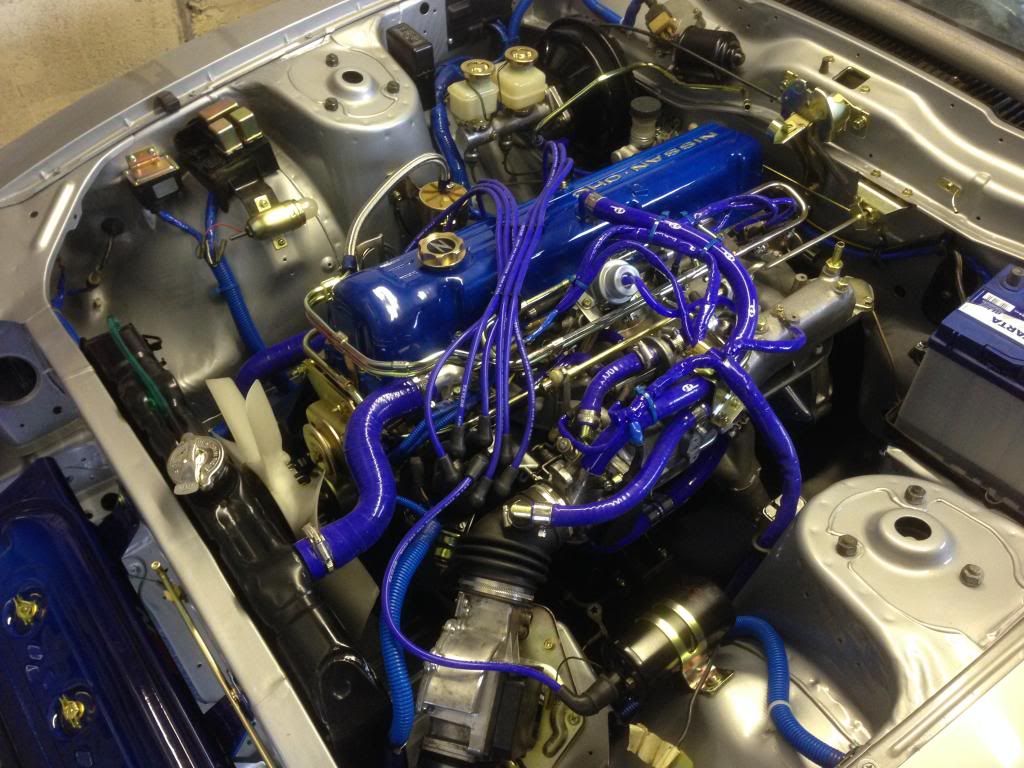
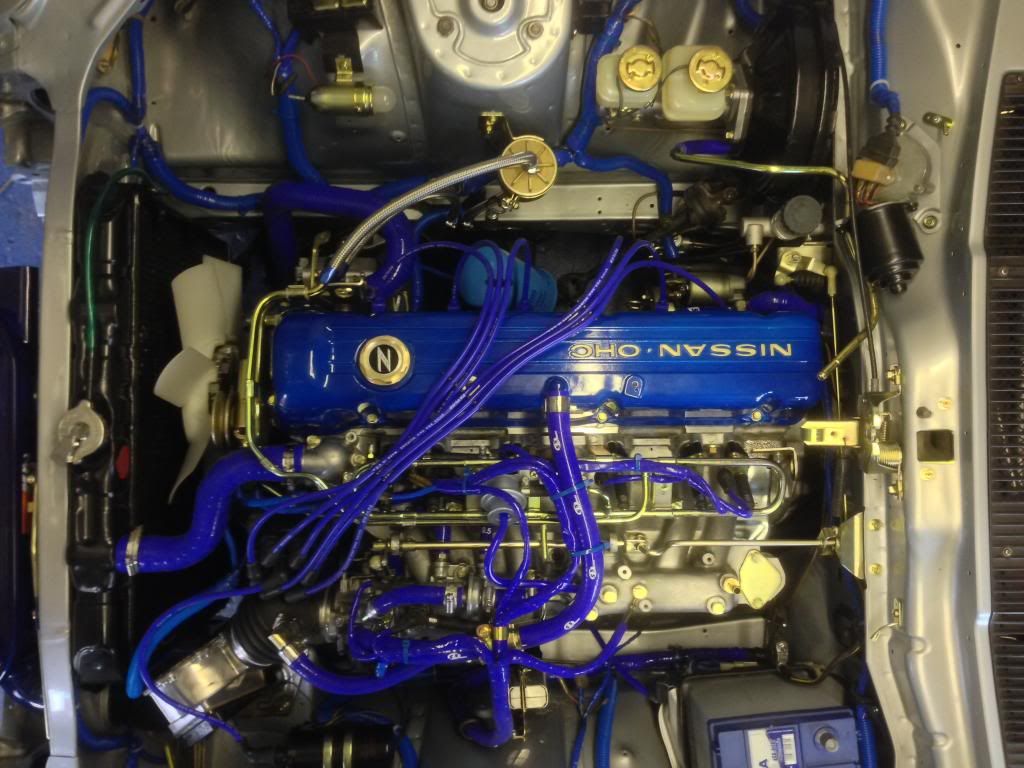
So with all the wiring done I wanted to see if the old girl would start. First turn of the key and it turned over but didn't catch - no fuel getting to the engine. Found the problem - me - I plumbed the feed and return up incorrectly… That fixed and it did start first turn of the key. This is my first complete overhead cam engine rebuild, so I'm very pleased that it runs and it sounds soooo damn good.
http://s1358.photobucket.com/user/huwsef/media/EngineStart_zpsc874c0ea.mp4.html
Last edited by a moderator:
fae821w
Club Member
Huw,
That makes two of us who like it in blue, really does contrast well with silver.
Recently picked-up some bits from Neil in Worcester, he said you had visited him.Out of interest was your car in the condition of his car when you started the resto?, he tells me you said to him not to scrap the car as someone could restore it, it looks a mess to me.
Andy.
I have huge admiration for people who work to these standards 
Huw
Club Member
Damn and buggeritt!
Today is not a good day. Fiddling about with the engine when I noticed coolant seeping from the head gasket along by cylinder 1&2 and 5&6. Head bolts were re-torqued after running up the engine for the first time over the Easter break. Not started it since.
So going to have to strip off the head and check the flatness of the head. I should have done it after getting it back from the machine shop. A learning point there I think.

Huw
Today is not a good day. Fiddling about with the engine when I noticed coolant seeping from the head gasket along by cylinder 1&2 and 5&6. Head bolts were re-torqued after running up the engine for the first time over the Easter break. Not started it since.
So going to have to strip off the head and check the flatness of the head. I should have done it after getting it back from the machine shop. A learning point there I think.
Huw
Mrs HollowPoint
Well-Known Forum User
nooooooooo! Damn bad news.  .... try try try again eh
.... try try try again ehAlphabettispaghetti
Club Member
Damn and buggeritt!
Today is not a good day. Fiddling about with the engine when I noticed coolant seeping from the head gasket along by cylinder 1&2 and 5&6. Head bolts were re-torqued after running up the engine for the first time over the Easter break. Not started it since.
So going to have to strip off the head and check the flatness of the head. I should have done it after getting it back from the machine shop. A learning point there I think.
Huw
******. Did you have the block decked also?
Ian Patmore
Well-Known Forum User
Its frustrating when you think you are getting somewhere, then.... you WILL get there.
Huw
Club Member
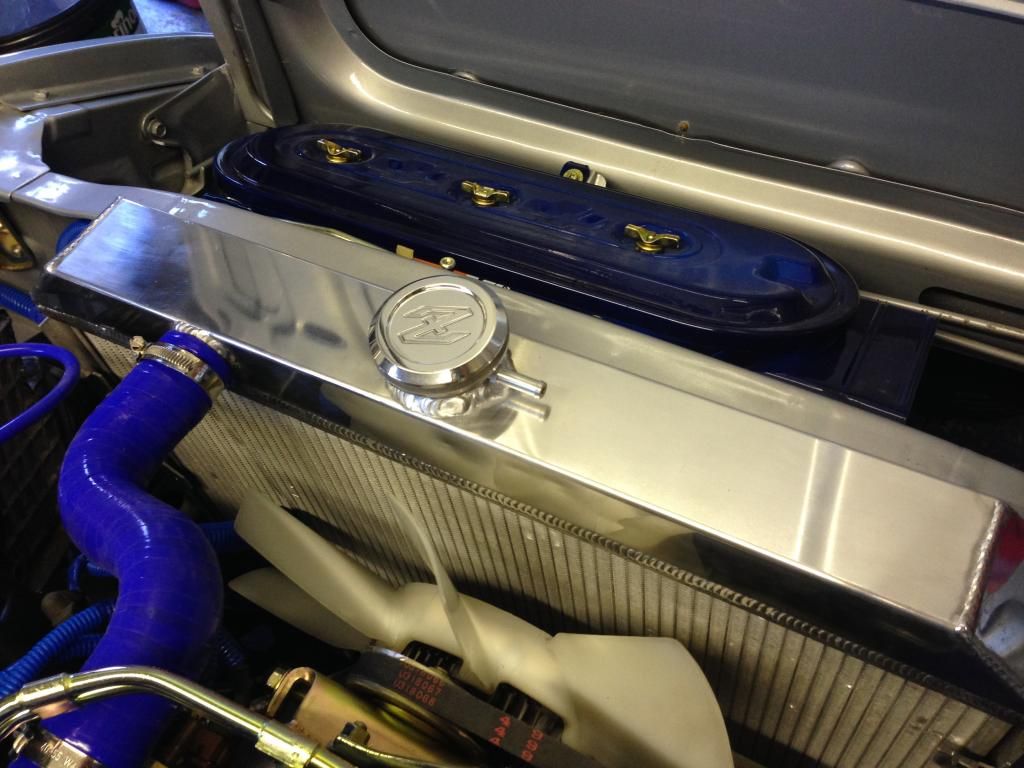
Finally fixed the leaking head. I stripped the head off AGAIN and rechecked the flatness of both head and block, no problems there as all within tolerance. I can only think it was a bad gasket, but on inspection it looked ok?? Bolted all back together with new gasket - no leaks  Whilst there I also decided to replace the radiator with a Aluminium 3 core unit. Shiny
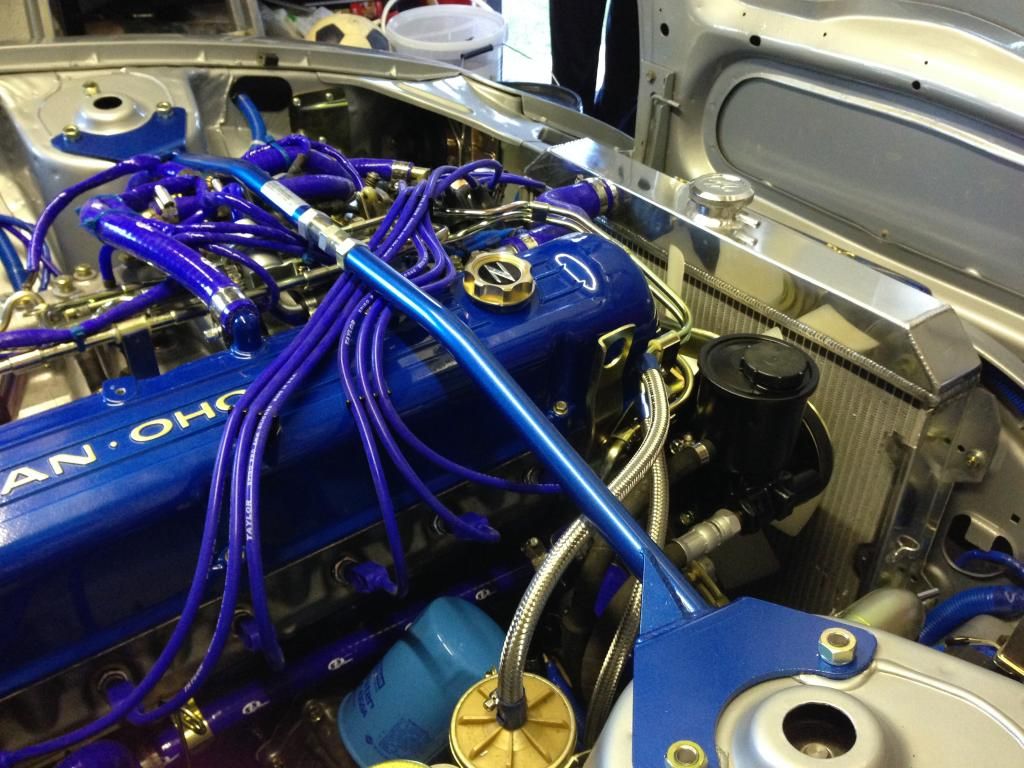
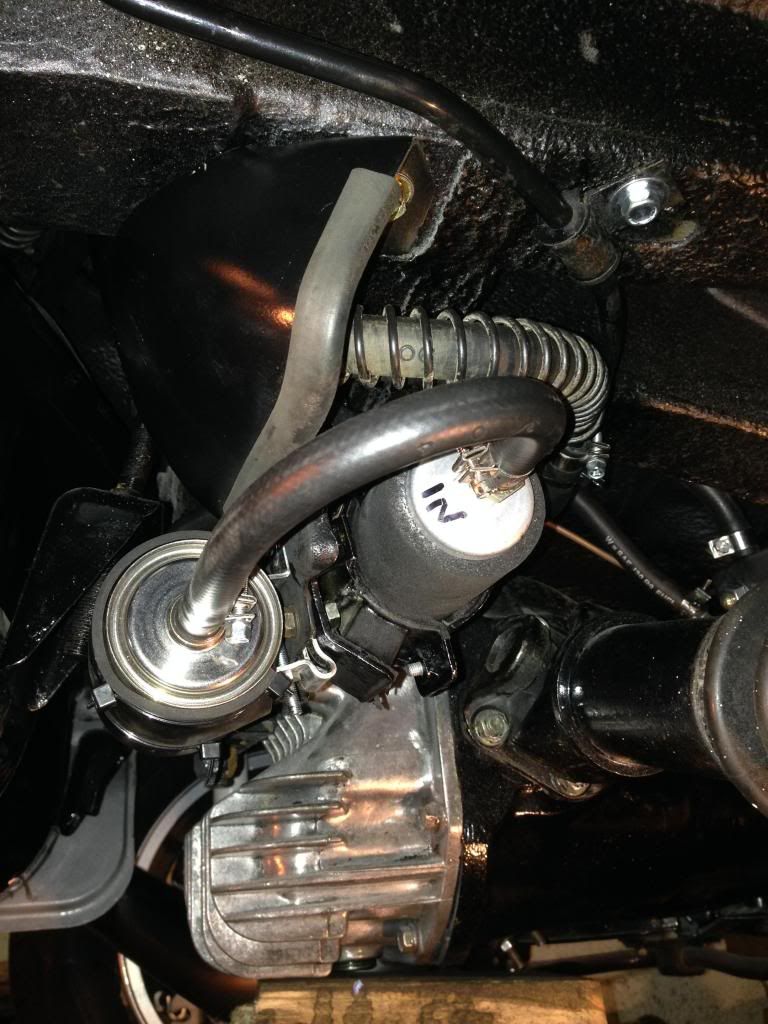
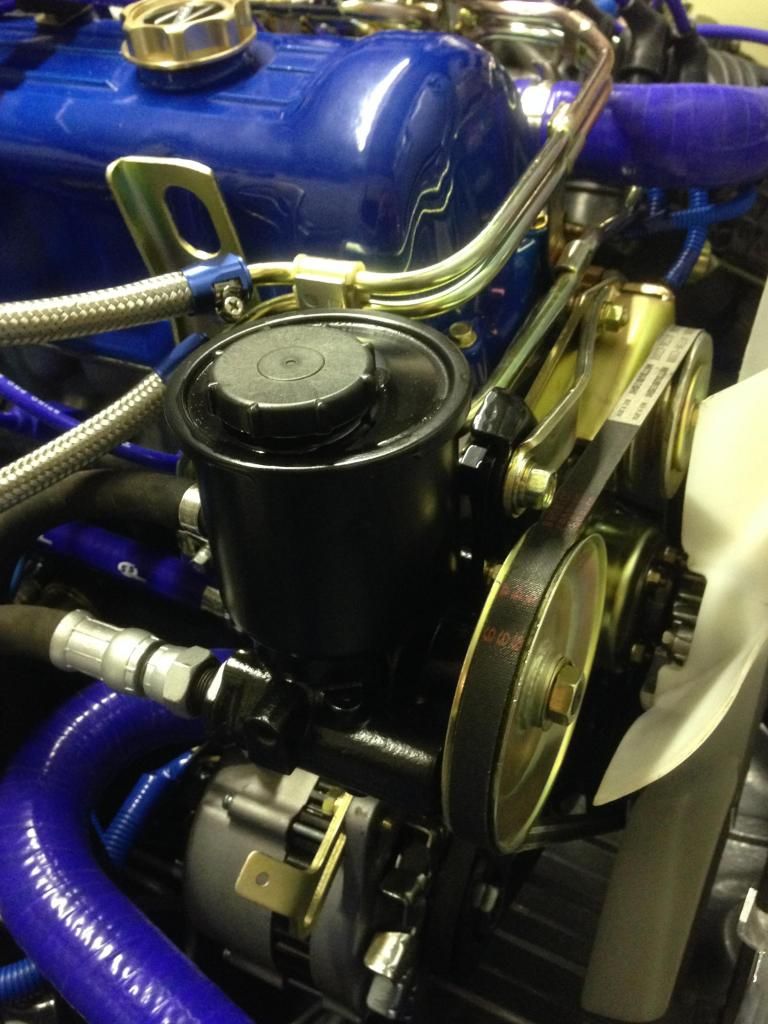
I have also refurbished and fitted the steering pump taken from a later model to go with the steering rack conversion that I did earlier.
After another trial run-up of the engine, spotted yet another leak. The heater matrix this time. Only noticed when steam started coming from the top dash heater vents when the engine got up to temperature. So back out with most of the dash I had only just finished to replace it. I would appear that the matrix had leaked in the past and some leak sealer was used to plug the leak this decided to fail once the systems was wet again. One new matrix and problems solved.
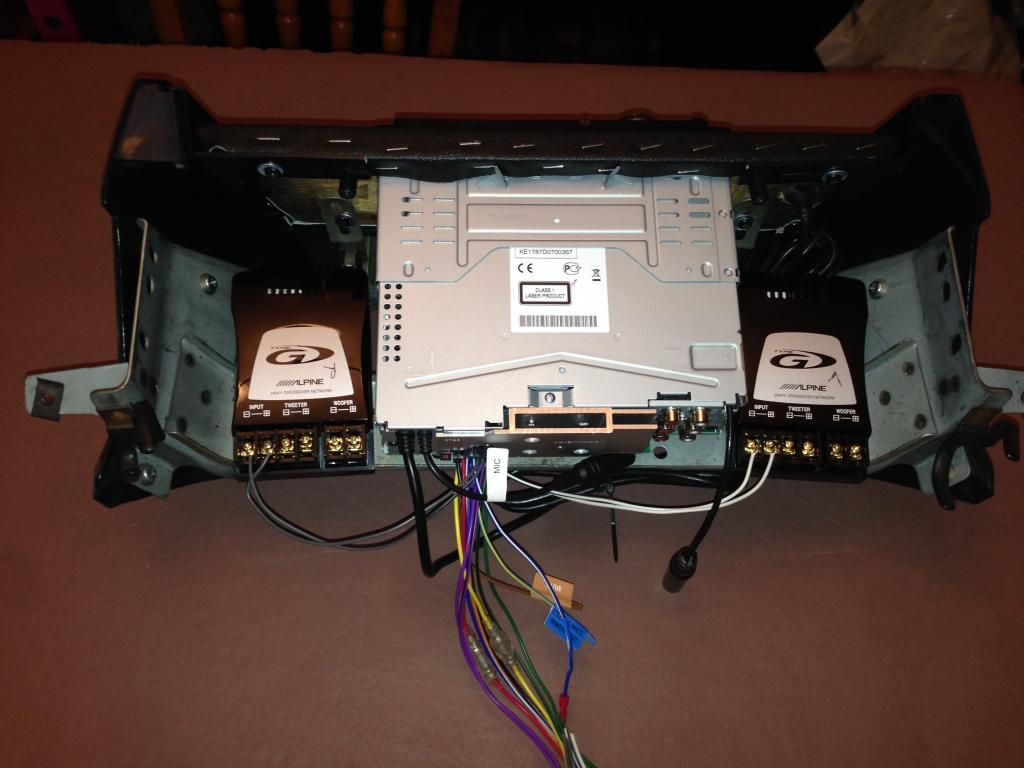
With the dash out I thought I would sort out the stereo whilst the wiring was exposed. This had been butcher by successive owners so needed to be rewired to suite an after market head unit. The cross-overs for the speakers fitted quite nicely in the stereo binnacle.

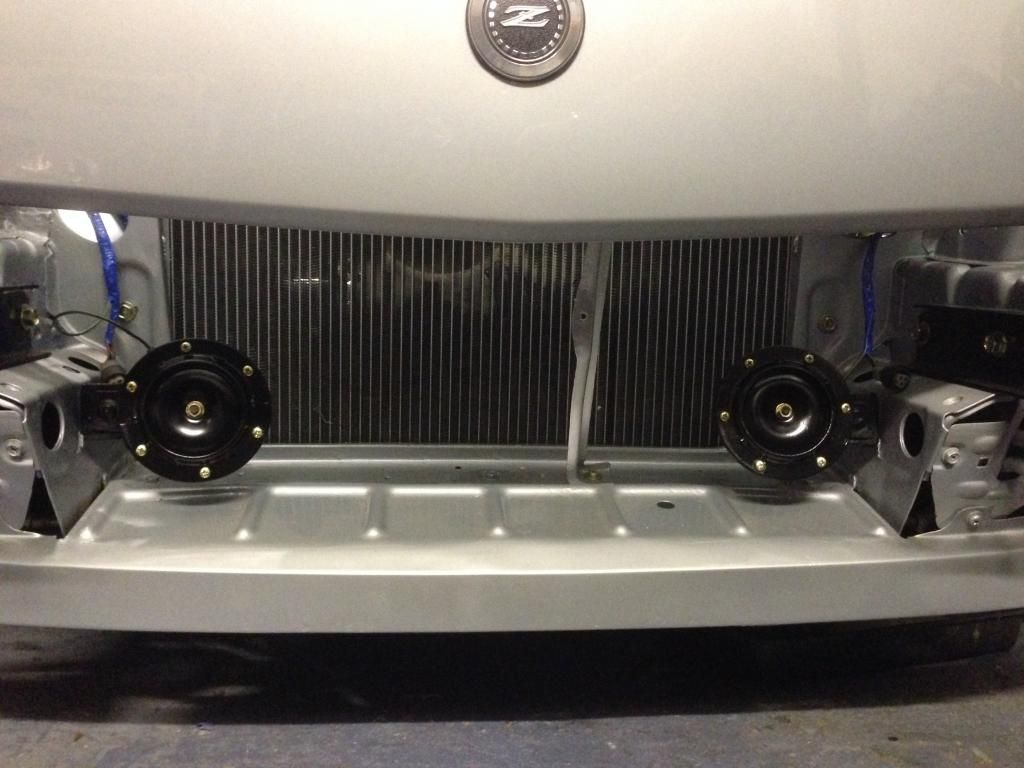
Horns were also refurbished and fitted to try and get an MOT this side of winter.
Just got to finish refurbishing the bumpers and its good for an MOT. Just the little matter of the interior to complete but I have to wait on the trimmer to recover the seats and door cards before I can say the project is done, more to come…...
Whilst there I also decided to replace the radiator with a Aluminium 3 core unit. Shiny 

I have also refurbished and fitted the steering pump taken from a later model to go with the steering rack conversion that I did earlier.

After another trial run-up of the engine, spotted yet another leak. The heater matrix this time. Only noticed when steam started coming from the top dash heater vents when the engine got up to temperature. So back out with most of the dash I had only just finished to replace it. I would appear that the matrix had leaked in the past and some leak sealer was used to plug the leak this decided to fail once the systems was wet again. One new matrix and problems solved.
With the dash out I thought I would sort out the stereo whilst the wiring was exposed. This had been butcher by successive owners so needed to be rewired to suite an after market head unit. The cross-overs for the speakers fitted quite nicely in the stereo binnacle.


Horns were also refurbished and fitted to try and get an MOT this side of winter.

Just got to finish refurbishing the bumpers and its good for an MOT. Just the little matter of the interior to complete but I have to wait on the trimmer to recover the seats and door cards before I can say the project is done, more to come…...