260z Restoration - Let's get started

Turn & Burn

Club Member
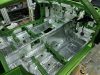
Finished the soundproofing today, the car looks like something created by NASA for a space adventure now. Very therapeutic work, it really brings out the attention to detail in me. All internal exposed panels that can ‘drum’ are done. I’ve put a single sheet on the roof too. Probably about 15kg of mass added which is a significant amount, but I think worth it.
Also made up a couple of 25mm bumpsteer spacers on the mill / lathe, I’ll fit these once I’ve got the longer bolts.
 

Attachments

  • 2605A233-7015-4C00-A092-28F6BE65C783.jpeg
    2605A233-7015-4C00-A092-28F6BE65C783.jpeg
    549.4 KB · Views: 98
  • 3CF1B396-475E-423B-8084-0CDB8D75EBB4.jpeg
    3CF1B396-475E-423B-8084-0CDB8D75EBB4.jpeg
    476.6 KB · Views: 95
  • 77B90398-C39C-4C37-BB50-D1E18D757DFC.jpeg
    77B90398-C39C-4C37-BB50-D1E18D757DFC.jpeg
    506.7 KB · Views: 97
  • 36F0B5A4-4265-4BC1-999D-D4CAA1023077.jpeg
    36F0B5A4-4265-4BC1-999D-D4CAA1023077.jpeg
    91.6 KB · Views: 91

uk66fastback

Club Member
Probably meant nice - blame autocorrect ...

I did my old fastback with Dynamat - good stuff but expensive. I see you have some on the firewall. I did the same and then covered it with the replacement factory sound-deadener - turned out okay and stopped a lot of heat soak from the V8 and headers.
 

Ian

Club Member
That looks great, nice neat work.

Are you going to use some mass loaded vinyl in places as well? as that is the best way to keep the noise out, the matt stops the vibration from the panels and the heavy vinyl layer blocks the sound.
 

Turn & Burn

Club Member
That looks great, nice neat work.

Are you going to use some mass loaded vinyl in places as well? as that is the best way to keep the noise out, the matt stops the vibration from the panels and the heavy vinyl layer blocks the sound.
I’m going to use MLV across the bulkhead, not sure on the floors yet, it’s heavy stuff!
 

Ian

Club Member
Depends on how quiet you fancy having it. I am not too fussed so will be only adding some to the bulkhead and around the gearbox to keep weight down. But for others having a much quieter car is worth the extra 10-20kg.
 

toopy

Club Member
Wouldn't it be better to have less sound deadening and more overall coverage with MLV, thus saving a bit on weight?
I thought the sound deadening was mainly to stop thinner panels resonating, as in the floors, doors and roof etc and not areas like the transmission tunnel which is much thicker.
 

Turn & Burn

Club Member
Wouldn't it be better to have less sound deadening and more overall coverage with MLV, thus saving a bit on weight?
I thought the sound deadening was mainly to stop thinner panels resonating, as in the floors, doors and roof etc and not areas like the transmission tunnel which is much thicker.
Maybe I’ve gone overboard on the deadening, it was just based on the advice of the sound deadening stores, although the tunnel is the same metal thickness though as far is I can tell from my resto work.
I’ve just received the MLV it’s not actually that heavy, I’m quite surprised. I got Dodo Soundstopper which I was advised as being the best stuff out there (by an independent!) I’ll possibly do a wrap over the gearbox now.
 

Ian

Club Member
Yes, from my understanding, 50% coverage per panel is fine for the Butyl matt an then you could cover more with the MLV. MLV can be quite heavy but the stuff I have isn't too bad, can't remember the brand, might be Dodo.

I'm aiming to go for about only 40% coverage per panel with the Butyl Matt, really don't want to add unnecessary weight.
 

Turn & Burn

Club Member
Insulation is more or less completed now, I added a further MLV panel to the bulkhead to replace the original crumbled matting, using original as a template where I could. Moved on to the cabin wiring loom which I’d previously un-taped and. replaced a few knackered cables. Looks like a new loom now.
Install on this went ok so proceeded onto installing the heater boxes, pedal box, brake servo and a new master cylinder. I’ve gone with a 1” cylinder to support the larger brakes disc brakes front and rear.
I’ve been toying with a Corsa EPS (power steering) conversion for a while so thought I’d have a go at this. I think it’s going to be a difficult install without cutting the steering column support (if anyone has done it please drop me a line). I’m not sure if I want to start cutting bits out.
 

Attachments

  • EA476E1A-299C-4D3A-B004-E15DA26CF632.jpeg
    EA476E1A-299C-4D3A-B004-E15DA26CF632.jpeg
    120.4 KB · Views: 87
  • 4DA54783-7BF5-4F2D-8399-0A3CD7237326.jpeg
    4DA54783-7BF5-4F2D-8399-0A3CD7237326.jpeg
    155.9 KB · Views: 85
  • 2A029E17-D064-4502-B659-D0A9BCD6A7C2.jpeg
    2A029E17-D064-4502-B659-D0A9BCD6A7C2.jpeg
    152.8 KB · Views: 85
  • 65548CE3-F45F-4A5F-9E40-DC9BD263F168.jpeg
    65548CE3-F45F-4A5F-9E40-DC9BD263F168.jpeg
    118.6 KB · Views: 84
  • C9095C3D-8AD9-46E1-8083-D1948DAB34BB.jpeg
    C9095C3D-8AD9-46E1-8083-D1948DAB34BB.jpeg
    145 KB · Views: 82
  • 55EEDC51-33DF-4625-8C20-597D3897F1CB.jpeg
    55EEDC51-33DF-4625-8C20-597D3897F1CB.jpeg
    133.7 KB · Views: 85

AliK

Vehicle Dating Officer
Staff member
Club Member
I went with the 40% or less method with Silent Coat MLV. With the floors and the trans tunnel I also added a bit of this over the top of the MLV

https://rover.ebay.com/rover/0/0/0?mpre=https://www.ebay.co.uk/ulk/itm/123680854046

I used a combination of this and very thin foam between the door cards and the doors; also sealed much of the holes in the doors behind the door cards. This made a rather large difference in wind noise.

The car is now a much nicer place to live in when cruising on the motorway. The doors make a noticeably solid cluck as they shut. Especially noticeable was the lack of road / tyre roar and wind noise when cruising at speed.

The downside to sound proofing of course is that I can now hear subtle transmission whines and mechanical noises I never did before ;)

The trans tunnel helped with keeping the heat out while stuck in traffic on the way to Silverstone last year (4.5 hours for 150 miles)!!

Loving that green BTW! [emoji106]
 

Turn & Burn

Club Member
I went with the 40% or less method with Silent Coat MLV. With the floors and the trans tunnel I also added a bit of this over the top of the MLV

https://rover.ebay.com/rover/0/0/0?mpre=https://www.ebay.co.uk/ulk/itm/123680854046

I used a combination of this and very thin foam between the door cards and the doors; also sealed much of the holes in the doors behind the door cards. This made a rather large difference in wind noise.

The car is now a much nicer place to live in when cruising on the motorway. The doors make a noticeably solid cluck as they shut. Especially noticeable was the lack of road / tyre roar and wind noise when cruising at speed.

The downside to sound proofing of course is that I can now hear subtle transmission whines and mechanical noises I never did before ;)

The trans tunnel helped with keeping the heat out while stuck in traffic on the way to Silverstone last year (4.5 hours for 150 miles)!!

Loving that green BTW! [emoji106]
Looks like a good approach you’ve taken, that’s where I’m hoping to get to also. I was wondering if the door seals would match the soundproofing of the rest of the car?
 

Turn & Burn

Club Member
More steady progress on the brake line install. I fitted a bias valve and started constructing the lines. Most of the install follows the original routing, but I’ve had to get creative with the bias valves connections as I’ve replaced the original pressure sensing switch. Underneath the car I’ve remade the original clips in stainless but reused the original rubbers.
Next for install will be the fuel hardlines which I’ll do in 8mm aluminium tube so I’ve trial fitted the tank with its Subaru fuel pump fitted to give me an idea of location for fuel lines. Also remade the fuel tank straps in stainless as I’d seen it done on a YouTube build and it looked neat!
 

Attachments

  • 3800E209-F840-45DD-9333-91B45C89BEC4.jpeg
    3800E209-F840-45DD-9333-91B45C89BEC4.jpeg
    106 KB · Views: 66
  • 16A2904A-E036-4766-BDE9-2984BD01219C.jpeg
    16A2904A-E036-4766-BDE9-2984BD01219C.jpeg
    107.8 KB · Views: 66
  • 180C0255-A3FB-427F-B5C8-8CF047FCA5EE.jpeg
    180C0255-A3FB-427F-B5C8-8CF047FCA5EE.jpeg
    119.2 KB · Views: 64
  • 814D5C17-C54E-432E-898B-042F2612A43E.jpeg
    814D5C17-C54E-432E-898B-042F2612A43E.jpeg
    123.8 KB · Views: 66
More steady progress on the brake line install. I fitted a bias valve and started constructing the lines. Most of the install follows the original routing, but I’ve had to get creative with the bias valves connections as I’ve replaced the original pressure sensing switch. Underneath the car I’ve remade the original clips in stainless but reused the original rubbers.
Next for install will be the fuel hardlines which I’ll do in 8mm aluminium tube so I’ve trial fitted the tank with its Subaru fuel pump fitted to give me an idea of location for fuel lines. Also remade the fuel tank straps in stainless as I’d seen it done on a YouTube build and it looked neat!

nice neat lines. Again :)

how did you straighten them?
 

Turn & Burn

Club Member
Managed some more garage time today due to apocalyptic weather up here. Brakes are more less piped up so started on the fuel lines. These are 8mm aluminium hardline with a black anodise. Fittings will also be black anodise AN6. Totally therapeutic job making up two identical lines that also follow the brake line and I lost my self in it for a few hours. Dead pleased with the results, this is the extent of the hardline, everything else will be in flexy I think.
 

Attachments

  • 4BD30763-DCE7-4C9E-AC64-D37888D8F98D.jpeg
    4BD30763-DCE7-4C9E-AC64-D37888D8F98D.jpeg
    117 KB · Views: 71
  • AB3D85A5-CB2D-4F97-B10C-80EE4254060D.jpeg
    AB3D85A5-CB2D-4F97-B10C-80EE4254060D.jpeg
    112.1 KB · Views: 68
  • 5B4ED20F-9BE7-4014-8B58-548CF19FAC77.jpeg
    5B4ED20F-9BE7-4014-8B58-548CF19FAC77.jpeg
    114.1 KB · Views: 70
  • BBAFD489-8719-480C-939F-4034BBB4482F.jpeg
    BBAFD489-8719-480C-939F-4034BBB4482F.jpeg
    92 KB · Views: 68
Top