240z + 1JZ-GTE (manual)

johnymd

Club Member
Yeah, the rad pannel has convenient holes, just the wright size. The one on the pasenger side is slightly lower though so you have to lower this side by 5mm. It would look better with tighter bends but I couldn't find any so used a 70mm 90 and cut it in half. Once its all ground back and smoothed it should look OK. I had to find someone else to weld them as my mate is so busy I didn't want to ask him. So it cost me £60 as rather than my normal FOC.
 

tel240z

Club Member
John just an observation but i see that the new belt tensioner set up is on the pull side of the belt, just thinking at high revs load on the alternator and water pump it may be inclined to pull against the spring loaded tensioner and either slip, or come off, also the crank driving pully is only covered by 90 degrees of the belt at any time be nice if you could lock the tensioner in place

just a thought

Tel

Oh presuming that is the engine rotates clockwise
 

johnymd

Club Member
Sometimes you can't see for looking and its always good to hear someones views. I really hadn't thought about this at all but what you say sounds very valid. I'll keep a close eye on it. I did consider that the main pulley only had a small section of belt contact but as this is the tried and tested method on this engine to do away with air con and power steering I assumed any problems would have come to light. If I have problems then I'll just put the old pumps back on.

Made some more progress tonight but no pictures.
Fitted the diff output shafts (Thanks George) and the driveshafts.
Fitted and plumbed in the swirl pot, lift pump and return pipes. Can't finish the main pump and filter as I'm still waiting for some fittings but they should be in tomorrow.

I'm starting to run out of jobs to do so I may have to get on with the thing I've been putting off - the wiring.
 

johnymd

Club Member
The fuel pump fittings I've been waiting for came yesterday so I managed to get the fuel system finished. It's pretty tight under the back but it all went in OK. I've made sure the filter is easy to remove too. Run the pump wires through a new gromett hole and up into the rear quarter where I've mounted the fuel pump ECU. The lift pump is fed when the ignition is on and the HP pump will be controled by the ECU.

I thought I'd redo the intercooler pipes as I wasn't happy with all those silicone elbows and all the parts were in. I've shortened the intercooler pipes so they end just inside the engine bay and cut up 3 45 ali bends. I'll see if I can get these welded up today.
 

Attachments

  • L1030047 (Large).JPG
    L1030047 (Large).JPG
    139 KB · Views: 93
  • L1030050 (Large).JPG
    L1030050 (Large).JPG
    253.1 KB · Views: 107
  • L1030053 (Large).JPG
    L1030053 (Large).JPG
    245.9 KB · Views: 101
  • L1030051 (Large).JPG
    L1030051 (Large).JPG
    202.1 KB · Views: 109
  • L1030052 (Large).JPG
    L1030052 (Large).JPG
    213.6 KB · Views: 103

johnymd

Club Member
Looking good great work.

Thanks Dave, I just couldn't live with all the silicone joiners.

Looking great, i wish mine had come together this quickly!

I've not touched the engine so it was just the swap to do. You've delved deep into the modified engine department and made it work. I'm impressed.
 

johnymd

Club Member
Finished off the intercooler pipework tonight and I'm much happier with it. Finished the heater water hoses so the coolant system can now be filled and tested. That's the last of the jobs so I'll make a start on the wiring tomorrow by pulling the engine loom apart and finding a location for the ECU and ignitor.
 

Attachments

  • L1030055 (Large).JPG
    L1030055 (Large).JPG
    188.9 KB · Views: 94
  • L1030054 (Large).JPG
    L1030054 (Large).JPG
    181.5 KB · Views: 90

johnymd

Club Member
I desided that I couldn't put it off any longer so tonight was the night to start my wiring. I rang my mate and dragged him away from work to give me a hand. The first thing we desided on was to use the fuse box, relays and loom from the soarer as a starting point to deal with most of the supplies the engine needed. We thought this would simplify matters but I'm not not too sure. Anyway, the first thing was to pull apart the loom and trace all the wires. Then strip all the wires we didn't need. I've left some spare circuits intact for future devices. We then stripped the engine loom and started traceing backwards from the ECU the circuits we needed. I already had an ECU pinout drawing that told me what external connection were needed. We soon found that this was not very accurate or complete. We ended the day with a good idea of what needed connecting to where so the next job would be to power up the fusebox and looms to check the supplies before connecting the ECU.

Here's a few pictures to show things have to get worse before they get better.
 

Attachments

  • L1030056 (Large).JPG
    L1030056 (Large).JPG
    245 KB · Views: 121
  • L1030057 (Large).JPG
    L1030057 (Large).JPG
    251.1 KB · Views: 98
  • L1030058 (Large).JPG
    L1030058 (Large).JPG
    221.5 KB · Views: 107
Last edited by a moderator:

SKiddell

Well-Known Forum User
Welcome to my world of elastictrickery Johnny where the multimeter is your best friend

Looking good though it all seems to sit quiet nicely in there
 

Rob Gaskin

Treasurer
Staff member
Site Administrator
John, I'm very impressed with your 'get it done' attitude.

I've got a bedroom and en-suite room I've been doing extensive work on for a few months now (major refit - including all plumbing). When we watch Grand Designs and people have built a new house in the same time my wife looks at me in that special way :rolleyes:.

It'll be interesting to see how it transforms the character of the car and what it's like to drive.

Good luck with the wiring :thumbs:
 

Bantambunny

Well-Known Forum User
I pulled my fuse box apart on the V8, it's amazing what you can remove but very useful to re use the inline fuse holders for future equipment and alot tidier too.

I've now moved it under the front headlight out the way and just need a cover to go in place to stop it getting wet
 

johnymd

Club Member
Spent another couple of hours on the wiring this morning. Powered up the fusebox and ECU, no smoke or high current draw so a good start. Power to the black/white wire on plug cf2 pulled in the starter so that's good. Found the feed to operate the main relay which put 2 of the supplies onto the ECU, in addition to the Batt supply already there. Traced the other 2 ECU supplies that came from the other fusebox (will need to configure a relay to control these and feed them via fuses). Connected up the fuel pump ECU but couldn't get it to fire the pump. Need to do a bit more research to find out what conditions the ECU requires before it primes the pump. Other than the fuel pump, the rest of it seams ready to start. Was hoping to get it running today but a mate and his new wife come visiting and we ended up going out for lunch. I'll have another go at it tomorrow and hopefully get it running.

Using the soarer fuse/relay box has made things much more complicated but is the right way of doing it. Trying to work out how the relays are interlinked has caused the biggest problems. The info on the internet helps a little but without the help of a mate of mine I'd be struggling to do it right. I'll be on my own again tomorrow as he's busy until late next week and I can't wait that long.
 

johnymd

Club Member
Sorry Dave but I'm another step closer. Just got her running. Ticks over fine and seams to rev without a problem. I still need to connect it up to the Z loom as its all on fly leads at the moment. Hopefully I'll be able to go for a drive by next week......can't wait.
 

Rob Gaskin

Treasurer
Staff member
Site Administrator
Congratulations John. :bow:

I liked the commentary best and why does it sound like it's running under water, my L6 sounds much nicer ;)?
 

johnymd

Club Member
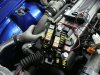
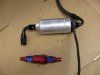
Well I didn't get to drive the z to the half way house meet today but I did take it up and down the road. The wiring is pretty much finished with all the supplies fed by the correct fuses and relays. I still need to control the fuel pump relay in a more satisfactory way and finish the radiator fan control. Gauges will also need tweaking but the engine conversion is pretty much done and working.

So, the last job to tackle before I'm back on the road is the exhaust, which I'll try and arrange tomorrow. After that the car will become a road going work in progress and will continue its evolutionary process. I've lots of future plans but I should be able to do these without taking the car off the road for long. It's 2 months this weekend since I took the engines out of the Z and soarer so I didn't quite make my 2 month target for the swap but I've not had as much time on the car as I'd liked, with heavy work commitments. Still, I'm pretty happy with the progress.
 
Top