1973 Fairlady Z - refurb and fix

Albrecht

Well-Known Forum User
On the Fairlady pics I have seen without rear spoiler, the Fairlady is on the right of the boot lid at a jaunty angle and the Nissan logo is at the bottom left of the boot lid. At least, that's where I put them based on previous conversations!

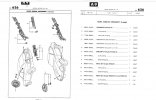
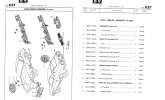
More on emblems for this late '73/early '74 period:

2-seater and 4-seater differences:

626-1.jpg627-1.jpg
 

Faster Behr

Club Member
Success with the tacho. It’s working at last.

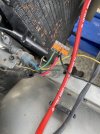
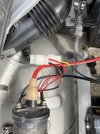
At some point in the past someone had fitted a later type 280Z voltage pick-up style tacho, 280ZX distributor and had deleted the coil ballast. They’d clearly had issues as the tacho was connected via a supplementary wire through the firewall and the loom was hacked off next to the coil. The only wire connected was the black/white from the ignition live and the tacho didn’t work.

I reconnected the original tacho wire onto the connection post at its rear and joined the black/white and green/white to close the circuit where the ballast would have been by the coil. Finally the black/white tacho wire was reconnected to the coil -ve, rather than to the +ve like earlier tachos with a current pickup.

image.jpg

Now I can rewire it neatly and move onto something else.

Thanks to Albrecht for the wiring info and to Rob Gaskins. His old posts were really helpful in working out what was going on.
 

Faster Behr

Club Member
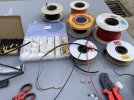
Another job out of the way. I knew these plugs would come in handy.

7E76E0A6-6E43-467C-A7D6-8C66AD5BDF0B.jpeg

5FA87B8A-EE18-4052-B474-CA0A5B2B96BB.jpeg

These are the front lamp harnesses made up yesterday.

66F52667-11A0-42E0-91B8-84057FB8FAF5.jpeg

My last job tonight was repairing the fuel gauge. I took everything apart, checked everything for continuity and for resistance across the sender. Put it all back together and it still didn’t work. So I took the gauge out again and put power across it. The needle rose gently so that’s ok. I put it back together and it worked on its own. Typical.

Whilst peeking around for the fuel gauge wiring I found a disconnected bullet terminal tucked up in front of the fuel tank. Imagine my surprise when I connected it and a fuel pump sprang to life. The punchline is that the car has a carb with a mechanical Nikki pump. I’ve no idea why there is an electric pump. I ran out of time to investigate further!
 

Robotsan

Club Member
Catching up on this thread makes me A) realise I would be really out of my depth with a project car like this, and thus B) glad I didn't quite have the funds together to buy it at the time!
A car like this really has to be in the hands of someone like yourself who can get in there and fix most of these issues yourself. I'm going to have to be sensible and buy a Z that someone else has already done all the hard work on!
Looking forward to seeing the progress with your car @Faster Behr . And deffo get some Watanabes on it! :)
 

Faster Behr

Club Member
Catching up on this thread makes me A) realise I would be really out of my depth with a project car like this, and thus B) glad I didn't quite have the funds together to buy it at the time!
A car like this really has to be in the hands of someone like yourself who can get in there and fix most of these issues yourself. I'm going to have to be sensible and buy a Z that someone else has already done all the hard work on!
Looking forward to seeing the progress with your car @Faster Behr . And deffo get some Watanabes on it! :)

Haha, well thanks, but to be honest all of this is possible with a few basic tools, research and patience. Collectively, we owe a lot to the enthusiasts before us who have taken the time and dedication to document their findings (and failings). Forums are such a great way of passing on knowledge and, consequently, a great resource for learning. When I bought my first BMW 2002 there wasn’t so much help around; just a marque book (Mike McCartneys restoration bible for anyone interested) and a flawed Haynes manual. For everything else we relied on “old hands” at niche parts suppliers for a shoulder to cry on and some sound (and not so sound) engineering principles. We really are blessed with forums. Without them we would see fewer interesting cars on the road today - period.

I think being a bit older helps me certainly. The cars I was driving in my early years were all terrible things and if you couldn’t fix them (frequently) then you were walking.

My wife asked me last night how the car was coming on (she is deeply skilled at feigning interest). I replied that it would be easier if it had a sunroof. Puzzled, she asked why. I replied that it would make it far easier to pour the cash in through the roof. There’s nothing that can’t be fixed with money, and patience.

I agree that buying a properly well sorted car is highly likely to be far simpler; and probably cheaper in many cases. But the amount you learn from getting stuck in is priceless. Thats with exception for major rust issues. The time it takes to sort out properly is insane. If you get a largely rust free car then the remainder is mostly just nuts and bolts.

And that’s an affirmative on the Watanabe’s. As soon as I can stop magic smoke escaping from the electrics I’ll get onto it.
 

Robotsan

Club Member
Haha, well thanks, but to be honest all of this is possible with a few basic tools, research and patience. Collectively, we owe a lot to the enthusiasts before us who have taken the time and dedication to document their findings (and failings). Forums are such a great way of passing on knowledge and, consequently, a great resource for learning. When I bought my first BMW 2002 there wasn’t so much help around; just a marque book (Mike McCartneys restoration bible for anyone interested) and a flawed Haynes manual. For everything else we relied on “old hands” at niche parts suppliers for a shoulder to cry on and some sound (and not so sound) engineering principles. We really are blessed with forums. Without them we would see fewer interesting cars on the road today - period.

I think being a bit older helps me certainly. The cars I was driving in my early years were all terrible things and if you couldn’t fix them (frequently) then you were walking.

My wife asked me last night how the car was coming on (she is deeply skilled at feigning interest). I replied that it would be easier if it had a sunroof. Puzzled, she asked why. I replied that it would make it far easier to pour the cash in through the roof. There’s nothing that can’t be fixed with money, and patience.

I agree that buying a properly well sorted car is highly likely to be far simpler; and probably cheaper in many cases. But the amount you learn from getting stuck in is priceless. Thats with exception for major rust issues. The time it takes to sort out properly is insane. If you get a largely rust free car then the remainder is mostly just nuts and bolts.

And that’s an affirmative on the Watanabe’s. As soon as I can stop magic smoke escaping from the electrics I’ll get onto it.

That's the thing - I'm 39, so not exactly young anymore but I've grown up with pretty modern cars really. Oldest I've owned was an 85 Baur 3 series (which was owned by ITV and used in Dempsey & Makepeace no less! 😂), but I also worked at a BMW dealership back then so got the techs there to fix everything.

More recently I've owned several e46 3 series, and currently an E46 M3. I fix most things on it myself, and like you say I just rely on forums and YouTube - but I reckon there must be 1000x the material about my car on YouTube than a Z. And anything to do with wiring I'm pretty much out straight away!

I plan to source a rust free (99%) 280 I think, to give myself the best chance of a sorted car for the lowest money. But I'd have to pay someone to fix most of the stuff you've been doing on this so far!
 

Albrecht

Well-Known Forum User
Whilst peeking around for the fuel gauge wiring I found a disconnected bullet terminal tucked up in front of the fuel tank. Imagine my surprise when I connected it and a fuel pump sprang to life. The punchline is that the car has a carb with a mechanical Nikki pump. I’ve no idea why there is an electric pump. I ran out of time to investigate further!

Factory Aircon-equipped cars came with an electric pump to 'assist' the mechanical pump, and as part of an effort to mitigate fuel percolation in Japan's high summer heat. You can imagine how hot that engine bay will have got in summer traffic, and with the aircon going full blast.

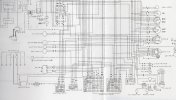
You can see the pump in the wiring loom schematic, right next to the radio(!).
 

Faster Behr

Club Member
Factory Aircon-equipped cars came with an electric pump to 'assist' the mechanical pump, and as part of an effort to mitigate fuel percolation in Japan's high summer heat. You can imagine how hot that engine bay will have got in summer traffic, and with the aircon going full blast.

You can see the pump in the wiring loom schematic, right next to the radio(!).

Ah-ha! Every day is a school day. Thank you, again.

I had wondered why there was a disconnected steel pipe next to the fuel flow pipe up from the chassis into the engine bay. I had convinced myself it was for something emissions related as I couldnt see why it would need a fuel return with a carb and mechanical pump. This should make any conversion I do to EFi easier just by the presence of a return. I doubt the helper pump is capable of the 40psi i'll need to run a 280Z hybrid system but I guess it's worth testing before writing it off and changing it.

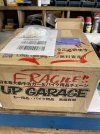
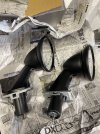
Today we have received gifts from afar.

13B9A419-64D4-41AB-9A20-45B7EFB5F821.jpeg

A58419E6-9F08-4D7A-926F-7E7746349AEB.jpeg

I’m keen to know how they compare to the original considering they are said to be reproductions? They certainly appear to be of good quality.
 

Albrecht

Well-Known Forum User
I had wondered why there was a disconnected steel pipe next to the fuel flow pipe up from the chassis into the engine bay. I had convinced myself it was for something emissions related as I couldnt see why it would need a fuel return with a carb and mechanical pump.

Fuel return line (smaller bore than feed) was a standard feature on L-series engined carburettor-equipped Zs.
 

Albrecht

Well-Known Forum User
I’m keen to know how they compare to the original considering they are said to be reproductions?

There are some repros on the market which have flat lense mirrors rather than the convex lense mirrors of the originals. Upshot is that they aren't as effective, although many people are convinced the originals are "useless" too.
 

Farmer42

Club Member
Just read through this thread and its been really interesting. I did pick up the bit about the clock and its oscillator. I have a Citizen calendar clock in my 75 2/2 but it only works intermittently. I have had it cleaned and tested and it works fine out of the car but as soon as I fit is it only works on occasions. I have checked the contacts and plug and they appear to be ok. I have even temporarily bypassed the plug and still get the same issues. Should this also have an oscillator box? I cant see one in the passenger footwell/firewall where it was pictured earlier in this thread. If it does have one, would it cause the issues i am having?
 

8658kv

Club Member
Just read through this thread and its been really interesting. I did pick up the bit about the clock and its oscillator. I have a Citizen calendar clock in my 75 2/2 but it only works intermittently. I have had it cleaned and tested and it works fine out of the car but as soon as I fit is it only works on occasions. I have checked the contacts and plug and they appear to be ok. I have even temporarily bypassed the plug and still get the same issues. Should this also have an oscillator box? I cant see one in the passenger footwell/firewall where it was pictured earlier in this thread. If it does have one, would it cause the issues i am having?
Hi Paul

list of clocks here.. https://zclocks.com/rally-clock-identification

yours doesn't appear to need the oscillator box.
 

Farmer42

Club Member
Cheers Steve. Back to the drawing board with the investigations. I think I will run a direct feed from the battery to see if there is a dodgy or broken wire somewhere. Good to know I don't have a bit missing or not working.
 

Faster Behr

Club Member
A little update in lieu of more happening this coming week. Lots of new parts trickling from the US and Japan. The FedEx man must wonder what I’m up to.

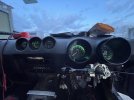
The electrical work is all sorted and all gremlins ironed out. Everything works. Gauges, lighting etc. I have added a new power supply and hidden away some speaker cables for the future addition of a radio. I also added an oil pressure warning switch circuit and a discrete warning lamp; also a hidden USB charger. All are reversible mods but worthy upgrades I think.

The horns have been replaced and rewired and a new repro washer bottle fitted and wired. I used some nice small 989 LED bulbs which fitted well into the gauges and didn’t interfere with the coloured inserts in the gauges. These dim really nicely and give a good brightness.

16E27E50-9FBA-4900-AC13-DE11DE4DC1E9.jpeg

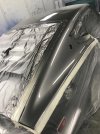
I mentioned earlier that the roof was in a poor state. Not only was the paint really bad but it was badly dented and would ‘pop’ up and down with light pressure. The paint everywhere else will do for now but I had to get the roof sorted so we could get some use out of the car this summer.

I’m lucky to have access to an ace paint and body guy a quarter mile from my house. He generally just does classics or anything that interests him. He takes the odd customer car here and there and does these alongside his own restorations.

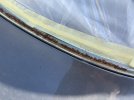
The first pic with the screen out. A bit of surface rust but nothing has gone through.

124884AB-6DE6-44BD-9788-A95C3154D243.jpeg

This is the best place to see the original colour of the car. It has been silver and is now grey. Ultimately it’ll be going back to the blue. I think this might be colour code 307 but I need to research this properly.

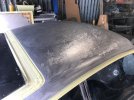
This is the roof stripped and de-stressed (essentially heated up and beaten)

449B68AD-EEA5-44F7-B0C5-CE63121F5346.jpeg

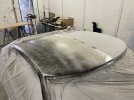
Primed and guide coated..

F12AAB3A-8AAD-40FB-AD7C-EA9CC00484F2.jpeg

Ready for paint…

9ADD1463-04A4-4D51-8FDB-D5EC932551EE.jpeg

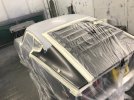
And finally painted yesterday…

0DC2B54C-C6A5-4C4C-AC38-3F6384936FF5.jpeg

1AB31714-DEDF-44FA-B497-1488A7D4EA1D.jpeg

It’ll be going back in the winter for a complete repaint. The roof repair would have been a big part of the prep involved in that so nothing has been lost really.

The screen fitter is coming on Tuesday so I should have the car back early next week. The next step is to put together my temporary fuel injection project and get the car roadworthy for us to use over the summer.
 

Robotsan

Club Member
A little update in lieu of more happening this coming week. Lots of new parts trickling from the US and Japan. The FedEx man must wonder what I’m up to.

The electrical work is all sorted and all gremlins ironed out. Everything works. Gauges, lighting etc. I have added a new power supply and hidden away some speaker cables for the future addition of a radio. I also added an oil pressure warning switch circuit and a discrete warning lamp; also a hidden USB charger. All are reversible mods but worthy upgrades I think.

The horns have been replaced and rewired and a new repro washer bottle fitted and wired. I used some nice small 989 LED bulbs which fitted well into the gauges and didn’t interfere with the coloured inserts in the gauges. These dim really nicely and give a good brightness.

View attachment 50083

I mentioned earlier that the roof was in a poor state. Not only was the paint really bad but it was badly dented and would ‘pop’ up and down with light pressure. The paint everywhere else will do for now but I had to get the roof sorted so we could get some use out of the car this summer.

I’m lucky to have access to an ace paint and body guy a quarter mile from my house. He generally just does classics or anything that interests him. He takes the odd customer car here and there and does these alongside his own restorations.

The first pic with the screen out. A bit of surface rust but nothing has gone through.

View attachment 50084

This is the best place to see the original colour of the car. It has been silver and is now grey. Ultimately it’ll be going back to the blue. I think this might be colour code 307 but I need to research this properly.

This is the roof stripped and de-stressed (essentially heated up and beaten)

View attachment 50085

Primed and guide coated..

View attachment 50086

Ready for paint…

View attachment 50087

And finally painted yesterday…

View attachment 50088

View attachment 50089

It’ll be going back in the winter for a complete repaint. The roof repair would have been a big part of the prep involved in that so nothing has been lost really.

The screen fitter is coming on Tuesday so I should have the car back early next week. The next step is to put together my temporary fuel injection project and get the car roadworthy for us to use over the summer.

Wow, you don't mess about! Great work.
 

arcdef

Club Member
Roof looks great from those pictures! Roughly how much did it set you back? I need to get mine repainted too :(
 
Top