richiep
Club Member
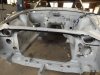
Rather than put this in an update on the “what did you do this week” thread where I’ve documented the first few steps with this mod, I thought I’d create a “how to” post to cover some info that people might find useful should they want to go down the same route with adding a cold air box intake system to their L6-engined S30Z.
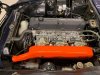
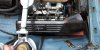
The cold air box I’m using is the fibreglass one sold by Mr.F, which is based on the carbon fibre ones developed and sold by Steve Kiddell and Pmac a bunch of years back.
Why a cold air box? Because power! It’s more nuanced than that really but, as Steve himself proved via dyno testing, this airbox design is good for up to 15HP extra. The design firstly allows for a ducted intake arrangement that delivers cold air from outside the engine bay directly to the carbs/ITBs. Like other engines, L6s love cold air, with greater density increasing flow. The standard Z engine bay gets hot, so the typical carb setup (triples or SUs) is drawing hot air in with less efficiency.
There is also an inherent challenge associated with reflected pulses generated between the carbs and the inner wing; I’m not an expert on the science here, but Steve’s extensive dyno testing revealed these pulses to be a source of power loss and dead spot creation. The airbox design negates this. It’s been discussed on previous occasions.
Anyway - the installation and why I’ve mentioned a Honda CRX in the title...
Firstly, these airbox installations aren’t a super easy plug and play thing. You need to cut and drill the backplate to suit your carb/manifold spacing and affix the hinges yourself. Also, whether you can fit one is dependent on your intake manifold dimensions. Specifically, if you have a Cannon brand triple carb intake manifold, you will need to change it! The Cannon has runners an inch longer than most other options, leaving no room for the airbox between carbs and inner wing. As detailed in the other thread, I ditched my Cannon for a Japanese Harada/Kameari 40-45mm intake, which is a great quality, well designed and proven option that comes equipped for both rod and cable linkage options. It is also great value for money versus the extortionate U.K.-made options.
Beyond that, it becomes a case of what components you want to use to filter and feed cold air from in front of the radiator support. This can be done non-invasively. In my case, I have used:
Ramair 76mm/3” i.d. output air induction filter
A 90deg bend stainless tube 76mm o.d. (This was trimmed at one end to allow for tucking the filter away from the bonnet hinge rods that run across the car in that area)
A Ramair silicon hump hose joiner 76mm i.d. (fits through the top hole in the radiator support where the air vent tube normally goes; the hump locates it nicely between the skins of that opening)
A silicon straight reducer hose 89mm-76mm (this fits on the inlet of the airbox and steps it down for the next rest of the intake)
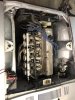
Beyond that, people have used things like the flexible wired induction tubing stuff to connect from the airbox to the rad support. However, years ago, someone on this forum made a discovery I filed away to use now - the cheap generic induction kits available on eBay for 1988-1991 Honda CRXs come with a long 76mm/3” polished aluminium pipe with multiple mandrel bends on more than one plane in it. It is possible to cut a section out of that tube that is exactly right to connect the airbox to the hump joiner hose through the rad support. Not as flexible as a floppy wired hose, but the silicon sections should give adequate flexibility for engine movement. And it looks the part too.


Obviously you end up with a few superfluous bits from the induction kit, although one could use the filter as opposed to what I did. Here’s a link to an example. Mine only cost £25 including postage:
https://www.ebay.co.uk/itm/Air-Indu...764266&hash=item1a3fa42b54:g:HPMAAOSwZltb7pWd
Hose clamps were good quality stainless ones.
All parts other than the airbox were bought from eBay.
Anyway, hope that helps as a tech thread. There are other things that could be done obviously; I wanted to create a quality looking setup that looked professional. Something that might be worth adding is some sort of securing bracket or something for the air filter, along with maybe a shield to help it avoid muck/direct exposure to water should one find oneself driving in a rainstorm!
The cold air box I’m using is the fibreglass one sold by Mr.F, which is based on the carbon fibre ones developed and sold by Steve Kiddell and Pmac a bunch of years back.
Why a cold air box? Because power! It’s more nuanced than that really but, as Steve himself proved via dyno testing, this airbox design is good for up to 15HP extra. The design firstly allows for a ducted intake arrangement that delivers cold air from outside the engine bay directly to the carbs/ITBs. Like other engines, L6s love cold air, with greater density increasing flow. The standard Z engine bay gets hot, so the typical carb setup (triples or SUs) is drawing hot air in with less efficiency.
There is also an inherent challenge associated with reflected pulses generated between the carbs and the inner wing; I’m not an expert on the science here, but Steve’s extensive dyno testing revealed these pulses to be a source of power loss and dead spot creation. The airbox design negates this. It’s been discussed on previous occasions.
Anyway - the installation and why I’ve mentioned a Honda CRX in the title...
Firstly, these airbox installations aren’t a super easy plug and play thing. You need to cut and drill the backplate to suit your carb/manifold spacing and affix the hinges yourself. Also, whether you can fit one is dependent on your intake manifold dimensions. Specifically, if you have a Cannon brand triple carb intake manifold, you will need to change it! The Cannon has runners an inch longer than most other options, leaving no room for the airbox between carbs and inner wing. As detailed in the other thread, I ditched my Cannon for a Japanese Harada/Kameari 40-45mm intake, which is a great quality, well designed and proven option that comes equipped for both rod and cable linkage options. It is also great value for money versus the extortionate U.K.-made options.
Beyond that, it becomes a case of what components you want to use to filter and feed cold air from in front of the radiator support. This can be done non-invasively. In my case, I have used:
Ramair 76mm/3” i.d. output air induction filter
A 90deg bend stainless tube 76mm o.d. (This was trimmed at one end to allow for tucking the filter away from the bonnet hinge rods that run across the car in that area)
A Ramair silicon hump hose joiner 76mm i.d. (fits through the top hole in the radiator support where the air vent tube normally goes; the hump locates it nicely between the skins of that opening)
A silicon straight reducer hose 89mm-76mm (this fits on the inlet of the airbox and steps it down for the next rest of the intake)
Beyond that, people have used things like the flexible wired induction tubing stuff to connect from the airbox to the rad support. However, years ago, someone on this forum made a discovery I filed away to use now - the cheap generic induction kits available on eBay for 1988-1991 Honda CRXs come with a long 76mm/3” polished aluminium pipe with multiple mandrel bends on more than one plane in it. It is possible to cut a section out of that tube that is exactly right to connect the airbox to the hump joiner hose through the rad support. Not as flexible as a floppy wired hose, but the silicon sections should give adequate flexibility for engine movement. And it looks the part too.
Obviously you end up with a few superfluous bits from the induction kit, although one could use the filter as opposed to what I did. Here’s a link to an example. Mine only cost £25 including postage:
https://www.ebay.co.uk/itm/Air-Indu...764266&hash=item1a3fa42b54:g:HPMAAOSwZltb7pWd
Hose clamps were good quality stainless ones.
All parts other than the airbox were bought from eBay.
Anyway, hope that helps as a tech thread. There are other things that could be done obviously; I wanted to create a quality looking setup that looked professional. Something that might be worth adding is some sort of securing bracket or something for the air filter, along with maybe a shield to help it avoid muck/direct exposure to water should one find oneself driving in a rainstorm!