Longest 240z restoration ever?

Paul Henley

Club Member
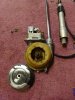
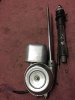
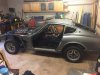
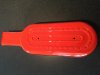
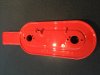
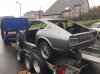
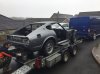
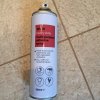
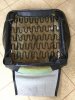
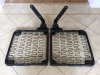
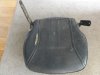
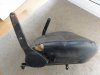
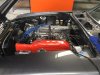
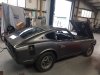
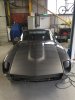
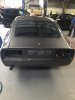
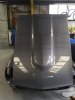
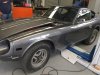
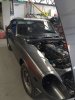
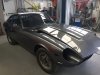
Hi All bit of an update as its been awhile. Not a lot of progress if I'm honest. After getting the engine running and the car movable, I contacted the body shop to inform them the car was now ready for final panel fit and top paint coat. Before it left I marked up the car (using blue tape) to identify all the damage/scratches that I'd done while carrying out the "first fix".The amount of tape I used confirmed that for me personally it was the correct thing to do in carrying out the paintwork in 2 stages, and leaving the final panel fit and paint until after I'd completed the bulk of the mechanical restoration. Despite having a double garage it's surprising how little room you have while working around all the junk that a family accumulates in a garage. The car left on 10th March and I was hopeful I'd have it returned in 4 weeks, not a chance, the car has been away for about 3 months now and I'd say is probably about 75% complete. The first thing they do is trial fit all the panels to the car to ensure proper alignment prior to painting and this required a lot more preparation than I'd anticipated. Very few of the panels to be fitted were original to the car, the doors and tailgate were sourced from the states, the front wings were new from Nissan, the headlight pods were new from the states though I'm unsure if they were OEM, The bonnet was second hand from within the UK. This mixture of new/second hand panels has required a lot of rework to ensure the correct fit and the lines of the car proper. As is often stated, the bulk of the work in bodywork is the preparation not the actual painting. I dropped by today to check on progress and was pleased to find the majority of the panels have now been painted in either primer or final coat prior to fitting and hopefully it won't be to long before its return, though I didn't press for a date. I did bring home a spare air filter box that I'd asked them to paint in the original orange (as well as the original now fitted to the engine) and I was very happy with the match. A few pics attached, hopefully it won't be to long before I'll have one of all the paint finished...
Paul
 

Attachments

  • IMG_0003r.JPG
    IMG_0003r.JPG
    890.6 KB · Views: 86
  • IMG_1303.JPG
    IMG_1303.JPG
    799.7 KB · Views: 67
  • IMG_1301.JPG
    IMG_1301.JPG
    784.1 KB · Views: 70
  • IMG_1300.JPG
    IMG_1300.JPG
    723.8 KB · Views: 81
  • IMG_0031r.JPG
    IMG_0031r.JPG
    870.6 KB · Views: 88
  • IMG_0028r.JPG
    IMG_0028r.JPG
    868.7 KB · Views: 80

Paul Henley

Club Member
Seat restoration

Hi all, bit on am update, this time on my old seats. The seats in my car were in a bit of a state, particularly with wear to the driver’s seat base and general sagging, corrosion and cleanliness all round. I decided to replace the original covers with a set of MSA replacements. After dissembling the seats I had the frames and springs blasted and then repainted. I had a little trouble removing the bolts from the sides/frames and ended having to use an impact wrench . Before reassembly I retapped the holes and it was a different story. There are wires sewn into the original covers that are used to tie the covers to the seat structures and also provide something for the hog rings to secure to. Although the new covers are designed to accept these wires, they didn’t come with my replacement covers, so these needed to be removed from the old for future use. I’ve never done any upholstery work before, so did a bit of research on YouTube to understand how to go about fitting the seat covers and understanding the basics like “what are hog rings and how do you fit them?” I read that the way to rejuvenate foam and restore it to its former shape was to inject it with steam, (I used a domestic steam floor cleaner) although this was partially successful and you could immediately see an improvement, I decided to add some additional material to add extra padding. I refitted the existing horse hair like material fitted within the seats for originality but it was very tired, the additional upholsterer’s wool matting that I added provided both support for the original horse hair lining and added additional bulk. I secured the covers to the frames using the metal wires mentioned earlier and tied them in using plastic cable ties. The replacement covers are very similar to the originals and are in two pieces, one for the seat and one for the back support with built in head rest. The covers for the seat bases were easy to fit over the foam formers and are held in place by clamping the hog rings with a pair of hog ring pliers. Although the seat cover kits come with hog rings and a pair of piers, I found the pliers were basically useless and invested in a new pair of piers that are spring loaded and therefore hold the ring in the pliers while you exert the force to close the rings, a relatively cheap and worthwhile investment. Fitting the covers over the back supports wasn’t so easy and I employed the support of my wife in fitting them. Basically you turn the cover inside out and begin by pulling it over the head rest. The material is a tight fit and needs a lot of encouragement to pull it into the correct position over the head rest. Once over the seat cover it is tied to the seat frame using the wire and cable ties mentioned earlier. Once done you then continue to roll the still inside out seat cover over the remaining foam and back support. Once the seat covers are fitted the two sections of the seat simply bolt back together in the reverse manner that you disassembled them. While apart I stripped, repainted and greased all mechanical parts, bolts, runners etc to try and give them that “as new “ look. One of the best tips that I found was to soften the back support covers by placing them in the oven for a few minutes prior to fitting, that way the softer more pliable material is a lot easier to coax, stretch and move into the position you need it. To hold the foams and additional padding in place I used a quick drying adhesive from Wilkinsons, although cheap it was very effective and I would recommend it. I’ve attached a few pic’s to try and demonstrate the process I went through. Put a bit more effort into the detail of this particular restoration element as I didn’t find much on the forum, hopefully my ramblings will be of some benefit to any members contemplating doing the same.

Paul
 

Attachments

  • IMG_2332r.jpg
    IMG_2332r.jpg
    408.4 KB · Views: 92
  • IMG_1555r.jpg
    IMG_1555r.jpg
    440.6 KB · Views: 77
  • IMG_1541r.jpg
    IMG_1541r.jpg
    577.9 KB · Views: 81
  • IMG_1552r.jpg
    IMG_1552r.jpg
    762.9 KB · Views: 81
  • IMG_1353r.jpg
    IMG_1353r.jpg
    498.1 KB · Views: 75
  • IMG_1548r.jpg
    IMG_1548r.jpg
    659 KB · Views: 82
  • IMG_1358r.jpg
    IMG_1358r.jpg
    610.5 KB · Views: 79
  • DSC06424r.jpg
    DSC06424r.jpg
    780.9 KB · Views: 77
  • DSC06415r.JPG
    DSC06415r.JPG
    1 MB · Views: 77
  • DSC06414r.jpg
    DSC06414r.jpg
    683 KB · Views: 84

uk66fastback

Club Member
When I get some time in the next day or so I'll reply on the seats write up as I've just done one of mine ...

Your car is looking SO good ...
 

Paul Henley

Club Member
Thanks all for the positive comments. I've now got the car back from the body shop following the second phase of painting which mainly consists of bolt on panel preparation (doors, wings, bonnet, tailgate, front panels, spoilers, light surrounds etc), fitting/aligning and final coats.(also includes repairing any scratches I'd made since it's first visit). I'm very happy with the result and now looking forward to fitting the final parts such as lights, horns, aerial, bumpers, badges, decals,wheels, wipers, interior etc etc, possibly the most rewarding part and I actually see a glimmer of light at the end of what has been a very long tunnel. A few pics of the car taken during its last days at the body shop prior to delivery home.
 

Attachments

  • red IMG_1534.jpg
    red IMG_1534.jpg
    609.1 KB · Views: 70
  • red IMG_1526.jpg
    red IMG_1526.jpg
    588.6 KB · Views: 69
  • red IMG_1509.jpg
    red IMG_1509.jpg
    569.3 KB · Views: 63
  • red IMG_1513.jpg
    red IMG_1513.jpg
    497.3 KB · Views: 70
  • red IMG_1372.jpg
    red IMG_1372.jpg
    274.8 KB · Views: 63
  • red IMG_1377.jpg
    red IMG_1377.jpg
    668.7 KB · Views: 62
  • red IMG_1370.jpg
    red IMG_1370.jpg
    356.5 KB · Views: 63
  • red IMG_1506.JPG
    red IMG_1506.JPG
    545.8 KB · Views: 71

IbanezDan51

Well-Known Forum User
Looks brilliant. Absolutely love the colour, i was thinking metallic grey for mine some time back.

Credit to yourself!
 

Paul Henley

Club Member
Aerial restoration

Hi all
Bit of an update. Since getting the car back from it’s 2nd phase of painting I’ve been starting to install the ancillaries and final pieces to the car, it’s “second fix”.
One of the parts I was most looking forward to refitting and operating was its original electrical aerial. So I hooked it up to it’s original radio, powered it up and flicked the aerial switch on the radio to drive it up.
Nothing.
Gutted I disconnected it and started to strip it out on the garage floor. Once I got it apart it was obvious what the problem was. When the car was laid up in the early eighties it must have had some water contamination in the drive/pinion gears and sitting for nearly 40 years with a lack of lubrication had led to seizure. The remedy then was to strip everything out, examine for wear/damage, clean all the parts, lubricate and reassemble. I couldn’t find any damage which was a good sign, no flats or missing teeth on the plastic gears (had there been I doubt these would have been available to replace?) I also cleaned the motor brushes and commutator, although I forgot to take any pics, these were easily accessible and had little wear. Then I applied some grease to the gears/internals and reassembled. I should mention that when testing I found there were two variables that affect operation. The first one is a screw that is located in a large hole in the bottom of the aerial (pic 5), the adjustment of this screw drives the pinion gear shaft and commutator up/down. Its position therefore sets alignment of the brushes on the commutator, so before the final cover goes over the electrical motor, it’s worth checking that the brushes are set centrally on the commutator. The second variable is the nut and its torque that holds the spring in place on top of the drive gear. I think this acts as a simple clutch for when the aerial is either fully up or fully down, not enough torque and the drive will slip, too much and it will continue to try and drive the aerial past its final position and I guess ultimately overload the motor. Once fully inspected and setup I reassembled all the covers, cleaned all the externals and re-installed into the car. I then finally got the smile when I was able to drive it up and down off the radio :)
 

Attachments

  • 9.jpg
    9.jpg
    620.8 KB · Views: 31
  • 8.jpg
    8.jpg
    716 KB · Views: 28
  • 7.jpg
    7.jpg
    405.3 KB · Views: 31
  • 6.jpg
    6.jpg
    774.1 KB · Views: 28
  • 5.jpg
    5.jpg
    866.7 KB · Views: 30
  • 4a.jpg
    4a.jpg
    533.1 KB · Views: 29
  • 4.jpg
    4.jpg
    696 KB · Views: 31
  • 3.jpg
    3.jpg
    909 KB · Views: 31
  • 2.jpg
    2.jpg
    784.3 KB · Views: 35
  • 1.jpg
    1.jpg
    995.7 KB · Views: 34

Paul Henley

Club Member
Thanks Mike, a few more pics (I'd used my limit of 10)
 

Attachments

  • IMG_3003.jpg
    IMG_3003.jpg
    591.4 KB · Views: 25
  • 12.jpg
    12.jpg
    668 KB · Views: 30
  • 11.jpg
    11.jpg
    688.6 KB · Views: 28

Paul Henley

Club Member
Hi all a bit of an update on progress as I've been slow to update as usual. The car is actually nearing completion and I'm at the stage of fitting the ancillaries, lights, chrome badges etc. This post contains progress of the horns. They were stripped, cleaned, painted and a service kit fitted with new screws, nuts etc. quite happy with how they turned out and they actually worked. I did however struggle to get them working initially off the horn button. They are permanently fed by 12v and the circuit is completed by earthing through the horn button. I couldn't get horn button to earth through the steering column, I'm guessing the earthing was prevented through having the shell painted, anyway I resolved the issue by fitting an additional earth which solved the problem. Pics attached.1.jpg 2.jpg 4.jpg 5.jpg 6.jpg 7.jpg 8.jpg 9.jpg 10.jpg 11.jpg
 

Rob Gaskin

Treasurer
Staff member
Site Administrator
A lovely car without a doubt. Very impressed with your resto. There are some very clever perfectionists on this site.

That's gorgeous.
 
Top