what to do with this

racer

Club Member
Lot's of sucking and blowing going on here and yet no pictures! Shame :devil:

Fighting talk Sean! I like it :thumbs:
 

SeanDezart

Well-Known Forum User
Well Matt - I won't be in the running for winning any drag-run trophys but if the Melton Expires (sorry - did I spell that right ?) ever Channel hops - one is going to taste the Cordon Bleu of **** whup............
 

tel240z

Club Member
Progress not a lot but a bit

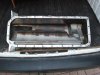
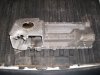
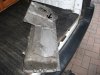
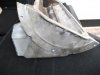
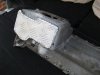
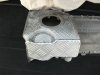
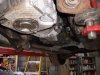
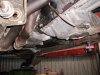
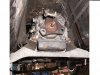
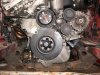
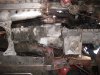
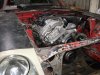
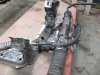
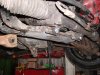
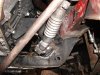
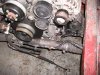
After having the engine in and out a few times and susing out what needs to be cut off, removed, rellocated the first job was to make the sump smaller to clear the n/s tie rod chassis mount, would have been nice to have removed the 2nd oil pick up bowel at the front of the sump as well as this is a bit close to the steering rack but i have another cunning plan for that later, must say the sump detail with its two gullys and oil return pipe from the block to keep the sump filled at the pump pick up points is quite reasuring, i have lost 0.3 of a litre by removing a section of the sumpbut i'm not to worried
 

Attachments

  • 001.JPG
    001.JPG
    2 MB · Views: 63
  • 002.JPG
    002.JPG
    2.8 MB · Views: 55
  • 003.JPG
    003.JPG
    2.4 MB · Views: 41

tel240z

Club Member
And more

Note the two gullys on picture 3, one is quite thin (on the right) and the other larger sort of in the centre and in picture 3 on the previous post arrowed is the oil return from the engine block
 

Attachments

  • 006.JPG
    006.JPG
    2.7 MB · Views: 40
  • 003.JPG
    003.JPG
    2.4 MB · Views: 43
  • 002.JPG
    002.JPG
    2.5 MB · Views: 41

racer

Club Member
Blimey, not your average sump Tel. It will be interesting to see how many other special bits there are on this engine. Nice ally welding by the way.
 

johnymd

Club Member
Looks like the sandwich girl has got a bit of checker plate missing from her van then!


Only joking Tel, great work.
 

tel240z

Club Member
had a few hours spare this afternoon and curiosity got the better of me so i decided to get the engine back in the car with some old transit engine mounts, then up on the lift to see if this 6 speed g/box is going to fit i,ll let the pics demonstrate ;)
 

Attachments

  • 001.JPG
    001.JPG
    2.5 MB · Views: 75
  • 003.JPG
    003.JPG
    2.6 MB · Views: 65
  • 004.JPG
    004.JPG
    2.3 MB · Views: 70

tel240z

Club Member
looks like i'm going to use the bmw g/box mount all fits well :bow:
 

Attachments

  • 009.JPG
    009.JPG
    2.4 MB · Views: 57
  • 005.JPG
    005.JPG
    2.4 MB · Views: 55
  • 011.JPG
    011.JPG
    2.7 MB · Views: 57

Rob Gaskin

Treasurer
Staff member
Site Administrator
It's looking good Terry :thumbs:

Have a look at this rear wing ;):
 

Attachments

  • album23746.jpg
    album23746.jpg
    47.1 KB · Views: 69
  • album24978.jpg
    album24978.jpg
    12.2 KB · Views: 53

tel240z

Club Member
Had the lazer pen on the gearbox output shaft pointing at the diff nose. result i can lower the engine another 30mm all good with no bonnet to engine issues i need a perfect drive line for when i use the m3 rubber cushdrive on the gearbox end and the cv joint on the diff :)
 

GTR-240Z

Well-Known Forum User
Looking very good Tel can't wait to see this next Monday when I drop the misses car down.
 

tel240z

Club Member
Well seeing as its been raining all week and didn't fancy southend making sand castles decided to do a bit more cutting grinding and welding, as usual i over engineer everything but well pleased with theend result, i remember when i done the impreza p/steering conversion that the other candidate was the rack off an e46 bmw (3 series) but at the time didn't lend itself to the clamp type brackets used by the 240 because it just had a 2 bolt fixing lugs on the back, things are different now though seeing as i want the car quite low now was the time to mount the rack where i wanted it and also going to be running quite a lot of caster enabled me to mount the rack higher and an inch forward, all looks good in the prototype stage and even the bmw steering pump is in the right place to connect the origional pipes talk about plug and play
Here is some pictures in the build stage, looking forward when its all linished down and painted check out the ATL fuel cell and the boot spoiler
 

Attachments

  • 004.JPG
    004.JPG
    2.5 MB · Views: 78
  • 006.JPG
    006.JPG
    2.7 MB · Views: 68
  • 008.JPG
    008.JPG
    2.1 MB · Views: 65

tel240z

Club Member
Bit of a trade off really Matt was going to have a custom jobby built with an internal pump to fill all the spare wheel up and would have been nearer 45 litres (10 gallons), on that basis 1000 kilo car six speed box must return 30 mpg like 300 miles on a tankfull as its only 30 litres then 6.5 gallons 195 to the tankfull, the trade off being that tank is over a grand at deemon tweeks but i paid well under half for it unused, it is foam filled has a inbuilt sump with 3 trap doors one way rollover vent and all the bits you would expect, just means i will carry a 15 litre can with me in the car on long journeys which puts me back to 300 miles or if i feel the need i'll build some clever reserve vessel under the car with a remote transfer pump filled from the datsun fuel filler
 

johnymd

Club Member
Bit late now but I may be able to still get these tanks for next to nothing. They are used tanks from rally cars that have to be replaced regular. Was going to get one from a mate who has contacts but went the swirl pot route in the end.
 

racer

Club Member
195 miles isn't too bad. I used to carry at least one full gerry can of fuel to the track on race days.
B ugger paying uk race track fuel prices!
 
Top