-
The Z Club relies on the support of it's paid members - join the club or renew your membership here.
You are using an out of date browser. It may not display this or other websites correctly.
You should upgrade or use an alternative browser.
You should upgrade or use an alternative browser.
Longest 240z restoration ever?
- Thread starter Paul Henley
- Start date
Yes, I agree with John - a top job.
What is the colour of the shell - is it a Datsun S30 colour. What was the original colour of the car. Sorry if you have already told us that.
What is the colour of the shell - is it a Datsun S30 colour. What was the original colour of the car. Sorry if you have already told us that.
Alphabettispaghetti
Club Member
coming along well. Is it going to be the same colour underneath and inside as the outside?
Mrs HollowPoint
Well-Known Forum User
ooh, looking like it's just about there now
Paul Henley
Club Member
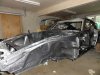
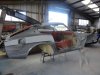
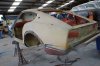
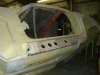
Thanks all for the encouraging comments, much appreciated. The shell was stripped of every item, nut and bolt and sand blasted. It was originally orange and then 100% of the shell painted BMW Space Grey, the colour being one of the few deviations to standard. Thanks again Paul
Attachments


looks amazing. You must be well chuffed! I have almost finished reassembley on mine, PMAC is a life saver, got loads of missing bits off him. A couple of weekends and I should be ready for MOT!
Yeah have to agree with you re
 PMAC he is a legend helped me out recently
 !!
!!Ian Patmore
Well-Known Forum User
Very good Paul, nice high standard with some thought. I will have to see if I can pop in next time I am passing.....
andrew muir
Club Member
Just shows what can be done!!
Really good job, well done for rescuing a zed from the scrapyard!
Really good job, well done for rescuing a zed from the scrapyard!
Paul Henley
Club Member
Thanks again for the comments, they really do give you enthusiasm. Yes, Peter Mac has helped me with parts and continues to do so
Ian, always a brew or a can for anyone passing through Cumbria
Ian, always a brew or a can for anyone passing through Cumbria
Paul Henley
Club Member
Short clip of the Zed in the rotisserie, it so much easier with this
https://www.youtube.com/watch?v=Y6YTjx56czQ&feature=youtu.be
https://www.youtube.com/watch?v=Y6YTjx56czQ&feature=youtu.be
Paul Henley
Club Member
That's the car your parts are going on Mike - Paul
Paul Henley
Club Member
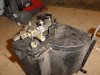
Fuel Tank Update
Hi All
Thought it was about time I got round to updating this restoration progress (I'm really lazy at doing this)
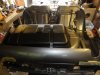
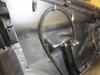
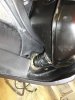
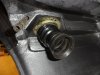
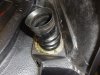
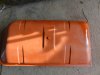
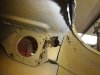
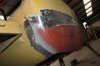
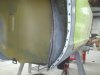
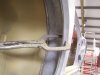
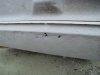
Thought I'd start with the petrol tank. I was fortunate in that the cars original petrol tank appeared to be practically rust free. So after cleaning out the tank I rubbed it down, then gave it a few coats of a rust inhibitor paint, followed by primer and a finishing silk coat of black. I took out the sender unit and measured it's resistance and it appears to be working ok. I replaced the metal ring and O Ring for fitting, if only for aesthetic reasons. The only area for concern appeared to be poor electrical connections on the sender unit but I cleaned them up on fitting the tank. I'll only know if I've done this well enough when I get a battery fitted and test it. I had a new set of Tank Straps and insulation rubbers to fit and Peter Mac provided a nice pair of re-coated "J" bolts to fit the tank in position. The original fuel filler pipe was refitted to the shell and tank with the help of a heated air blower to soften the rubber to get it to fit through the necessary holes. I'd had the original pipe clamp ring re-plated (for want of a better description) and refitted with it's original rubber ring. This rubber ring was slightly perished on the side that faces the underneath of the car, but I couldn't find a replacement so after a clean the old one went back on. Hope the following pics show the above...
Hi All
Thought it was about time I got round to updating this restoration progress (I'm really lazy at doing this)
Thought I'd start with the petrol tank. I was fortunate in that the cars original petrol tank appeared to be practically rust free. So after cleaning out the tank I rubbed it down, then gave it a few coats of a rust inhibitor paint, followed by primer and a finishing silk coat of black. I took out the sender unit and measured it's resistance and it appears to be working ok. I replaced the metal ring and O Ring for fitting, if only for aesthetic reasons. The only area for concern appeared to be poor electrical connections on the sender unit but I cleaned them up on fitting the tank. I'll only know if I've done this well enough when I get a battery fitted and test it. I had a new set of Tank Straps and insulation rubbers to fit and Peter Mac provided a nice pair of re-coated "J" bolts to fit the tank in position. The original fuel filler pipe was refitted to the shell and tank with the help of a heated air blower to soften the rubber to get it to fit through the necessary holes. I'd had the original pipe clamp ring re-plated (for want of a better description) and refitted with it's original rubber ring. This rubber ring was slightly perished on the side that faces the underneath of the car, but I couldn't find a replacement so after a clean the old one went back on. Hope the following pics show the above...
Attachments
Paul Henley
Club Member
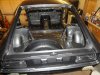
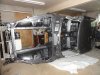
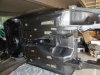
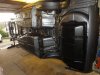
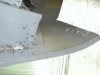
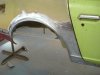
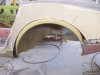
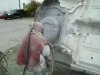
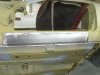
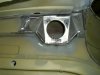
Thanks mate, I was lucky the car had stood under cover for about the last 30 years so the shell had very little rust to attend to. I had the outer rear wheel arches replaced following a botched repair by a previous body shop that I used and this meant the inner arches also had to be replaced. I also had the lower section (below the bumper) replaced as it wafer this around the exhaust outlet, so while that was done I also had the bottom sections of the rear quarter panels replaced. The body shop also made and fitted a new panel for where the fuel filler pipe mounts to the shell and the passenger side sil, when the shell was blasted it exposed rust that I hadn't seen previously.Pics below
Attachments
Paul Henley
Club Member
Paul Henley
Club Member
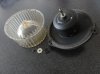
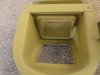
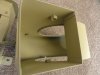
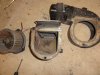
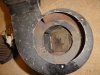
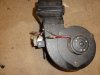
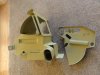
Fan/Heater Overhaul
Hi All
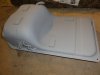
Thought I'd put something together to show what I've done with the Fan/Heater. Both units had some degree of corrosion, but I had no reason to believe they weren't working prior to stripping. With he fan I stripped it, checked the electrical connections, stripped and cleaned the plastic fan in soapy water with a tooth brush, checked the bearings which seemed fine. I sand blasted the housings, painted them in primer then in black and reassembled. With the Heater, similarly I stripped it down and inspected the various parts. The Heater Matrix seems ok as expected as it's protected within the housing and no signs of excessive corrosion, so I'm hoping that will be ok. I ordered and replaced the water direction control valve as I didn't want to risk finding that it leaked after 'd got the dash back in, likewise I replaced all associated hoses and clips as they were still the originals. Like the fan, I sand blasted the housings, painted in primer and black. Then after greasing the hinges etc and reassembling I refitted both units to the bulkhead Quite happy with the result, but the test will be putting water through it - Fingers Crossed.
Hi All
Thought I'd put something together to show what I've done with the Fan/Heater. Both units had some degree of corrosion, but I had no reason to believe they weren't working prior to stripping. With he fan I stripped it, checked the electrical connections, stripped and cleaned the plastic fan in soapy water with a tooth brush, checked the bearings which seemed fine. I sand blasted the housings, painted them in primer then in black and reassembled. With the Heater, similarly I stripped it down and inspected the various parts. The Heater Matrix seems ok as expected as it's protected within the housing and no signs of excessive corrosion, so I'm hoping that will be ok. I ordered and replaced the water direction control valve as I didn't want to risk finding that it leaked after 'd got the dash back in, likewise I replaced all associated hoses and clips as they were still the originals. Like the fan, I sand blasted the housings, painted in primer and black. Then after greasing the hinges etc and reassembling I refitted both units to the bulkhead Quite happy with the result, but the test will be putting water through it - Fingers Crossed.