dash repair test
Had this article hanging around on my PC for a while and thought it may be of use
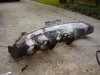
Well - a start for this work should be fully disassembled dash, without gauges and etc. I dont have pics of the very first stages, but will try to describe it. First of all - i would recommend to take 60-80 grit sand paper, and start smoothing edges of the crack. Try to smooth it out, that crack edges would be nice and even with over all shape of the dash. Once you get to this point you will see that you overhanded up to a foam. Now try to sand a bit deeper on the edges of the crack and wider. Just to make an around 5mm deeper edges and around 2-3 cm wider on the edge. Once you get to this point - use expanding foam glue. I can’t tell the brand, as in most of the different countries it would be difficult to find the exact one, but most Home Depot like stores do have quite a lot of foam type glue. Take the one that expands less and dyes quick. Take some masking tape, and mask from inside of the dash that foam would not drip down. Fill the cracks with foam, let it dry, and start shaping the form of the dash / cracks. Sand down around 2-3 mm deeper around repair areas, as you will cover this area with filler. Once done, take some fiberglass filler - and smooth down the shape of the crack so that it would flow into one nice shape with the dash. Now at this stage try to be as accurate with the shape as possible. Once done - you should have a dash that looks nice and have one continues shape. (pics for reference)
PicA
Next step is where it gets a bit complicated. Some people skip this step, and start filling / spray primer finish off they dash without gluing it with fiberglass. If you chose to do so - all the work you did will eventually be useless as dash WILL crack after some time on the sun... And you will not have nice clean result.
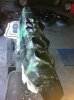
So here it goes. Take a 5mm drill bit, and start drilling to the top of the dash. YES, drill it

Drill around 2 cm between the holes, and go over on almost WHOLE top of the dash. Especially drill around the edges near the gauges openings (if you are covering JUST the top of the dash, not like the one in pics, as it had cracks down deeper near the center gauges pods...) I would recomend if covering just the top of the dash to just take some guide line and decide on the edge of the fiberglass where it will be. Like near the glove box - you can see the edge of the dash higher a bit, so put some masking tape and dont drill lower then the edge / masking tape is. This drilling is requared for the resin to sink into foam / go deeper in the dash once you start covering everything with the fiberglass. Once you done drilling, take some 80 grit sand paper and sand whole surface of the dash. Sand it so that it would be visible scratches all over the top of the dash. Now go over a bit your chosen guide line, sand over a bit more. You can actually sand around 3-4cm lower then the guide line for your fiberglass cloth.

Once done sanding, you will need to source fiberglass cloth that is 2x2 twill or even better the lower twill, as it should be thin, and flexible. Measure the piece of cloth to cover WHOLE top of the dash in ONE piece. Pre cut it to the shape.
Before you go with resin, make sure you will de grease the dash with some alcohol, or solvents, because if some silicone shines been used on the dash, nothing will stick to it... So grease it off as GOOD as you can, use different pieces of fabrics, use some silicone removers, make sure its nice and clean
Now take some epoxy resin, mix it, and brush it on top of the dash. Brush it so that resin would go deeper into the foam true the holes you drilled. Brush it all the way, not a thick coat, leave it dry for around 15-20 min for the resin to start getting tacky. DO NOT fully dry. Now once you get to this stage - lay down the cloth, it will stick, so dry to lay it down equaly, nicely without any air bubbles. Once done - brush it over with resin. I usually do 2 layer of cloth, and IF cracked areas are a bit lower then the main dash structure, i place separate pieces of the cloth on these areas to make it more thicker in these places. Make sure to fully run over the cloth with the resin, that it would not be dry. Now leave it in the sun for least 6-8 hours or in any dry warm place for resin to dry.
C
Now this is where the fun begins
Sanding fiberlglass = itchy hands
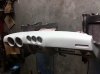
I hate this part, but this part is vital for the over all look. Start blocking fiberglass with rough sand paper (60 or so), just try to make the shame of the dash rough, not over sand down deep to the dash again, rather just sand all the imperfections of the cloth, make it as flat as possible and nice surface. Once you done with the fiberglass, take some fiberglass filler and start filling the edge where cloth finishes and flows in to the rest of the dash. This edge needs to be sanded down as flat as possible before filling. Once you do so, start with fiberglass filler and fill it all the way on the whole edge, and you can start filling with it all the imperfections on the dash covered with cloth. Block it. Now take some normal filler, and start preparing the dash for paint. At this stage some times i give up and get my dash to the body shop
For the guys to fill / block it up to the result you see in the picture. If you decide to finish up your self, the fill the normal filler all around the inperfections, sand it down untill you get nice even surface. I usually start with 150 grit (on the fiberglass filler), then fill the normal filler and block it with 150 / smooth it with 220 grit. Once you done with 220, spray a layer of primer. I would not recommend primers from spray cans as they are too thin, over reduced, any good 2 components primer would do. Spray a layer, even thicker one, let it dry. Once dry (if primer is grey / white) take a black spray paint, and dust over the whole dash, this will be your guide coat for sanding. If you use black primer - then take some light paint. Sand it again with 220 for the rough places, and finish it off with 400 once you get everything nice. For the last layer i usually go with epoxy primer, as it sets everything in once piece and its pretty tough for all the forces that you trow at it
) You can use a simple primer also, it should work too. Finish everything with wet 600 grit.
D
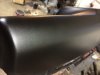
Now the tricky part number 2. To get nice and clean looking finish - you should source a good structure paint used for bumper repairs. Take the smallest structure (not the rough ones, as your dash will look silly!). I usually spray few light coats of the bumper paint to form a equal coat all over the dash. Then let it dry and use some black paint to go over the structure paint. This will give you nice uniform surface without too much gain, but at the same time it will look more like plastic / vinyl. You have to play around to get the nice finish, it might not come up from the very first time. But dont worry, if its too much grainy - use some grey scotch bride fabric to sand it down / tone it down a bit, then spray few coats again of paint, if its less structure - use some bumper paint and etc..
E
http://zclub.net/forum/attachment.php?attachmentid=22722&stc=1&d=1517140467
Once you get the point that you like the surface, i would recommend to clear it with matt or semi matt clear. Light coat of it will give you even better look on surface, and will protect it from scratches.
F
If all done right - you should get to this result you see in the pics. Im pretty sure doing it first time most of you guys will mess up pretty bad, but practice makes perfect! Dont rush, and you will get your self a nice clean dash that will last for long long time.
h