What did you do to your Z this week?

jonbills

Membership Secretary
Site Administrator
I’ve spent the weekend playing with my Dellorto’s again.
I’ve put a stiffer spring on the accerator pump levers, raised the fuel level 3mm to get the main circuit starting earlier and reduced the first progression hole to 1mm to keep the AFR more even through the progression.
I’ve now got AFR around 13 to 15 cruising and near seamless transition from the idle circuit to the main circuit.
I might have to go and have another drive just to make sure I wasn’t dreaming :D
 

Paul_S

Club Member
Progress - at last!

Finally I can contribute to this thread! :D

I readied the rear diff during the evenings last week and this weekend we fitted it. When I say, "we" I mean me and my Dad. He is 84 and was all over - and under - the 240Z! What a legend! :thumbs:

So, with his help we got it fitted in place. There was a scare when it wouldn't line up but it turned out that the bracket was fitted back to front at some point which accounted for the holes being 2" out of alignment.

Next, we inspected the rear brakes. Mr.F has a PM as I need some bits!

Overall I'm extremely happy with progress as I've had the car since April and this is the first proper weekend I've had to work on it.
 

Rob Gaskin

Treasurer
Staff member
Site Administrator
Finally I can contribute to this thread! :D

I readied the rear diff during the evenings last week and this weekend we fitted it. When I say, "we" I mean me and my Dad. He is 84 and was all over - and under - the 240Z! What a legend! :thumbs:

So, with his help we got it fitted in place. There was a scare when it wouldn't line up but it turned out that the bracket was fitted back to front at some point which accounted for the holes being 2" out of alignment.

Next, we inspected the rear brakes. Mr.F has a PM as I need some bits!

Overall I'm extremely happy with progress as I've had the car since April and this is the first proper weekend I've had to work on it.

The Moustache bar that the diff mounts to mounts in opposite configuration depending on whether you have an R180 or R200 diff. that caused me a problem when I first fitted an R200 to a 240Z.

The next thing was that the driveshaft was very tight on one side and needed fitting on the studs (diff end) before bolting to the hub.

Respect for your Dad. :bow:
 

Paul_S

Club Member
The Moustache bar that the diff mounts to mounts in opposite configuration depending on whether you have an R180 or R200 diff. that caused me a problem when I first fitted an R200 to a 240Z.

The next thing was that the driveshaft was very tight on one side and needed fitting on the studs (diff end) before bolting to the hub.

Respect for your Dad. :bow:

Everything you said there makes perfect sense! :thumbs:

We reversed the rubber mounting on top it and it worked a treat. We didn't reverse the whole bar because of the exhaust.

We also had trouble with the passenger side half shaft and had to remove it from the hub end too. The driver side was fine.

I was going to go back and check on that driveshaft because I thought it might be seized. Should I worry?

Yep, my Dad is really excited about helping get the Datsun on the road. Nearly as excited as I am having him help me! :D

My Mum and Sarah went shopping instead. Probably for the best. Stick to what you're good at and all that! :rofl:
 

Paul_S

Club Member
Is it the diff mount that has to be reversed then?
That's what we did.

I've not got the exhaust fitted yet, but the bar is shaped (or so it appears to me) so allow the exhaust to pass by.

The pic below shows the bar and the bump for the exhaust, but this was before we rotated the rubber mount on top of it, taking the bar 2" further forward:

gallery_245_510_109645.jpg


Like I say, this is what we did on the day, but we could be wrong because we were guessing!

To rotate the rubber mounting, remove the weight under the bar to reveal a nut. Undo that to remove the rubber mount and spin it 180 degrees before reassembling.
 

Rob Gaskin

Treasurer
Staff member
Site Administrator
The Moustache bar that the diff mounts to mounts in opposite configuration depending on whether you have an R180 or R200 diff. that caused me a problem when I first fitted an R200 to a 240Z.
.................

Does this help? Note the wide bar that the rear of the diff (via two studs) bolts too.
 

Attachments

  • diffcomparefrontA.jpg
    diffcomparefrontA.jpg
    42.2 KB · Views: 30

Paul_S

Club Member
Ah, we did think to turn that around but didn't in the end because the marks on it showed it was right (but obviously for the R180 diff). We left that as it was and rotated the rubber mount on the front bar. It made bolting on the prop harder, but not impossible.

It all fits in place, but I wonder if it makes a difference that my diff is 2" further forward.

Does anyone know the distance between the rear of the diff and the drive shafts for the R180 and R200? I guess that's the most critical thing?
 

Fairlineguy

Club Member
Early cars had the diff mounted forward with a flat mustache bar and short propshafts .
Datsun moved the diff back 2in to improve driveshaft alinement by rotating the diff mounting
And installing a longer propshaft and a stepped mustache bar.
The mounting should have an arrow stamped on it to point forward
 

johnymd

Club Member
In your picture the diff front mount is the correct way round and so is the front diff crossmember. The moustache bar must be the correct way round, as shown in the picture Rob provided. R180 and R200 moustache bars are very different when you put them side by side. You cannot fit the wrong one as the diff rear studs are a different spacing so wont fit the wrong moustache bar.
 

Paul_S

Club Member
Confused of Ashford

Thanks for all your advice everyone. But, I'm officially confused now! Mods - this may need moving to it's own thread! :rofl:

I was looking at the photo Rob posted and did a bit of googling. I found this page which shows that same image and some others (I have downloaded them and used some below. If you click on the pics on their page I linked to it pops up adverts and other mess).

My diff is a 3.7:1 ratio so (assuming the table on that page is correct) I must have a 280ZX (2+2) one.

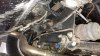
If I've understood you correctly, then the moustache bar needs to be rotated and the front mount left the same. The picture below is my diff before I rotated the rubber mount at the front:

gallery_245_510_109645.jpg


I checked the moustache bar on the car (it was fitted when I bought it) and it's flat along the rear edge and the rolled ends are forward. I think you are suggesting this is wrong when the R200 diff is put in a 240Z and that the rolled ends should face rearward so it brings the bar (and hence the diff) forward.

I have done the opposite - I rotated the rubber mounting on the front bar 180 degrees which meant the diff mounted against the moustache bar fine. Now the front bar is further forward it means the prop shaft is tricky to bolt on.

The thing is, looking at the photos in the page I linked to, it looks the same as my setup.

i.e. the front bar sits almost proud of the input shaft:

gallery_245_510_69831.jpg


Also, the moustache bar ends curl forward (see the lower R200 diff below):

gallery_245_510_11989.jpg


Something that bugs me though - I don't remember my diff being offset and it's very obvious in the photo below (left):

gallery_245_510_40261.jpg


Is there an alternative diff that comes with a 3.7 ratio? Or is there a chance the internals have been swapped in mine?

Also, in the page I linked to the author says not to use the R180 drive shafts because of the different lengths. I noticed that the passenger side shaft appeared a bit too long and I needed to disconnect it at the hub end to make it fit (Rob said the same). Should I be concerned?

Sorry if I've missed the point here, or made any else even more confused than me!
 

Rob Gaskin

Treasurer
Staff member
Site Administrator
Paul, if your moustache bar is mounted with the ends curled forwards then that is correct. However I THINK it sits BEHIND the diff subframe and not inside it like a 240Z bar. Can someone else confirm that.

3.7 is standard 260Z 2 seater.

Also your driveshafts should be ok the one side hasn't got much compression movement left but mine worked ok for ten years with the standard 240 shafts.

Yes the diff is offset but that's just the way it's made.

The prop is difficult to attach, it all gets a bit tight (especially if you have an uprated anti-roll bar).

So you may be ok.
 

johnymd

Club Member
When I swapped from R180 to R200 I don't recall having any issues at all, although it was a long time ago. The 260z 2 seater shell is essentially the same as all 240z shell except the very early shell so all the parts are a simple bolt on swap. All you need is the diff and moustache bar. Everything else stays as is. I've not heard of swapping the front diff mount around or turning the moustache bar. The R200 moustache bar is orientated the opposite way to the R180 but should not be swapped around from how it's designed to be fitted in its original car.

I will have a quick look under my blue car to confirm this and get back to you today.
 

uk66fastback

Club Member
I have been carrying on recolouring my original white vinyl interior. Just got the door cards and the headlining and A pillars to do now ... then it's just a matter of reinstalling everything. I'm really pleased with the way it is turning out and glad I went this route. i'm also recolouring the interior panels which went a nice shade of yellow/brown and reinforcing a few of the weak spots with fibreglass (they are SO brittle it's a joke!) I'm carrying them with more care than my month-old great nephew ...
 

atomman

Club Member
While my car is up on axle stands awaiting some rear brake cylinders, I made some new plug leads, just need to make/find some nice lead spacers next to get rid of the cable ties, I think it tidy's up the bay a bit,
 

Attachments

  • DSC_0011.JPG
    DSC_0011.JPG
    1.8 MB · Views: 36

uk66fastback

Club Member
That's SO neat atomman ... nice work. I don't mind the cable ties though ...

I did buy some so called 'direct replacements' from a Z place in the US to replace my original 45 yo leads, and they are so LOOOONG it's crazy. Each one probably about four inches longer than the originals ...

So what once looked neatish - going over the top of the cam cover with the lead spacers, and nice, tight leads, now looks a bit poor, with these leads flapping about in BIG curves to use up the extra lead length!
 

Paul_S

Club Member
Thanks again for the advice on the diff. It fits so I can't have gone too wrong! I'll give it the once over to make sure everything looks OK before I do anything silly like take it out on the road!
 

johnymd

Club Member
What have you used to colour (color as it's an import) your trim. I'm looking at doing the same. The last time I used VHT vinyl spray and it came out patchy.

I like the look of the leads going round the front of the engine and this is how I did the silver car.
 

uk66fastback

Club Member
I've been using a kit from Furniture Clinic which I initially bought at the NEC Resto show back in March. I had ONE orig decent seat cover - the other was ripped. I got hold of another one in the right colour but it was a later repro and the grain was different and didn't match at all, so then Sean kindly sent me an original one (albeit in butterscotch) ...

The kits are predominantly for leather interiors. But with an adhesion promoter - which acts like an etch primer I would think, you can 'key' the vinyl to accept the new colour. Which in my case (ivory) wasn't much different than the original colour (white, apparently)

It is pretty time consuming as instead of just simply ripping out and replacing you have to carefully remove the old one, clean it up as best you can, then spray with the adhesion promoter and then sponge on the colour. Then when you've done a few coats, drying with a hairdryer in no time, you can airbrush on a final even coat then seal.

I want to update my original resto thread on my car in time but can pop a couple of pics on here for now to show the difference.

I suppose the main advantages are it's a lot cheaper than renewing the seat covers and the whole vinyl - they still all match and they are the original pieces (bar one seat cover) - so for an original car it's the way to go - but the original vinyl has to be serviceable of course, which luckily, mine was.

In the car ...

uIQef1Pd.jpg


As it came out, filthy ...
SvtXkyjr.jpg


After recolouring ...
NshiLccs.jpg


Seat covers in progress ...
74b7JrnD.jpg
 
Last edited by a moderator:

Rob Gaskin

Treasurer
Staff member
Site Administrator
Thanks again for the advice on the diff. It fits so I can't have gone too wrong! I'll give it the once over to make sure everything looks OK before I do anything silly like take it out on the road!

Paul, does your diff mounting look like this (mine)?
 

Attachments

  • 20171108_160421.jpg
    20171108_160421.jpg
    1.4 MB · Views: 22
Top